James Priest
100 Days Of Code
| Log 1 | Log 2 | Log 3 | Log 4 | Log 5 |
|---|---|---|---|---|
| 100 Days Round 1 | this log | 100 Days Round 3 | 100 Days Round 4 | 100 Days Round 5 |
Challenge & Commitment
This is part of Alexander Kallaway’s 100DaysOfCode challenge. More details about the challenge can be found here: 100daysofcode.com.
Commitment: I will code daily for the next 100 days.
| Start Date | End Date |
|---|---|
| January 28, 2018 | May 8, 2018 |
Goals
- Code daily
- Complete Udacity’s Grow with Google Challenge Scholarship - Mobile Web Specialist
- Get accepted to the Google Udacity Mobile Web Specialist Nanodegree program
Code Log
100. Site Optimizations
Day 100: May 8, 2018 - Tuesday
Project: Google Udacity Nanodegree (Mobile Web Specialist)
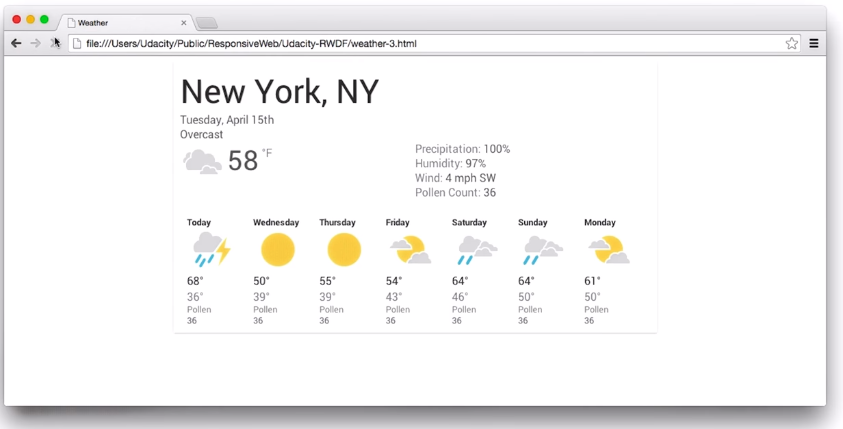
Progress: Completed Lesson 5: Optimizations from the Udacity course: Responsive Web Design Fundamentals.
This lesson dealt with how to adapt:
- Responsive tables for mobile (hidden columns, contained scrolling, block elements)
- Font sizing across different viewports
- Images resolution based on device pixel density
- Minor breakpoints
Read more: Notes - Responsive Web Design Lesson 5: Optimizations
Links:
- My Course Notes - Responsive Web Design Fundamentals
- Udacity’s Responsive Web Design Fundamentals by Google (free 2 week course)
99. Make a Site Responsive
Day 99: May 7, 2018 - Monday
Project: Google Udacity Nanodegree (Mobile Web Specialist)
Progress: Completed Lesson 4: Common Responsive Patterns from the Udacity course: Responsive Web Design Fundamentals.
The end of this lesson asked us to put what we learned into practice by implementing a combination of patterns, breakpoints, and layouts to make an existing site responsive.
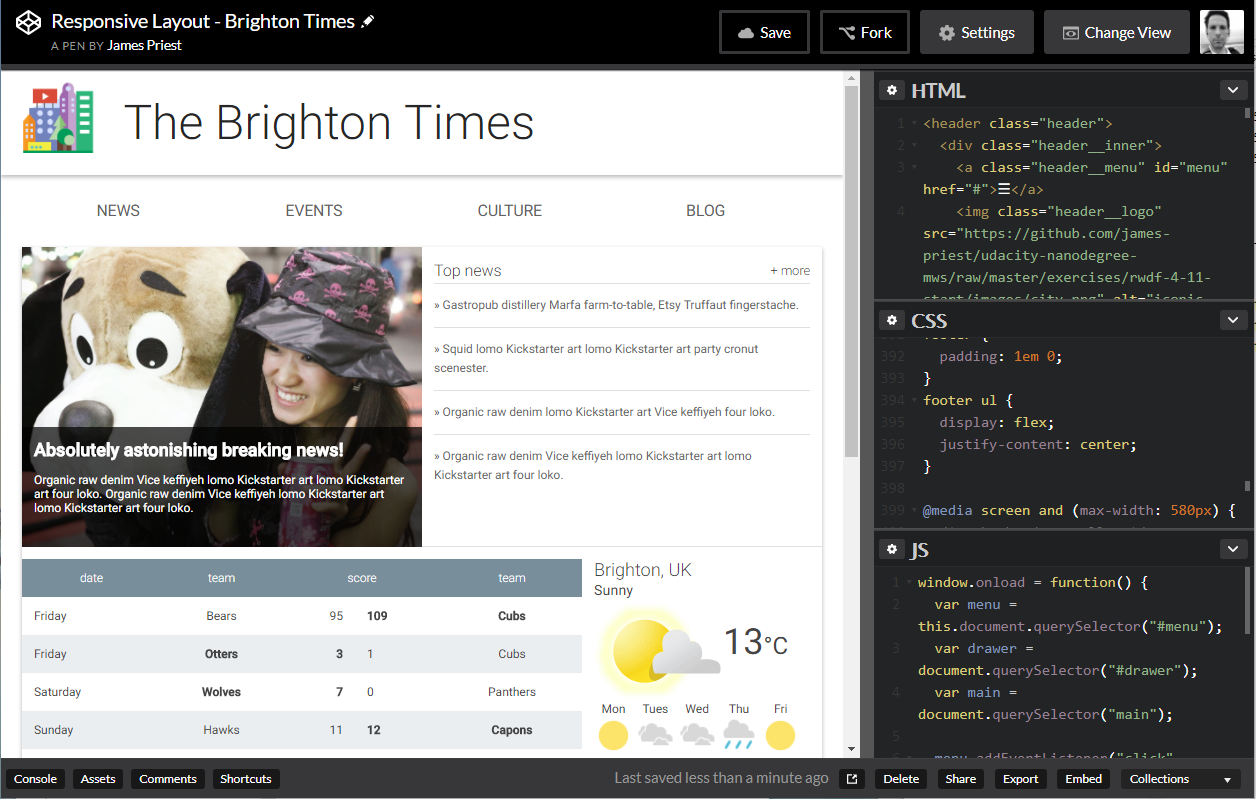 Live Sample - The Brighton Times
Read more: Notes - Responsive Web Design Lesson 4: Common Responsive Pattern 4.11 & 4.12
Links:
- My Course Notes - Responsive Web Design Fundamentals
- CodePen - The Brighton Times - Responsive design exercise
- Udacity’s Responsive Web Design Fundamentals by Google (free 2 week course)
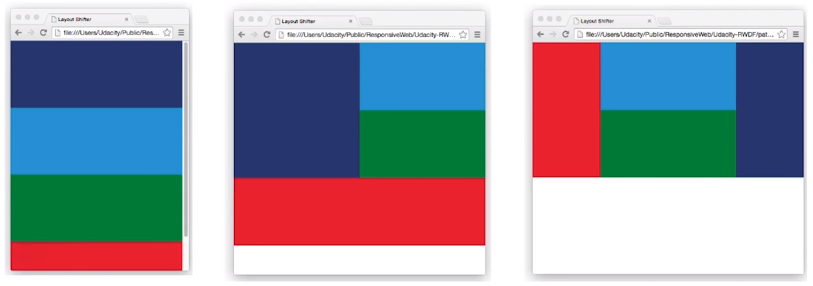
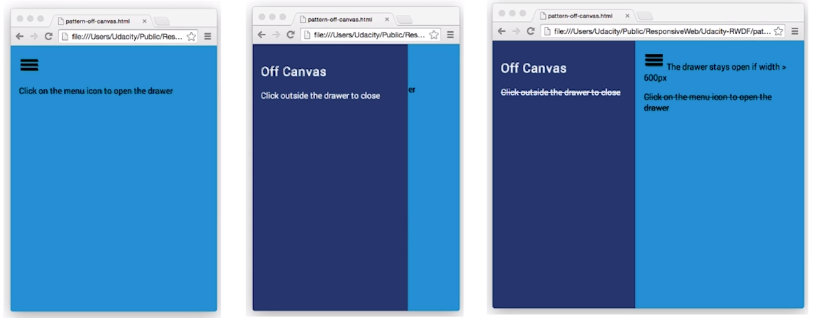
98. Responsive Layout Patterns 3 & 4
Day 98: May 6, 2018 - Sunday
Project: Google Udacity Nanodegree (Mobile Web Specialist)
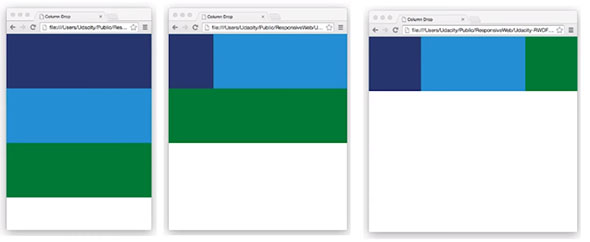
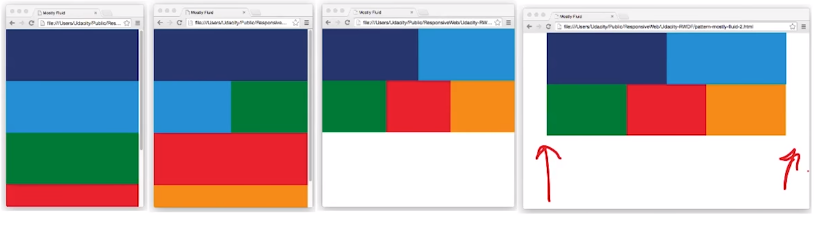
Progress: Completed more of Lesson 4: Common Responsive Patterns from the Udacity course: Responsive Web Design Fundamentals. This lesson details four of the most commonly used responsive layout patterns.
These include:
-
Column Drop (https://codepen.io/james-priest/pen/KRXeKo)
-
Mostly Fluid (https://codepen.io/james-priest/pen/XqeYjQ)

-
Layout Shifter (https://codepen.io/james-priest/pen/KRygva)

-
Off Canvas (https://codepen.io/james-priest/pen/xjPdwe)


Read more: Notes - Responsive Web Design Lesson 4: Common Responsive Pattern 4.7 - 4.10
Links:
- My Course Notes - Responsive Web Design Fundamentals
- CodePen - Column Drop Pattern
- CodePen - Mostly Fluid Pattern
- CodePen - Layout Shifter
- CodePen - Off Canvas
- Udacity’s Responsive Web Design Fundamentals by Google (free 2 week course)
97. Responsive Layout Patterns 1 & 2
Day 97: May 5, 2018 - Saturday
Project: Google Udacity Nanodegree (Mobile Web Specialist)
Progress: Started Lesson 4: Common Responsive Patterns of my Responsive Web Design Fundamentals course. This lesson details four of the most commonly used patterns.
These include:
-
Column Drop (https://codepen.io/james-priest/pen/KRXeKo)
-
Mostly Fluid (https://codepen.io/james-priest/pen/XqeYjQ)
- Layout Shifter
- Off Canvas
Read more: Notes - Responsive Web Design Lesson 4: Common Responsive Pattern 4.1 - 4.3
Links:
- My Course Notes - Responsive Web Design Fundamentals
- CodePen - Column Drop Pattern
- CodePen - Mostly Fluid Pattern
- Udacity’s Responsive Web Design Fundamentals by Google (free 2 week course)
96. Media Query, Breakpoint, Flexbox, & Grid
Day 96: May 4, 2018 - Friday
Project: Google Udacity Nanodegree (Mobile Web Specialist)
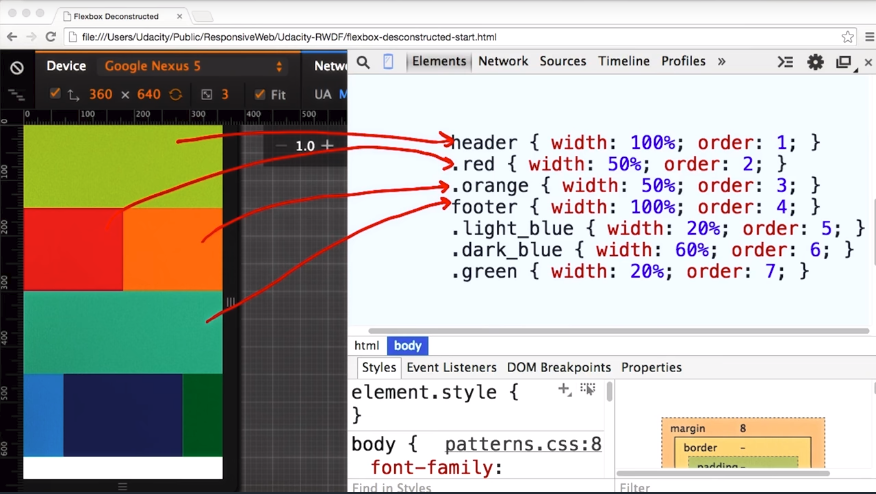
Progress: Completed Lesson 3: Building Up of my Responsive Web Design Fundamentals course. This lesson continued discussing the building blocks of responsive design.
The lesson covered:
- Link and embedded media queries
- Use of
min-width&max-width - Warnings against
min-device-widthandmax-device-width - Setting breakpoints and the methodology for determining where to set them
- Introduction to CSS Grid
- Introduction to Flexbox
You can read more here: My Notes - Responsive Web Design Lesson 3: Building Up
Links:
- My Course Notes - Responsive Web Design Fundamentals
- Udacity’s Responsive Web Design Fundamentals by Google (free 2 week course)
95. Mobile First Design
Day 95: May 3, 2018 - Thursday
Project: Google Udacity Nanodegree (Mobile Web Specialist)

Progress: Completed Lesson 2: Starting Small of my Responsive Web Design Fundamentals course. This lesson showed how to design for mobile first.
The lesson covered:
- Defining the viewport
- Hardware pixels, device independent pixels, & CSS pixels
- Using relative widths for responsive design
- Establishing large enough tap targets
- Designing for the smallest form factor first and then expanding the design as needed
You can read more here: My Notes - Responsive Web Design Lesson 2: Starting Small
Links:
- Course Notes - Responsive Web Design Fundamentals
- Udacity’s Responsive Web Design Fundamentals by Google (free 2 week course)
94. Why Responsive Design
Day 94: May 2, 2018 - Wednesday
Project: Google Udacity Nanodegree (Mobile Web Specialist)

Progress: Completed Lesson 1: Why Responsive? of my Responsive Web Design Fundamentals course.
The lesson covered:
- The benefits of creating a single, responsive codebase rather than maintaining separate codebases for various devices & platforms
- Setting up Chrome DevTools
- Using emulators & simulators
- Configuring remote debugging on a physical device
You can read more here: My Notes - Responsive Web Design Lesson 1: Why Responsive?
Links:
- Course Notes - Responsive Web Design Fundamentals
- Udacity’s Responsive Web Design Fundamentals by Google (free 2 week course)
93. Using the Console ColorTool on Window 10
Day 93: May 1, 2018 - Tuesday
Project: Configuring Console (Cmd, PowerShell, & Bash) colors on Windows 10
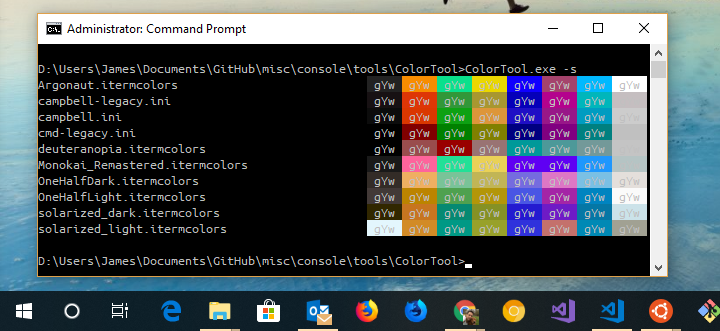
Progress: The default console colors were pretty bad when Bash on Ubuntu on Windows was first released in August of 2016 as part of the Windows Anniversary Update.

The first thing I did was to update the directory color to be more readable. This is done by making a change to the ~/.bashrc file. I found an Ask Ubuntu article that details the process.
LS_COLORS=$LS_COLORS:'di=0;36:'; export LS_COLORS
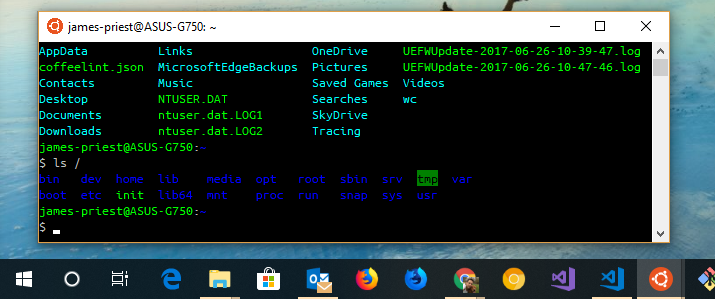
This change gave windows directories a cyan color which was better but it still left the default color scheme pretty hard to read.
Now with the April 2018 release Microsoft has updated the default color scheme for Console. Unfortunately, it only takes effect on new installs. For exisitng installations you have to manually do this. Fortunately, Microsoft released a tool that makes this much easier to do than before.
With the Microsoft Console ColorTool you can apply any iTerm2 color scheme to your console.
Monokai

Argonaut
Now I have a great terminal experience that feels closer to *nix than ever before.
For more information on how to do this, see the links below.
Links:
- How do I change the color for directories with ls in the console - Ask Ubuntu article
- Introducing the Windows Console ColorTool - Microsoft Developer blog
- How to change Command Prompt’s color scheme on Windows 10 - Step-by-Step Guide
- Microsoft Console ColorTool GitHub repo
- iTerm2-Color-Schemes GitHub repo
92. Using Vim on Ubuntu on Window 10
Day 92: April 30, 2018 - Monday
Project: Configuring Linux on Windows 10
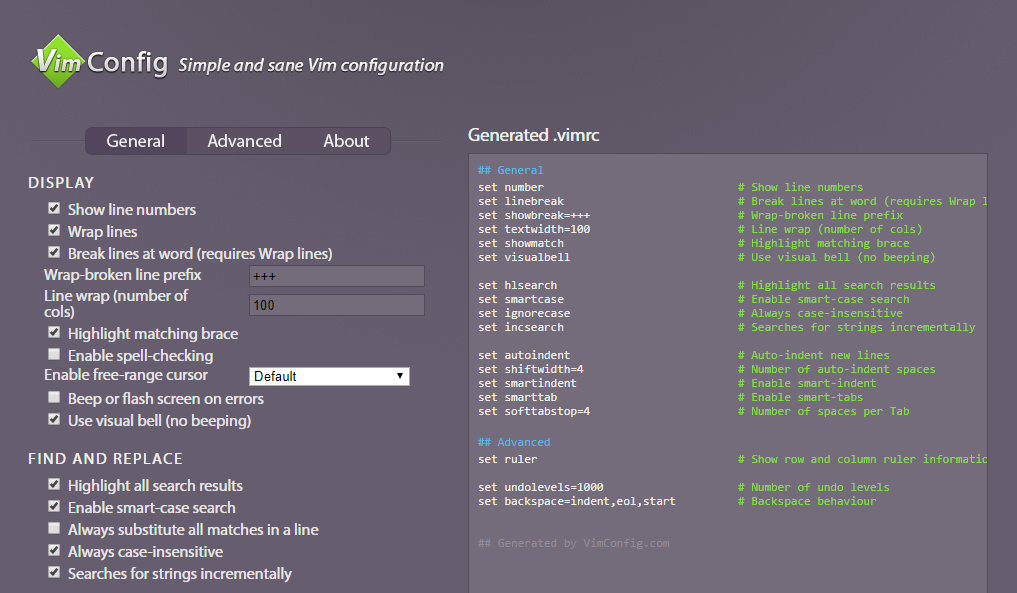
I’ve now updated my software sources, upgraded existing packages, and installed new ones for my Ubuntu instance on Windows 10.
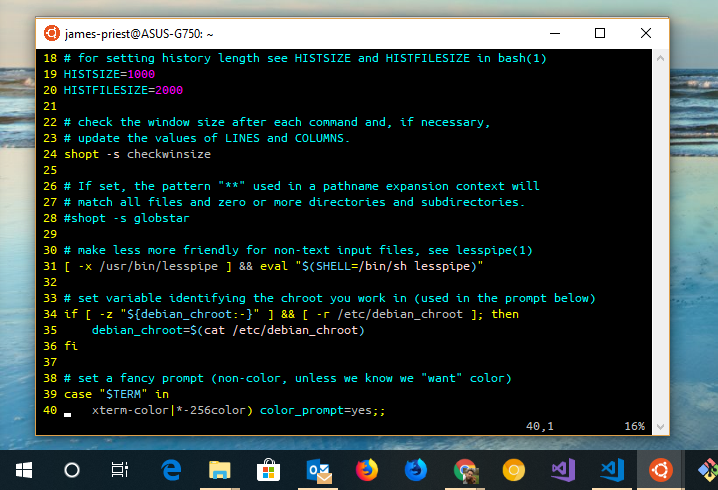
Progress: Right now, if I use Vim to open my “.bashrc” file it show this.
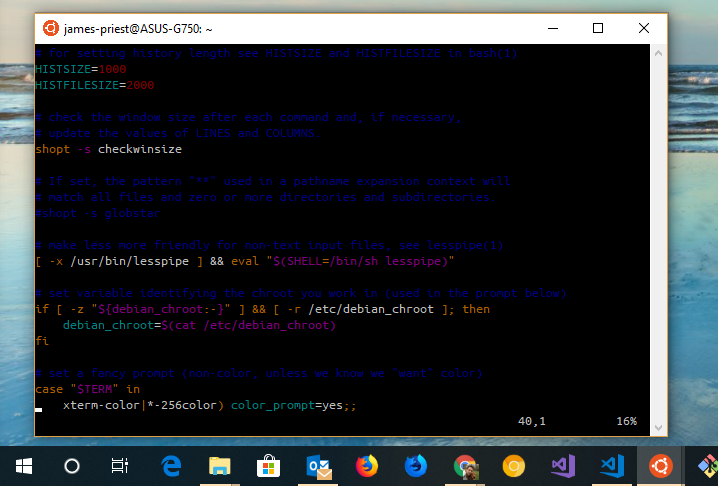
This is really hard to read with the default color scheme and currently it’s not very easy to update.
So, the next step was to open a browser and go to http://vimconfig.com. This generates a config file (.vimrc) that you can drop into your home (~) directory.
I used Vim to create the resource file. I then saved the file out to my home directory.
vim ~/.vimrc
The file has the following settings and the only setting I added manually was the last one which uses set background=dark to make everything readable until I can get around to updating the color scheme globally.
set number
set linebreak
set showbreak=+++
set textwidth=100
set showmatch
set visualbell

set hlsearch
set smartcase
set ignorecase
set incsearch

set autoindent
set shiftwidth=4
set smartindent
set smarttab
set softtabstop=4

set background=dark
The final result looks like this.
Links:
- Vim Config tool - Creates config settings that can be copied to
.vimrcin home directory - Fixing dark blue colors on Windows 10 Ubuntu bash - Medium article
91. Using Apt on Ubuntu on Windows 10
Day 91: April 29, 2018 - Sunday
Project: Configuring Linux on Windows 10
Now that I have the Windows Subsystem for Linux (WSL) feature turned on and Ubuntu installed, I can proceed to configure my Linux terminal.
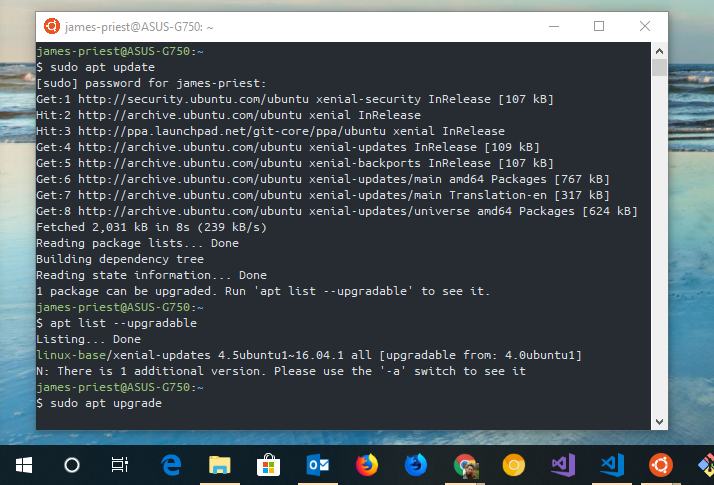
Progress: The first thing I did was to check out Apt. It’s a new package manager introduced in Ubuntu 16.04 that simplifies “apt-get” commands by providing more intuitive syntax for better usability. This is not a layer on top of “apt-get” but a new set of terminal commands to interact with packages.
The first step is to update the software sources.
sudo apt update
You can then view what needs upgrading by issuing this command.
apt list --upgradable
Or you can simply tell Apt to upgrade everything that needs upgrading.
sudo apt upgrade
To install a package you simply issue the “install’ command. You can install multiple packages like this.
sudo apt install ruby2.3 ruby2.3-dev build-essentails
Here’s a list of basic commands
Basic commands
- list - list packages based on package names
- search - search in package descriptions
- show - show package details
- update - update list of available packages
- install - install packages
- remove - remove packages
- upgrade - upgrade packages
- full-upgrade - upgrade the system by removing/installing/upgrading packages
- edit-sources - edit the source information file
Links:
- The Difference Between Apt and Apt-get on Ubuntu - maketecheasier post
- Simplify Command-Line Package Management with APT instead of apt-get - How-To Geek article
- How to Install Linux Software in Windows 10’s Ubuntu Bash Shell - How-To Geek article
- Difference Between apt and apt-get Explained - It’s FOSS blog post
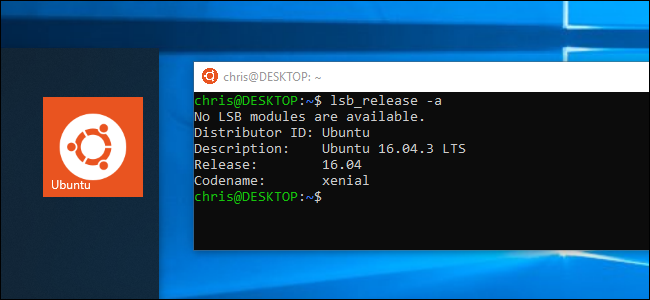
90. Linux on Windows 10
Day 90: April 28, 2018 - Saturday
Project: Install Jekyll on Windows Subsystem for Linux (WSL)
This involves switching my build system from an Ubuntu VM to the new Windows Subsystem for Linux (WSL).
WSL is a compatibility layer for running Linux binary executables natively on Windows 10.
You can then install one or more distros from the Windows Store. I installed Ubuntu which provides the ability to launch a terminal window (Ubuntu Bash) from Windows taskbar, console, or from within Visual Studio Code.
What this means is that we can now run our Linux build systems natively. This includes Nodejs, Jekyll, Ruby, Rails, Python, etc. without having to install Windows versions of Linux tools.
Progress: This code log as well as other sites I use for course notes and projects are built using Jekyll and hosted on GitHub as GitHub Pages.
Jekyll is a static site generator & build system. It’s written in Ruby and relies heavily on Gems. It’s what GitHub uses to auto-generate GitHub Pages.
It’s designed to run on *nix environments and must be run locally if you want to preview your work before going live. This means, that once you push a commit, it moves the files to GitHub and immediately triggers the build system to auto-generates the site.
Until now I’ve been running Ubuntu 16.04 Xenial in a local VM. This is not the most streamlined solution and produced build times that would take between 20-30 seconds on each save. This was pretty clunky and produced an extra layer to maintain.
Prior to WSL, the other possible alternative was to install the Windows versions of various Linux tools and hope that you could get them configured and working well with each other within the Windows environment. This always ended up being an exercise in frustration.
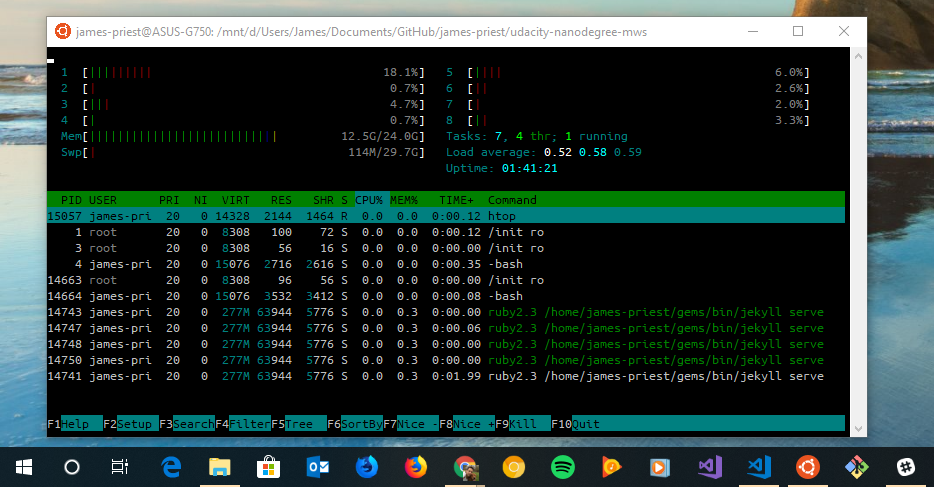
Now that I have WSL installed, my build time has dropped to under 5 seconds per save operation and is half of that (1-2 seconds) if I enable Jekyll’s incremental build option!
Now I have a legit Linux terminal running in VSCode which cracks the development universe wide open.
I no longer have to fear or avoid the ($) prompt in online tutorials and coding exercises! I can now run Windows and Linux terminal side-by-side!

Links:
- How to Install and Use the Linux Bash Shell on Windows 10 - How-To Geek article
- Jekyll on Windows - Installation Guide from the Jekyll site
- Setting up you GitHub Pages site locally with Jekyll - Steps from the GitHub Help site
- Web Dev on Windows with WSL and VS Code - Article on setting up Linux, Git, Ruby, Rails, Python, Node & VS Code on Windows 10
89. Mobile Device Debug with Chrome DevTools
Day 89: April 27, 2018 - Friday
Project: Google Udacity Nanodegree (Mobile Web Specialist)
Progress: Today’s lesson detailed the need for responsive design and set the stage for how to develop and test sites designed for mobile devices, using a mobile-first approach.
Two methods of testing were discussed.
- Testing on an actual device
- Using DevTools’ built-in emulator/simulator in lue of an actual device
Testing using the built-in device emulators from within Chrome is fairly straight-forward and can be done right from DevTools.
Using an actual device is a bit more involved in that it requires:
- Creating a bridge (with USB cable) to a mobile device.
- Enabling the device’s USB debugging option
- Installing Chrome Beta on the device
- Opening Chrome on the dev machine and navigating to
chrome://inspect - Connecting the debug session to the discovered device
This establishes a bridge to the target device so that pages run on it can be debugged in DevTools on your development machine.
Very cool!
Links:
- Udacity’s Grow with Google Scholarship Challenge
- Google Udacity Mobile Web Specialist Nanodegree program
88. Started Mobile Web Specialist Nanodegree
Day 88: April 26, 2018 - Thursday
Project: Google Udacity Nanodegree (Mobile Web Specialist)

Progress: Started my Google Udacity Nanodegree program today! This Grow with Google Scholarship program is awesome. It provides a super rich environment for learning that includes:
- Full curriculum consisting of on-demand lessons with quizzes, labs, & projects
- Community Managers that guide us in the program and help keep us engaged and on track
- Targeted Slack channels (announcements, resources, project discussions, live help, etc.)
- Mentors who’ve completed the course & provide one-on-one guidance and technical help
- Career resources to help us get employed once we graduate
I attended the live student orientation on Tuesday and spent yesterday (Wednesday) doing the following:
- Getting myself set up on Slack
- Going through the student resources
- Reading the syllabus & coursework
- Reviewing project deadlines
- Checking out possible meetups
- Reaching out to my mentor
- Connecting with my fellow students
Today is the day I actually jump into the material starting with Lesson 1: Mobile Web Specialist Nanodegree Orientation.
I’m energized and ready to learn!
Links:
- Udacity’s Grow with Google Scholarship Challenge
- Google Udacity Mobile Web Specialist Nanodegree program
87. CodePen - Geolocation
Day 87: April 25, 2018 - Wednesday
Project: Add to CodePen work samples

Progress: Posted a Geolocation API code sample onto CodePen. This uses Google Maps to display a map with coords, TERRAIN map-type, marker, & zoom-level.
Links: https://codepen.io/james-priest/pen/gzMMod
86. CodePen - DragDrop #2
Day 86: April 24, 2018 - Tuesday
Project: Add to CodePen work samples
Progress: Posted my drag and drop samples and exercises onto CodePen. This is a scramble game to uses a bit more code and logic than the proof-of-concept.
Links: https://codepen.io/james-priest/pen/aGZNjb
85. CodePen - DragDrop #1
Day 85: April 23, 2018 - Monday
Project: Add to CodePen work samples
Progress: Posted my drag and drop samples and exercises onto CodePen. This one is a proof of concept and tests both drag and drop events.
Links: https://codepen.io/james-priest/pen/LmZNeV
84. CodePen - Canvas #4
Day 84: April 22, 2018 - Sunday
Project: Add to CodePen work samples
Progress: Posted previously created <canvas> work onto CodePen. Another series of lines and arcs using beginPath(), arc(), arcTo(), fill(), and stroke().
Links: https://codepen.io/james-priest/pen/wjMvWV
83. CodePen - Canvas #3
Day 83: April 21, 2018 - Saturday
Project: Add to CodePen work samples
Progress: Posted previously created <canvas> work onto CodePen. This one uses beginPath(), arc(), arcTo(), fill(), and stroke().
Links: https://codepen.io/james-priest/pen/YLwKoL
82. CodePen - Canvas #2
Day 82: April 20, 2018 - Friday
Project: Add to CodePen work samples

Progress: Posted previously created <canvas> work onto CodePen. This one uses the strokeRect() method to create rectangle outlines with gradients.
Links: https://codepen.io/james-priest/pen/XqXryK
81. CodePen - Canvas #1
Day 81: April 19, 2018 - Thursday
Project: Add to CodePen work samples
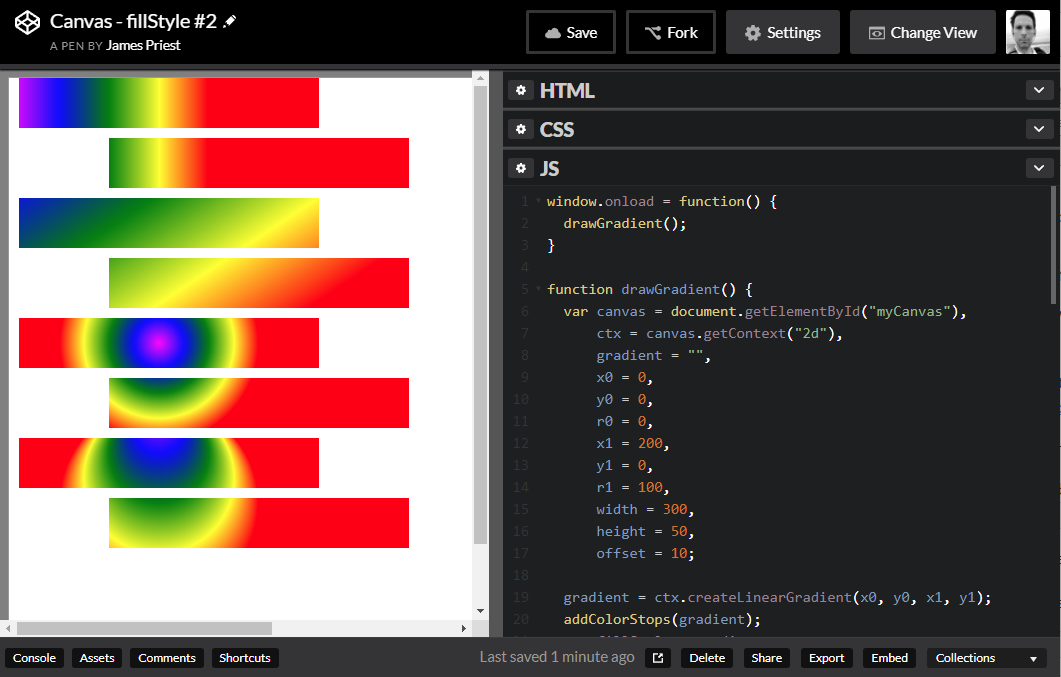
Progress: Posted previously created <canvas> work onto CodePen. This uses the fillStyle() method to create some rectangles with gradients.
Links: https://codepen.io/james-priest/pen/wjMwmQ
80. Linux Containers on Windows (LCOW)
Day 80: April 18, 2018 - Wednesday
Project: Upgrade from Windows 8.1 to Windows 10 v1709 Fall Creator’s Update
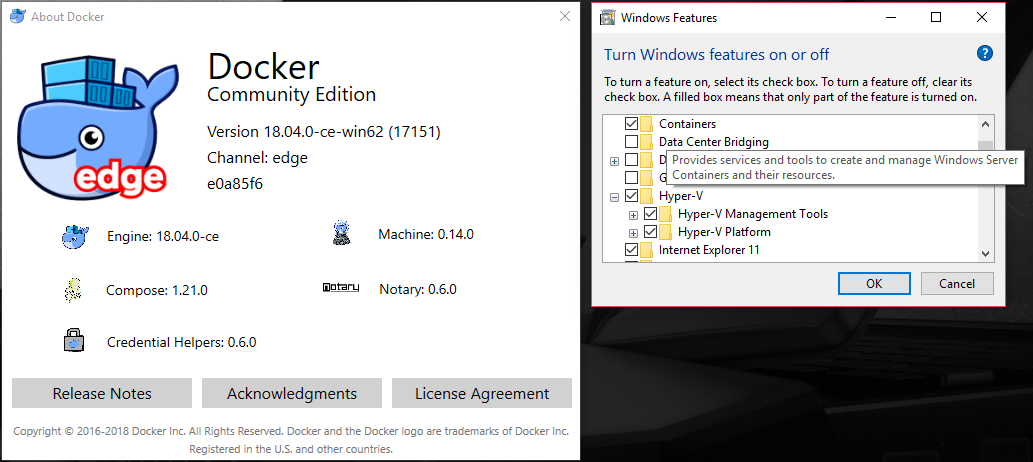
I decided to make the switch to Windows 10. I had been hesitant to upgrade until I came across some new features that I couldn’t do without.
Linux Bash Shell is one and Linux Containers on Windows is another…
Here’s what it is and what it offers.
- Linux Containers on Windows (LCOW)
- Baked-in Docker support
- Think native Docker support on Windows without Hyper-V or VirtualBox overhead
- That means there’s no VM or Hyper-V involved (unless you want), so Linux Containers run on Windows itself using built in container support.
- Allows you to run other virtualization systems such as VMware Workstation
- Supports Windows and Linux containers running side-by-side via LCOW
Docker for Windows & LCOW will now allow you to spin up containers for both environments. This was stated in a Docker blog post:
“Developers will be able to more easily build and test mixed Windows/Linux Docker applications by running containers for both platforms side-by-side on the same system.”
Progress: Installed Edge version of Docker for Windows Desktop app. This turned on certain Windows features such as Containers and Hyper-V.
Enabling Hyper-V did prevent VMware from running due to issues with VMware running under hypervisor. This was solved by issuing the following command thru elevated Cmd prompt.
bcdedit /set hypervisorlaunchtype off
Links:
- Allow Hyper-V and VMware Workstation to co-exist
- Docker and Linux Containers on Windows, with or without Hyper-V Virtual Machines
- Docker blog posts
79. Linux Bash Shell on Windows (WSL)
Day 79: April 17, 2018 - Tuesday
Project: Upgrade from Windows 8.1 to Windows 10 v1709 Fall Creator’s Update
I decided to make the switch to Windows 10. I had been hesitant to upgrade until I came across some new features that I couldn’t do without.
Linux Bash Shell is one…
Progress: Once Windows was up and running properly, I had to turn this feature on. It’s under Control Panel > Programs > Turn Windows Features On Or Off. From there you enable the “Windows Subsystem for Linux” option.
After you enable the feature you must install a Linux distribution from the Windows Store. I chose Ubuntu although there are many others. Once installed, I was good to go.
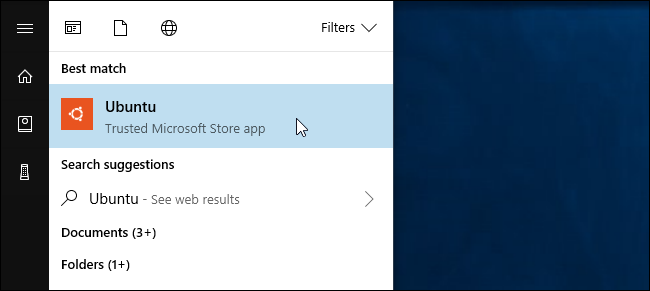
Here are some highlights.
- Windows Subsystem for Linux (WSL)
- Used to be called Bash on Ubuntu on Windows
- Think full Ubuntu or other distro (SUSE, Debian, Kali, etc) with native Bash shell
- Runs native Linux command-line tools (vim, sed, awk, etc) & first-line packages (Ruby, Python, etc.)
- Can use
aptorapt-getto install packages
Now I can do things like run Ruby and Jekyll right from Windows rather than incur the overhead of running a build system in a Linux VM. That will help with this blog in particular.
Links:
- How-To Geek articles
78. Windows 10 Upgrade
Day 78: April 14-16, 2018 - Saturday-Monday
Project: Upgrade from Windows 8.1 to Windows 10 v1709 Fall Creator’s Update

I finally decided to make the switch to Windows 10. I had been hesitant to upgrade because I had everything fine-tuned and working beautifully on Win 8.1.
I figured I would wait until a must have feature emerged in Windows 10 that I couldn’t do without. There were two…
- Windows Subsystem for Linux (WSL)
- Linux Containers on Windows (LCOW)
More on these two features in upcoming posts.
Progress: This took 3+ days due to issues with the Media Creation Tool and my slow internet connection. The tool would fail the installation after a 5-6 hour download. It would then start whole process over again.
I was able to fix what turned out to be permissions issues on the filesystem, registry, & firewall. I also virus scanned the system to make no infections were causing the problem.
Once this was done, I created installation media and did the following.
- Downloaded all laptop mfg system drivers
- Upgraded the Bios
- Uninstalled unnecessary or incompatible applications
- Tidied up the system prior to install
Once the upgrade was done I:
- Installed new system drivers
- Downloaded new updates
- Debugged post-upgrade system issues (no sound, missing utility apps, etc.)
Links:
- Windows Error 0x80070005 fix - This walks through steps to fix Access Denied errors.
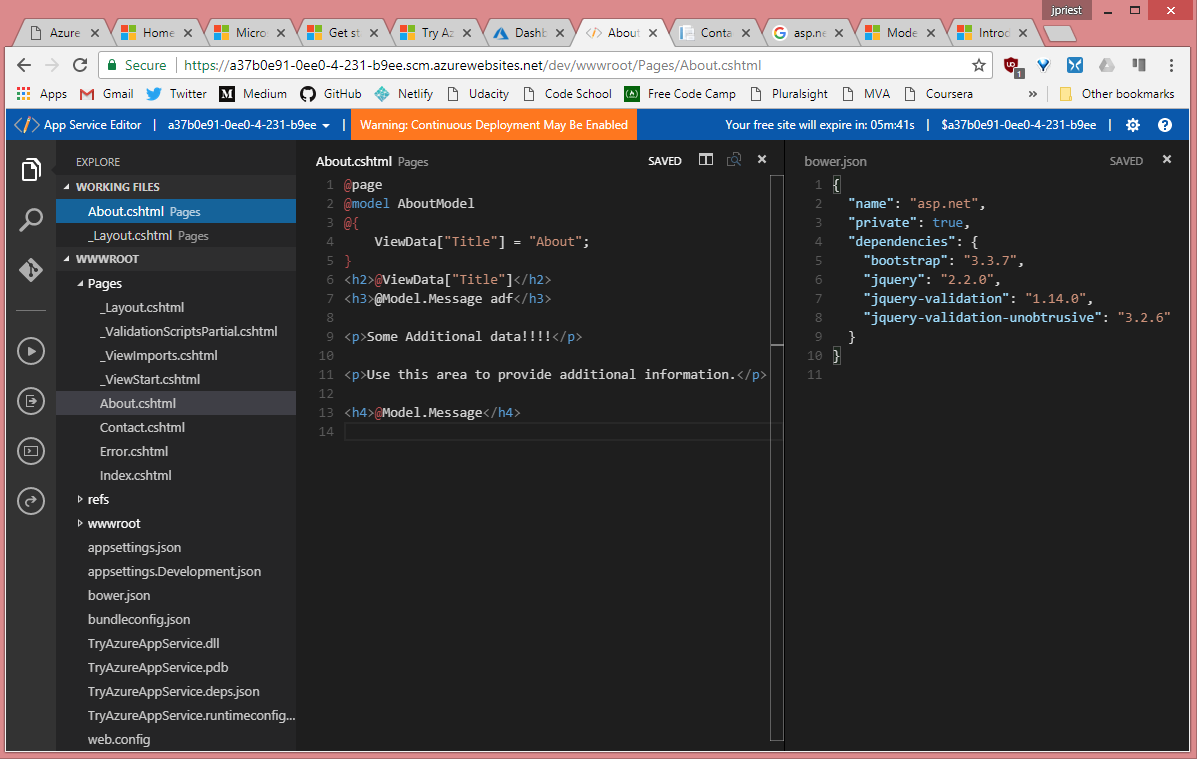
77. Azure Developer Tour
Day 77: April 13, 2018 - Friday
Project: Azure Research and Evaluation

Progress: I attended the Azure Developer Tour in Los Angeles earlier this week. It was a one-day event that covered the following.
- App Service - (Web Apps, Web App Containers, Functions Apps, etc.)
- DevOps / VMs
- Databases
- Containers / Serverless
- AI / Machine Learning
This was a great experience. I got a chance to see how easy it is to host services in the cloud and also got some exposure to new technologies I didn’t realize were ready for prime-time.
You can manage your services through a cool dashboard.
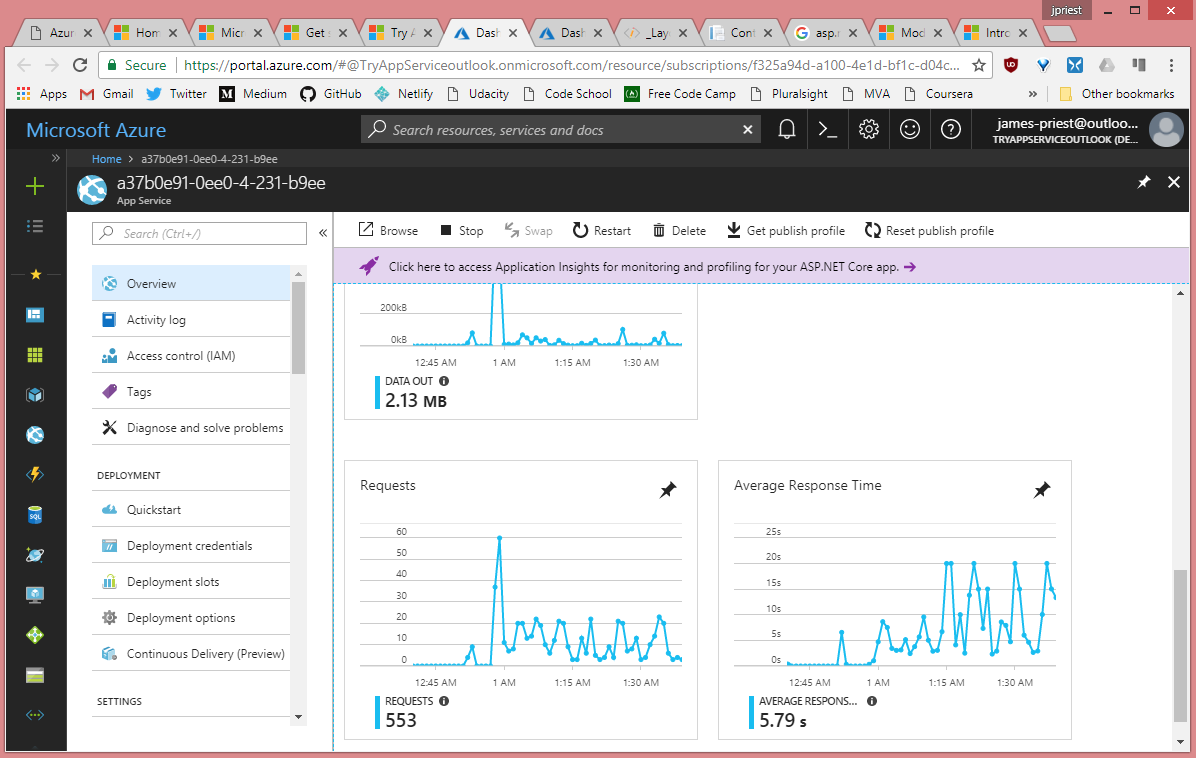
You can access your app and write code through their App Service Editor which works Visual Studio Code. It has Version Control (Git), a File System Browser, and Integrated Debugger.
Links:
- Try Azure App Service - Easily spin up a service for a limited time with no account sign-up
76. React Bootcamp Day 4
Day 76: April 12, 2018 - Thursday
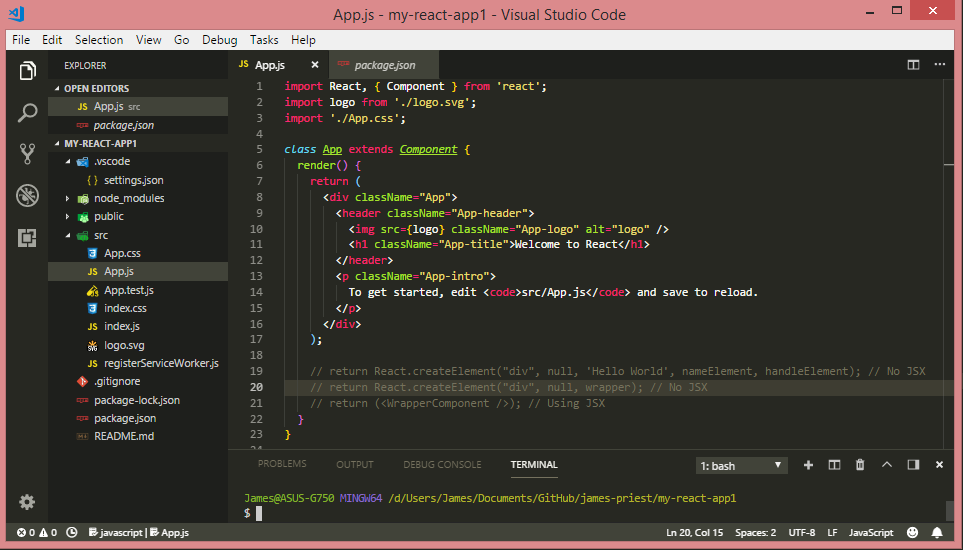
Project: Tyler McGinnis’ React Bootcamp
Progress: Completed this four day class which serves as a great introduction to React. The course is taught by Tyler McGinnis who created Udacity’s React Nanodegree program. He also has a series of React(v16.3) courses on his website. (https://tylermcginnis.com/).
Day 4 covered:
- Use of the
create-react-appnpm package to create a react app scaffold and build environment - Installation of React Router v4 (
react-router-dompackage) to create routes, nested routes, & dynamic routes
Links:
- Tyler’s website - https://tylermcginnis.com/
- Tyler’s articles
- React Bootcamp: Day 4 video - https://youtu.be/alZur1g2Cnw
- My Code Samples - React Bootcamp GitHub Repo
75. React Bootcamp Day 3
Day 75: April 11, 2018 - Wednesday

Project: Tyler McGinnis’ React Bootcamp
Progress: This is a four day class which serves as a great introduction to React. The course is taught by Tyler McGinnis who created Udacity’s React Nanodegree program. He also has a series of React(v16.3) courses on his website. (https://tylermcginnis.com/).
Day 3 covered:
- Component Lifecycle
- componentDidMount - Fired after the component mounted
- componentWillUnmount - Fired before the component will unmount
- getDerivedStateFromProps - Fired when the component mounts and whenever the props change.
Links:
- Tyler’s website - https://tylermcginnis.com/
- Tyler’s articles
- React Bootcamp: Day 3 video - https://youtu.be/Xa3DGGP4mLM
- My Code Samples - React Bootcamp GitHub Repo
74. React Bootcamp Day 2
Day 74: April 10, 2018 - Tuesday
Project: Tyler McGinnis’ React Bootcamp
Progress: This is a four day class which serves as a great introduction to React. The course is taught by Tyler McGinnis who created Udacity’s React Nanodegree program. He also has a series of React(v16.3) courses on his website. (https://tylermcginnis.com/).
Day 2 consisted of:
- Overview of React components
- Learned how to create a component which is a class that extends from
React.Component - Covered the
propsobject - Explored state - the internal data store of a component
Links:
- Tyler’s website - https://tylermcginnis.com/
- React Bootcamp: Day 2 video - https://youtu.be/NHfRLQuHjsU
- My Code Samples - React Bootcamp GitHub Repo
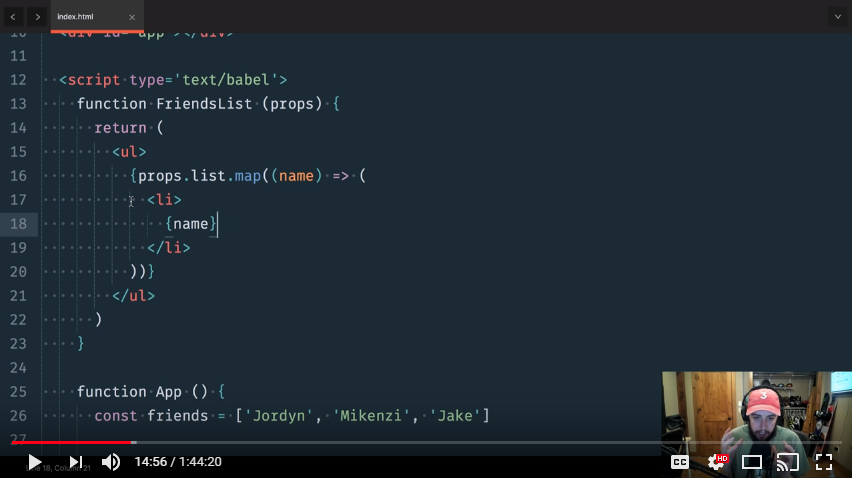
73. React Bootcamp Day 1
Day 73: April 9, 2018 - Monday

Project: Tyler McGinnis’ React Bootcamp
Progress: This four day class served as a great introduction to React. Each day consisted of a live YouTube session lasting about two hours in which a key concept of the library was covered. We then put what was learned into practice by following along with many code examples.
The course is taught by Tyler McGinnis who created Udacity’s React Nanodegree program. He also has a series of very current React(16.3) and related courses on his website. (https://tylermcginnis.com/).
Day 1 consisted of:
- Overview of what React is and what it does
- Basic setup using a minimal HTML template
- Learning the
React.createElement()construct - Creating functional components (aka stateless functional components) for components that don’t need to manage state
- Understanding & using JSX syntax
Links:
- Tyler’s website - https://tylermcginnis.com/
- React Bootcamp: Day 1 video - https://youtu.be/8GXXGJRDMdQ
- My Code Samples - React Bootcamp GitHub Repo
72. Offline - Web SQL Pt4 - JOIN & Aggregate Functions
Day 72: April 8, 2018 - Sunday
Project: Study for MS 70-480 Cert Exam (Programming in HTML5 with JavaScript & CSS3)
Progress: Today’s lesson focused on executing table JOINS and creating aggregate functions with with GROUP BY. These include COUNT(), MIN(), MAX(), AND SUM().
// JOIN syntax
var db = openDatabase('Library', '1.0', 'My library', 5 * 1024 * 1024);
var lastName = 'D%';
db.transaction(function(t) {
    t.executeSql("SELECT a.firstName, a.lastName, b.title " +
        "FROM authors a " +
        "INNER JOIN books b on a.id = b.authorId " +
        "WHERE lastName LIKE ?"
        , [lastName], displayResults);
});
// GROUP BY syntax
db.transaction(function(t) {
    t.executeSql("SELECT a.firstName, a.lastName, COUNT(b.id) as numOfBooks " +
        "FROM authors a " +
        "INNER JOIN books b on a.id = b.authorId " +
        "GROUP BY a.id"
        , [], displayResults);
});
Read here: Chapter 16 - Offline Web Applications: Web SQL - Filtering Results.
Links:
- Course Notes - Chapter 16 - Offline Web Applications
- Code Samples - Web SQL - Create database, add table, insert, update, delete
- GitHub Repo - Web Storage GitHub Repo
71. Offline - Web SQL Pt3 - Reading & Filtering Results
Day 71: April 7, 2018 - Saturday
Project: Study for MS 70-480 Cert Exam (Programming in HTML5 with JavaScript & CSS3)
Progress: Today’s lesson focused on reading and filtering data.
// Read & output data
function displayResults(transaction, results) {
  for (var i = 0; i < results.rows.length; i++) {
    var item = results.rows.items(i);
    $('#items').append('<li>' + item.firstName + ' ' + item.lastName + '</li>');
  }
}

var db = openDatabase('library', '2.0', 'My library', 5 * 1024 * 1024);
db.transaction(function(t) {
  t.executeSql("SELECT * FROM authors", [], displayResults)
});
// Filter data
var db = openDatabase('Library', '2.0', 'My library', 5 * 1024 * 1024);
var lastName = 'Priest';
db.transaction(function(t) {
    t.executeSql("SELECT * FROM authors WHERE lastName = ?"
    , [lastName], displayResults);
});
Read here: Chapter 16 - Offline Web Applications: Web SQL - Filtering Results.
Links:
- Course Notes - Chapter 16 - Offline Web Applications
- Code Samples - Web SQL - Create database, add table, insert, update, delete
- GitHub Repo - Web Storage GitHub Repo
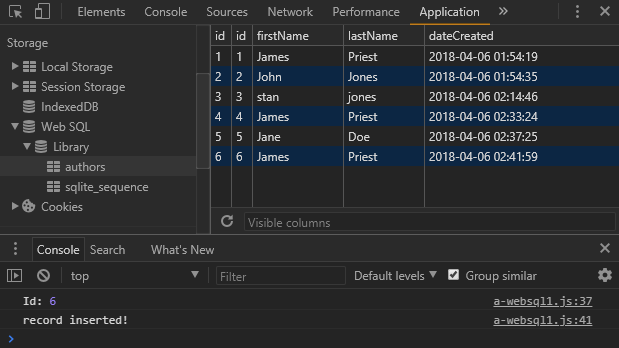
70. Offline - Web SQL Pt2 - Insert, Update, Delete
Day 70: April 6, 2018 - Friday
Project: Study for MS 70-480 Cert Exam (Programming in HTML5 with JavaScript & CSS3)
 Live Sample - Web SQL - Create database, add table, insert, update, delete
Progress: Today was spent completing a proof-of-concept page that does the following.
- Creates and opens a Web SQL database
- Adds a table
- Inserts a record
- Updates a record
- Deletes a record
Read about Web SQL here: Chapter 16 - Offline Web Applications: Web SQL - Working with data.
Links:
- Course Notes - Chapter 16 - Offline Web Applications
- Code Samples - Web SQL - Create database, add table, insert, update, delete
- GitHub Repo - Web Storage GitHub Repo
69. Offline - Web SQL Pt1 - Open Database
Day 69: April 5, 2018 - Thursday
Project: Study for MS 70-480 Cert Exam (Programming in HTML5 with JavaScript & CSS3)
 Code Samples - Web SQL - Create database, add table, insert, update, delete
Progress: This lesson served as an introduction to Web SQL. It is currently only supported by Safari and Chrome so it is best suited for:
- Use in iOS apps (iPad or iPhone)
- A data repository for Chrome extensions
This first lesson consisted of learning how to:
- Open or create a database and set the DB name, version, displayName, & size
- Update the schema by creating a table along with incrementing the version number
- Using transactions
- Inserting records as part of a transaction
- Using parameterized queries
Read about Web SQL here: Chapter 16 - Offline Web Applications: Lesson 1: Web SQL.
Links:
- Course Notes - Chapter 16 - Offline Web Applications
- Code Samples - Web SQL - Create a database, add a table, insert records
- GitHub Repo - Web Storage GitHub Repo
68. Web Storage Pt6 - Storage Events
Day 68: April 4, 2018 - Wednesday
Project: Study for MS 70-480 Cert Exam (Programming in HTML5 with JavaScript & CSS3)
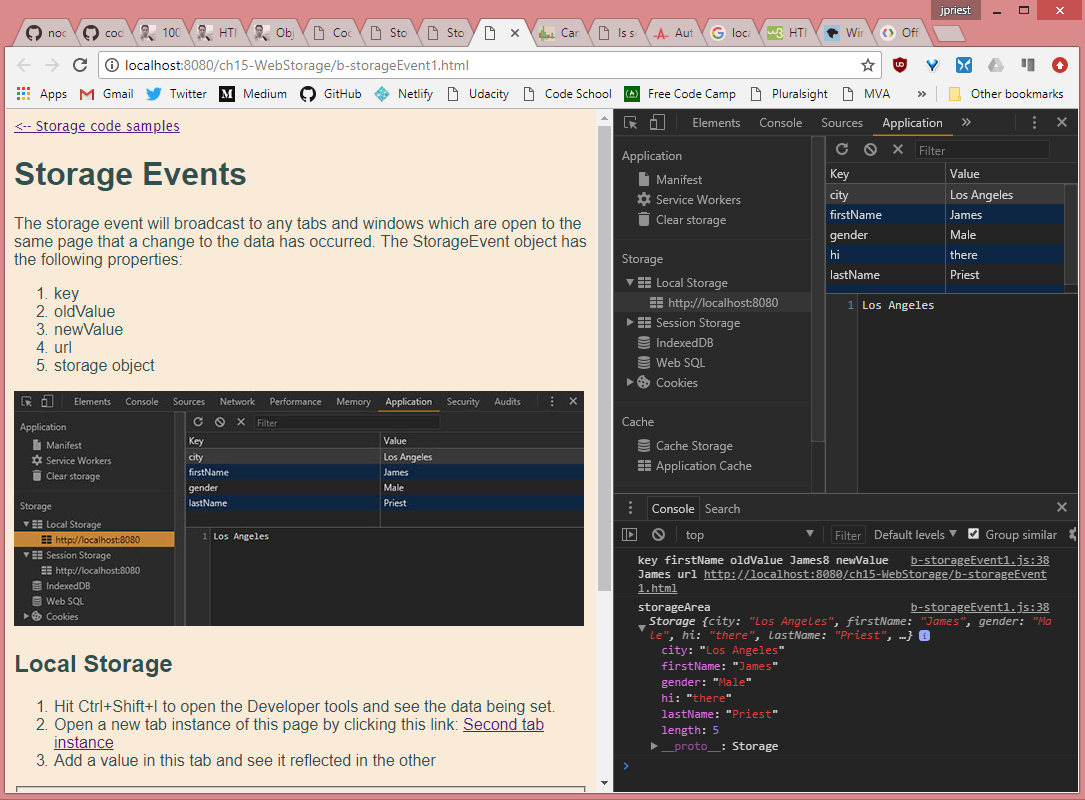 Code Samples - Storage Events
Progress: This lesson covers the StorageEvent object and how to use it to effectively notify other tabs and windows of data changes to local or session storage.
Read about HTML5 storage here: Chapter 15 - Web Storage: Handling storage events.
Links:
- Course Notes - Chapter 15 - Web Storage
- Code Samples - Cookies, Local Storage, Session Storage, & Storage events
- GitHub Repo - Web Storage GitHub Repo
67. Web Storage Pt5 - Sample Code
Day 67: April 3, 2018 - Tuesday
Project: Study for MS 70-480 Cert Exam (Programming in HTML5 with JavaScript & CSS3)
Progress: This lesson summarizes the key take-aways regarding local and session storage, collectively known as web storage.
I also created some sample code to test various methods regarding local and session storage.
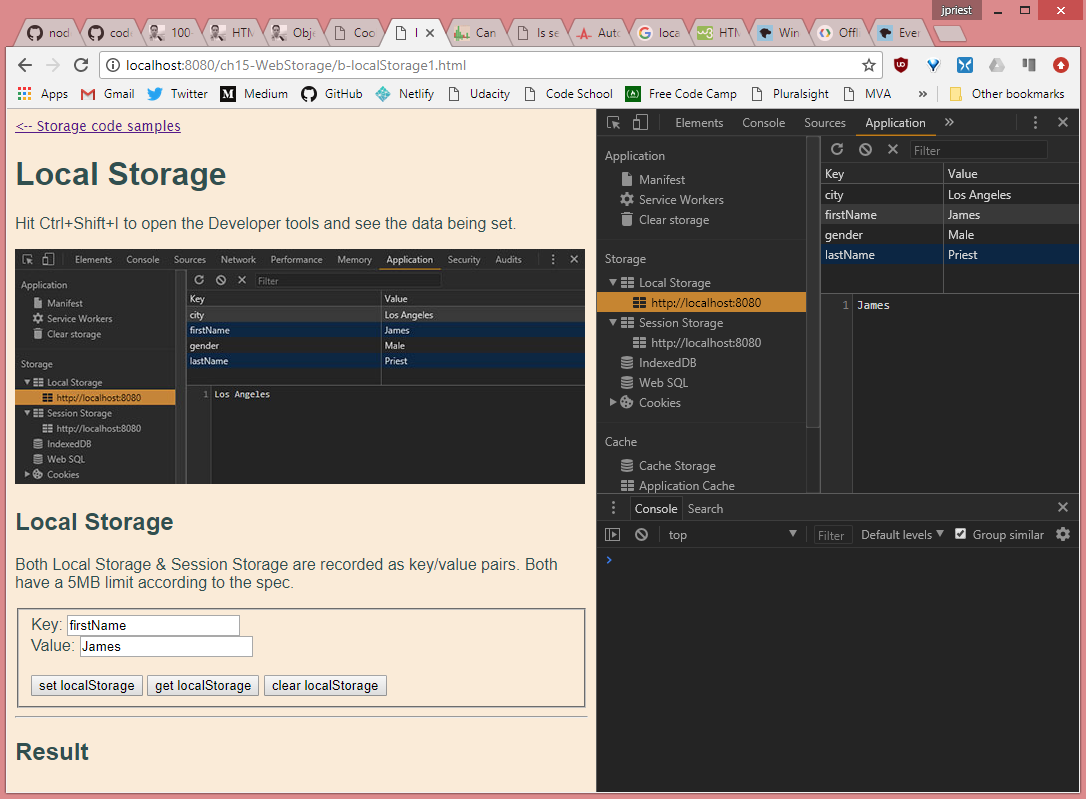 Code Samples - Cookies, Local Storage, & Session Storage
Read about HTML5 storage here: Chapter 15 - Web Storage: Lesson summary.
Links:
- Course Notes - Chapter 15 - Web Storage
- Code Samples - Cookies, Local Storage, & Session Storage
- GitHub Repo - Web Storage GitHub Repo
66. Web Storage Pt4 - Google’s Storage Recommendations
Day 66: April 2, 2018 - Monday
Project: Study for MS 70-480 Cert Exam (Programming in HTML5 with JavaScript & CSS3)
Progress: This lesson starts by describing the performance pitfalls of some of these storage techniques including size limitations and synchronous-only blocking operations.
It then gets into Google’s recommendation for specific storage methods based on browser adoption and performance considerations. These are IndexedDB & Cache API which are used extensively with Service Workers to provide good offline first user experience.
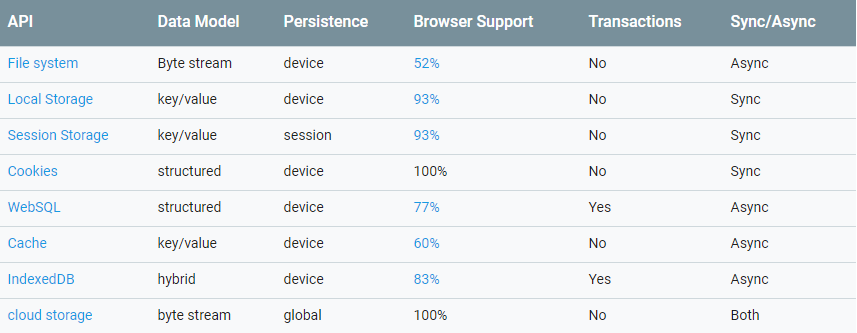
It describes the inherent limitations of other storage methods.
- Web Storage (e.g LocalStorage and SessionStorage) is synchronous, has no Web Worker support and is size and type (strings only) limited
- Cookies have their uses but are synchronous, lack web worker support and are also size-limited.
- Web SQL does not have broad browser support and its use is not recommended.
- The File System API is not supported on any browser besides Chrome.
- The File API is being improved in the File and Directory Entries API and File API specs but neither is sufficiently mature or standardized to encourage widespread adoption yet.
Read about HTML5 storage here: Chapter 15 - Web Storage: Anticipating potential performance pitfalls.
Links:
- Course Notes - Chapter 15 - Web Storage
- Cookie namespace patterns - Code Samples
- GitHub Repo - Web Storage GitHub Repo
65. Web Storage Pt3 - HTML5 Storage APIs
Day 65: April 1, 2018 - Sunday
Project: Study for MS 70-480 Cert Exam (Programming in HTML5 with JavaScript & CSS3)

Progress: This discusses and breaks down the different HTML5 storage APIs and how they compare and contrast to old style cookies.
This includes:
- Local Storage (Web Storage)
- Session Storage (Web Storage)
- IndexedDB
- Web SQL (
deprecated) - Filesystem API (
deprecated)
Read about HTML5 storage here: Chapter 15 - Web Storage: Understanding HTML5 storage.
Links:
- Course Notes - Chapter 15 - Web Storage
- Cookie namespace patterns - Code Samples
- GitHub Repo - Web Storage GitHub Repo
64. Web Storage Pt2 - Namespace Patterns
Day 64: March 31, 2018 - Saturday
Project: Study for MS 70-480 Cert Exam (Programming in HTML5 with JavaScript & CSS3)
// IIFE namespace pattern
var namespace = namespace || {};

/* here a namespace object is passed as a function parameter.
 * this allows us to assign public methods and properties to it. */
(function( o ){
    o.foo = "foo";
    o.bar = function(){
        return "bar";
    };
})(namespace);
Progress: Much of my cert study material puts code right in the global namespace. This is done to keep proof-of-concept code simple and under control but it misses an opportunity to reinforce good coding practices.
Today I took the time to re-write code to get and set cookies using four different namespace patterns from Addy Osmani’s Essential JavaScript Namespacing Patterns.
The namespace patterns include:
- Single global variable
- Object literal notation
- Nested namespace pattern
- Immediately Invoked Function Expression (IIFE)
The notes explaining how to use these four patterns are here: Chapter 15 - Web Storage: Structuring code with Namespace patterns.
Links:
- Course Notes - Chapter 15 - Web Storage
- Cookie namespace patterns - Code Samples
- Original code
- Single global variable
- Object literal notation
- Nested namespace pattern
- Immediately Invoked Function Expression (IIFE)
- GitHub Repo - Web Storage GitHub Repo
63. Web Storage Pt1 - Cookies
Day 63: March 30, 2018 - Friday
Project: Study for MS 70-480 Cert Exam (Programming in HTML5 with JavaScript & CSS3)
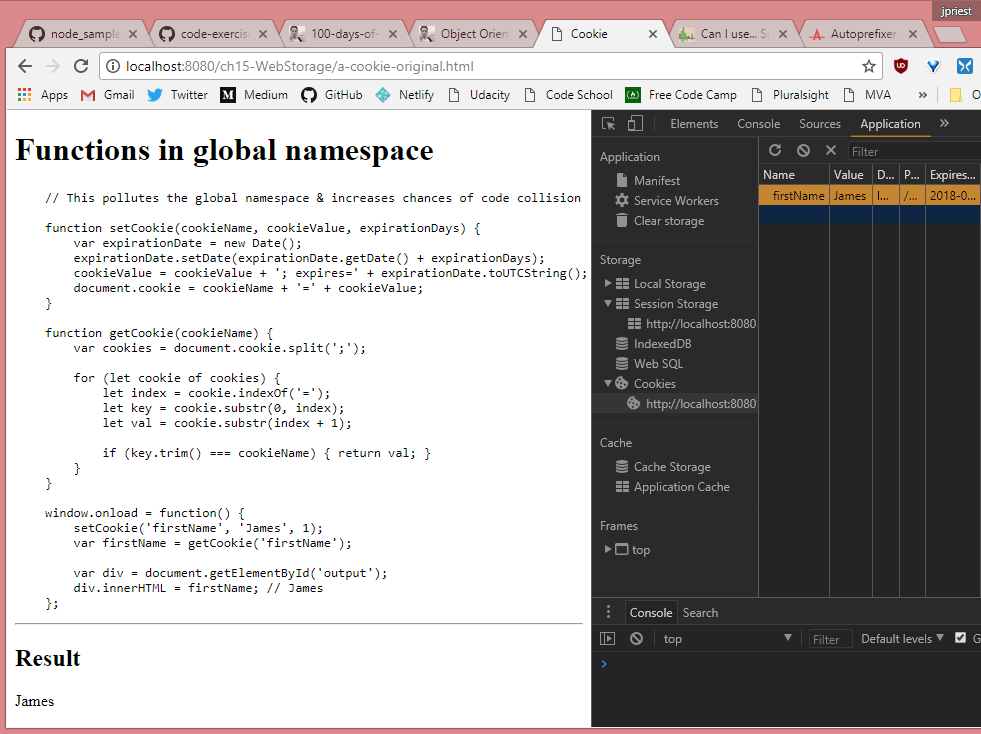
Progress: This chapter covers Web Storage (localStorage & sessionStorage) along with a basic overview of cookies, their use, and their limitations.
This lesson detailed the following.
- Introduction to Web Storage
- Understanding the use of cookies
- How to set and retrieve cookie values.
The live sample can be viewed here: a-cookie-original.html
Links:
- Course Notes - Chapter 15 - Web Storage
- Cookie sample - Get/Set browser cookie (a-cookie-original.html)
- GitHub Repo - Web Storage GitHub Repo
62. JS Tutorial Pt13 - Polymorphism
Day 62: March 29, 2018 - Thursday
Project: Study for MS 70-480 Cert Exam (Object Oriented JavaScript)
Progress: This lesson covers polymorphism in JavaScript. It starts with an example of polymorphism in C# and shows how to accomplish the same task with JavaScript.
 // Shape object is be the base object
var Shape = function () { };

// Add draw function to the Shape prototype
// Objects derived from Shape will be able to override the draw() method
Shape.prototype.draw = function () {
    return "I am a generic shape";
};

// Create a Circle object
var Circle = function () { }

// Make shape the parent for Circle
Circle.prototype = Object.create(Shape.prototype);

// Circle object overrides draw() method
Circle.prototype.draw = function () {
    return "I am a circle";
};
var Square = function () { };
Square.prototype = Object.create(Shape.prototype);
Square.prototype.draw = function () {
    return "I am a square";
};

var Triangle = function () { };
Triangle.prototype = Object.create(Shape.prototype);

var shapes = [new Shape(), new Circle(), new Square(), new Triangle()];

shapes.forEach(function (shape) {
    document.write(shape.draw() + "<br/>");
});
Output
I am a generic shape
I am a circle
I am a square
I am a generic shape
Here are the lesson notes:
Links:
- Course Notes - Object Oriented JavaScript
- GitHub Repo - OO JavaScript GitHub Repo
61. JS Tutorial Pt12 - Object Reflection
Day 61: March 28, 2018 - Wednesday
Project: Study for MS 70-480 Cert Exam (Object Oriented JavaScript)
Progress: This lesson covers object reflection in JavaScript. In C# reflection allows us to inspect meta data of assemblies, modules, and types. In JavaScript it allows the examination of objects with regards to the object’s properties, methods, and inheritance.
var Employee = function (firstName, lastName, gender, email) {
    this.firstName = firstName;
    this.lastName = lastName;
    this.gender = gender;
    this.email = email;
}

Employee.prototype.getFullName = function () {
    return this.firstName + " " + this.lastName;
}

Employee.prototype.getEmail = function () {
    return this.email;
}

Employee.prototype.getGender = function () {
    return this.gender;
}

var employee1 = new Employee("Mark", "Matt", "Male", "a@a.com");

for (var property in employee1) {
    document.write(property + " : " + employee1[property] + "<br/>");
}
Output
firstName: Mark
lastName: Matt
gender: Male
email: a@a.com
getFullName: function () { return this.firstName + " " + this.lastName; }
getEmail: function () { return this.email; }
getGender: function () { return this.gender; }
Here are the lesson notes:
Links:
- Course Notes - Object Oriented JavaScript
- GitHub Repo - OO JavaScript GitHub Repo
60. JS Tutorial Pt11 - Abstract Classes
Day 60: March 27, 2018 - Tuesday
Project: Study for MS 70-480 Cert Exam (Object Oriented JavaScript)
Progress: This lesson covers abstract classes which cannot be instantiated in an of themselves but rather, act as a base class from which create a sub-class from.
// Create a Shape object which is abstract
var Shape = function () {
    this.shapeName = "None";
    throw new Error("Cannot create an instance of abstract class");
};

// Add draw function to the Shape prototype
// Objects derived from Shape should be able to call draw() method
Shape.prototype.draw = function () {
    return "Drawing " + this.shapeName;
};

// Create a Circle object
var Circle = function (shapeName) {
    this.shapeName = shapeName;
};

// Make shape the parent for Circle
// Object.create() allows to create an object without using constructor
Circle.prototype = Object.create(Shape.prototype);

var circle = new Circle("Circle");
// Since Circle inherits from abstract Shape object, it can call draw() method
document.write(circle.draw());

alert(circle instanceof Circle); // Returns true
alert(circle instanceof Shape);  // Returns true
Here are the lesson notes:
Links:
- Course Notes - Object Oriented JavaScript
- GitHub Repo - OO JavaScript GitHub Repo
59. JS Tutorial Pt10 - Inheritance in JavaScript
Day 59: March 26, 2018 - Monday
Project: Study for MS 70-480 Cert Exam (Object Oriented JavaScript)
Progress: This lesson covers the basics of object inheritance in ES5. We do this using a pattern that sets a derived object ‘s prototype to the base object. This allows the derived object access to the base object’s prototype methods and properties.
// Employee will be the base object (Similar to base class in C#)
var Employee = function (name) {
    this.name = name;
};

// getName() function is added to the base object (Employee)
Employee.prototype.getName = function () {
    return this.name;
};

// PermanentEmployee will be the derived object
var PermanentEmployee = function (annualSalary) {
    this.annualSalary = annualSalary;
};

// Use prototype to set Employee as the base object for PermanentEmployee
PermanentEmployee.prototype = new Employee("Mark");

var pe = new PermanentEmployee(50000);
// Derived object (permanentEmployee) can see the
// base object (Employee) getName() method
document.write(pe.getName());

alert(pe instanceof Employee);          // Returns true
alert(pe instanceof PermanentEmployee); // Returns true
Here are the lesson notes: Object Oriented JavaScript - Inheritance in JavaScript.
Links:
- Course Notes - Object Oriented JavaScript
- GitHub Repo - OO JavaScript GitHub Repo
58. JS Tutorial Pt9 - Overriding JS functions
Day 58: March 25, 2018 - Sunday
Project: Study for MS 70-480 Cert Exam (Object Oriented JavaScript)
Progress: This lesson covers the process of overriding a function on the prototype object in cases where this behavior is desired.
The lesson covers:
- Creating an object constructor
- Defining a member function on the prototype object.
- Overriding that prototype member function with a new function definition
function Employee(name) {
    this.name = name;
}

Employee.prototype.getName = function () {
    return this.name;
}

function GetEmployeeDetails() {
    Employee.prototype.getName = function () {
        return this.name.toUpperCase();
    }

    var e1 = new Employee("Mark");
    var e2 = new Employee("Sara");

    document.write("e1.name = " + e1.getName() + "<br/>");
    document.write("e2.name = " + e2.getName() + "<br/>");
}

GetEmployeeDetails();
Here are the lesson notes: Object Oriented JavaScript - Overriding JavaScript Functions.
Links:
- Course Notes - Object Oriented JavaScript
- GitHub Repo - OO JavaScript GitHub Repo
57. JS Tutorial Pt8 - The Prototype Object
Day 57: March 24, 2018 - Saturday
Project: Study for MS 70-480 Cert Exam (Object Oriented JavaScript)
Progress: This lesson covers the prototype object and how to add methods you wish to make public to this object in order to limit memory consumption.
The lesson covers:
- Creating a privileged method for the function
- Creating the function as a static method
- Creating the function as a public method on the prototype object.
function Employee(name) {
    // public instance field
    this.name = name;
}

// Public prototype method
Employee.prototype.getName = function() {
    return this.name;
};

var e1 = new Employee("Mark");
var e2 = new Employee("Sara");

document.write("e1.name = " + e1.getName() + "<br/>"); // Mark
document.write("e2.name = " + e2.getName() + "<br/>"); // Sara
Here are the lesson notes: Object Oriented JavaScript - Prototype in JavaScript.
Links:
- Course Notes - Object Oriented JavaScript
- GitHub Repo - OO JavaScript GitHub Repo
56. JS Tutorial Pt7 - Static Fields & Methods
Day 56: March 23, 2018 - Friday
Project: Study for MS 70-480 Cert Exam (Object Oriented JavaScript)
Progress: This lesson covers what a static member is and how to create one. It also discusses when to use this construct.
A static member is a static field (variable) or static method (function). The term static means that there is only ever one copy created in memory for that field or method.
function Shape(shapeName) {
    // Instance field
    this.ShapeName = shapeName;

    // Static field
    Shape.Count = ++Shape.Count || 1;

    // Static method
    Shape.ShowCount = function() {
        return Shape.Count;
    };
}

var shape1 = new Shape('Circle');
var shape2 = new Shape('Rectangle');
var shape3 = new Shape('triangle');

document.write('Shape.Count = ' + Shape.ShowCount());  // Shape.Count = 3
Five instances of an object can be created from a constructor function but if that constructor defines a static member, only one copy of that member will be created in memory.
Here are more complete examples: Object Oriented JavaScript - Static Members in JavaScript.
Links:
- Course Notes - Object Oriented JavaScript
- GitHub Repo - OO JavaScript GitHub Repo
55. JS Tutorial Pt6 - Property Getters & Setters
Day 55: March 22, 2018 - Thursday
Project: Study for MS 70-480 Cert Exam (Object Oriented JavaScript)
Progress: Today we cover getters and setters in JavaScript. This allows us to control how we update private properties and control what is returned upon request. It provides encapsulation which is one of the four pillars of object-oriented design.
Here is an example in code.
function Employee(name, age) {
    var _name = name;
    var _age = age;

    Object.defineProperty(this, 'age', {
        get: function () {
            return _age;
        },
        set: function (value) {
            if (value > 100 || value < 1) {
                alert("Invalid age");
            } else {
                _age = value;
            }
        }
    });

    Object.defineProperty(this, "name", {
        get: function () {
            return _name;
        }
    });
}
You can read a more complete example which includes full code and explanation in my notes on this lesson: Object Oriented JavaScript - Properties in JavaScript.
Links:
- Course Notes - Object Oriented JavaScript
- GitHub Repo - OO JavaScript GitHub Repo
54. JS Tutorial Pt5 - Private Members
Day 54: March 21, 2018 - Wednesday
Project: Study for MS 70-480 Cert Exam (Object Oriented JavaScript)
Progress: This lesson dives deeper into how to create the kind of encapsulation found in traditional class-based inheritance structures of C# and Java.
// JavaScript
function Employee(firstName, lastName) {
    // Private Field
    var privateFullName;

    // Public Fields
    this.firstName = firstName;
    this.lastName = lastName;

    // Private Function
    var privateGetFullName = function () {
        privateFullName = firstName + " " + lastName;
        return privateFullName;
    };

    // Privileged Function
    this.privilegedGetFullName = function () {
        return privateGetFullName();
    };

    // Public Function
    Employee.prototype.publicGetFullName = function () {
        return this.privilegedGetFullName();
    };
}
This lesson covers:
- Private fields - variables that can only be accessed by private functions and privileged methods.
- Public fields - variables available outside the object.
- Private functions - available only to privileged methods or other private functions.
- Privileged methods - available both inside and outside the object. Has access to private fields and functions.
- Public methods - available inside and outside the object. No access to private fields or functions but can access privileged methods.
You can read a more complete example which includes full code and explanation in my notes on this lesson: Object Oriented JavaScript - Private members in JavaScript.
Links:
- Course Notes - Object Oriented JavaScript
- GitHub Repo - OO JavaScript GitHub Repo
53. JS Tutorial Pt4 - Namespaces
Day 53: March 20, 2018 - Tuesday
Project: Study for MS 70-480 Cert Exam (Object Oriented JavaScript)
Progress: This lesson takes the code scenario posed in the previous lesson and solves for it by creating namespaces. JavaScript does not have namespaces as such but uses objects to accomplish the same kind of encapsulation.
Furthermore, we can create nested namespaces by creating a nested object hierarchy. A nested namespace is a namespace inside another namespace.
var myApp = myApp || {};
var myApp.utilities = myApp.utilities || {};

myApp.utilities.validateData = function(data) {
  // some code...
};
You can read a more complete example which includes full code and explanation in my notes on this lesson: Object Oriented JavaScript - Namespaces in JavaScript.
Links:
- Course Notes - Object Oriented JavaScript
- GitHub Repo - OO JavaScript GitHub Repo
52. JS Tutorial Pt3 - Global Namespace Pollution
Day 52: March 19, 2018 - Monday
Project: Study for MS 70-480 Cert Exam (Object Oriented JavaScript)
Progress: This lesson details the pitfalls of writing code that lives in the global namespace. Global namespace pollution occurs when we declare variables or functions globally which have the possibility of overwriting code from included libraries or third-parties.
This is most common in large code bases but can occur anytime variables, objects, or functions are being declared globally.
This lesson creates an example of how this can occur.
Notes on this lesson: Object Oriented JavaScript - Global namespace pollution.
Links:
- Course Notes - Object Oriented JavaScript
- GitHub Repo - OO JavaScript GitHub Repo
51. JS Tutorial Pt2 - Object Literal vs Constructor
Day 51: March 18, 2018 - Sunday
Project: Study for MS 70-480 Cert Exam (Object Oriented JavaScript)
Progress: This lesson gets more in depth with the differences between using literal notation to define a custom object vs using a constructor function to create one.
The lesson shows how an object literal is a singleton, and objects defined with a constructor and the new keyword are separate individual instances.
// object literal notation
var employee = {
    name: "John"
}
// constructor function
var emp = function () {
    this.name = "John";
}
// Create an instance of employee
var employee = new emp();
The bottom line is that when we need multiple instances we should use a constructor function. When one instance is needed we can define the object using literal notation.
Notes on this lesson can be found here: Object Oriented JavaScript - Object literal vs. object constructor.
Links:
- Course Notes - Object Oriented JavaScript
- GitHub Repo - OO JavaScript GitHub Repo
50. JS Tutorial Pt1 - Object Oriented Programming
Day 50: March 17, 2018 - Saturday
Project: Study for MS 70-480 Cert Exam (Object Oriented JavaScript)
Progress: Learned about two distinct ways to create custom objects in JavaScript.
- Constructor functions
- Object literal notation
The lesson covered code examples of each.
// Constructor function
function Employee(firstName, lastName)
{
    this.firstName = firstName;
    this.lastName = lastName;

    this.getFullName = function () {
        return this.firstName + " " + this.lastName;
    }
}

var employee = new Employee("Pragim", "Tech");
// Object literal notation
var employee = {
    firstName: "Pragim",
    lastName: "Tech",

    getFullName: function () {
        return this.firstName + " " + this.lastName;
    }
}
Notes on this lesson can be found here: Object Oriented JavaScript - OOP.
Links:
- Course Notes - Object Oriented JavaScript
- GitHub Repo - OO JavaScript GitHub Repo
49. VSCode from Scratch
Day 49: March 16, 2018 - Friday
Project: Reinstall Visual Studio Code & plugins
Progress: Today I decided to wipe clean my Visual Studio Code installation and start fresh. I had many plug-ins installed that were using resources and keeping me from a streamlined coding experience.
I also had quite a few modifications to my user settings, including linting, code formatting, themes, icons, plugin settings, etc.
I did a number of things before a fresh install:
- Made a list of all currently used plugins (so I could reinstall the ones I wanted)
- Uninstalled Visual Studio Code
- Renamed the
extensionsdirectory (to clear out old extensions) - Renamed the
Codedirectory within %UserDir%/AppData/Roaming (to start with a fresh user settings) - Installed fresh copy
Once this was done, I proceeded to install the extensions I wanted along with some new ones. Everything runs clean and smooth now.
48. Geolocation Pt3
Day 48: March 15, 2018 - Thursday
Project: Study for MS 70-480 Cert Exam (Programming in HTML5 with JavaScript & CSS3)
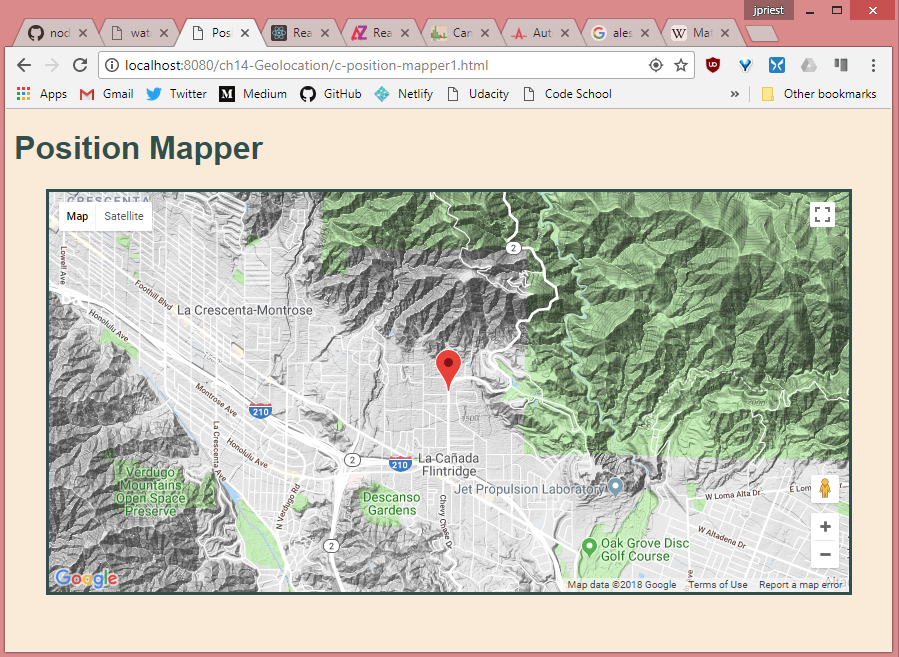
Progress: This last lesson covered the use of Geolocation API with Google Maps API.
This lesson detailed the following.
- Properly referencing the Google Maps API
- Setting the
optionsobject for use with the Google Maps API - Creating and setting a Map and Marker object
The live sample can be viewed here: Position Mapper
Links:
- Course Notes - Chapter 14 - Geolocation
- Geolocation sample 1- Latitude, longitude, & timestamp output
- Geolocation sample 2- GPS Watch Position
- Geolocation sample 3- Position Mapper
- GitHub Repo - Geolocation GitHub Repo
47. Geolocation Pt2
Day 47: March 14, 2018 - Wednesday
Project: Study for MS 70-480 Cert Exam (Programming in HTML5 with JavaScript & CSS3)

Progress: This lesson covered the use of the watchPosition() method to continuously monitor changes in GPS positioning and call a success function in order to respond to the changes.
This lesson detailed the following.
navigator.geolocation.watchPosition()method.- Use of
watchPosition()’s return valuewatchIdwith theclearWatch()method. - Various methods to calculate distance between two points over a curved surface (earth).
- Calculation of distance traveled using the haversine formula.
The live sample can be viewed here: GPS Watch Position
Links:
- Course Notes - Chapter 14 - Geolocation
- Geolocation sample 1- Latitude, longitude, & timestamp output
- Geolocation sample 2- GPS Watch Position
- GitHub Repo - Geolocation GitHub Repo
46. Geolocation Pt1
Day 46: March 13, 2018 - Tuesday
Project: Study for MS 70-480 Cert Exam (Programming in HTML5 with JavaScript & CSS3)
$(document).ready(function() {
    getLocation();
});
function supportsGeolocation() {
    return 'geolocation' in navigator;
}
function getLocation() {
    if (supportsGeolocation()) {
        navigator.geolocation.getCurrentPosition(showPosition, showError);
    } else {
        showMessage("Geolocation isn't supported by your browser");
    }
}
function showPosition(position) {
    var datetime = new Date(position.timestamp).toLocaleString();

    showMessage('Latitude: ' + position.coords.latitude + '<br>' +
        'Longitude: ' + position.coords.longitude + '<br>' +
        'Timestamp: ' + datetime);
}
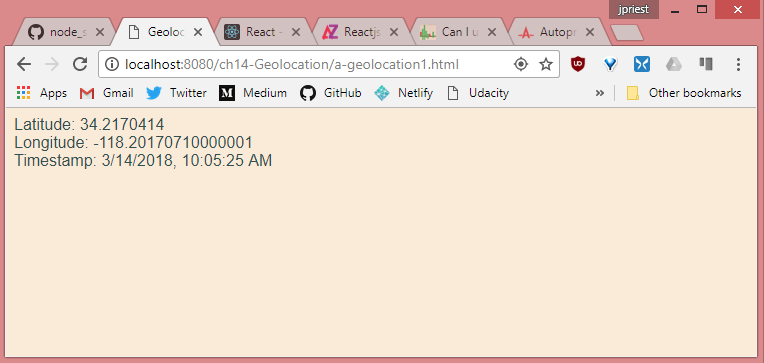
Progress: This lesson covers the basics of the Geolocation API which at its most basic returns latitude and longitude positions from which to use with multiple third-party apps and services.
This lesson detailed the following.
navigator.geolocation.getCurrentPosition()method- Position object which is returned from
getCurrentPosition()method. It contains thecoordsandtimestampproperties - Coordinates object which contains properties for
latitude,longitude,altitude,accuracy,altitudeAccuracy,heading, &speed.
Links:
- Course Notes - Chapter 14 - Geolocation
- Geolocation sample- Latitude, longitude, & timestamp output
- GitHub Repo - Geolocation GitHub Repo
45. Scramble Game Pt3
Day 45: March 12, 2018 - Monday
Project: Study for MS 70-480 Cert Exam (Programming in HTML5 with JavaScript & CSS3)
Progress: We finish part 3 of the HTML5 Drag & Drop number scramble game by adding keyboard controls and wrapping up some game functions.
This includes:
- Allowing tile movement with arrow keys
- Creating a key press animation to show the user what key was pressed
- Creating a
scramble()tile function - Building a
checkForWinner()function
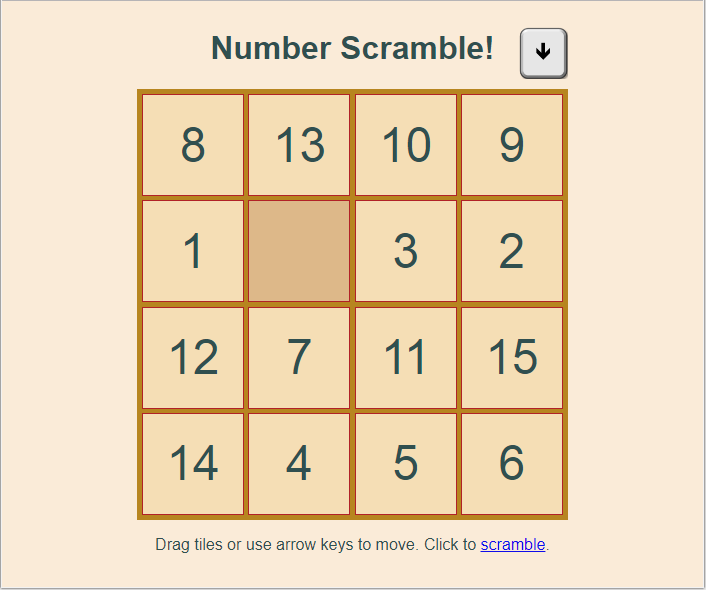
Here’s the completed game: Scramble Game
Links:
- Course Notes - Chapter 13 - Drag and Drop
- Drag & Drop sample 1- Numbers
- Drag & Drop sample 2- List
- Drag & Drop sample 3- Files
- Drag & Drop sample 4- Scramble Game
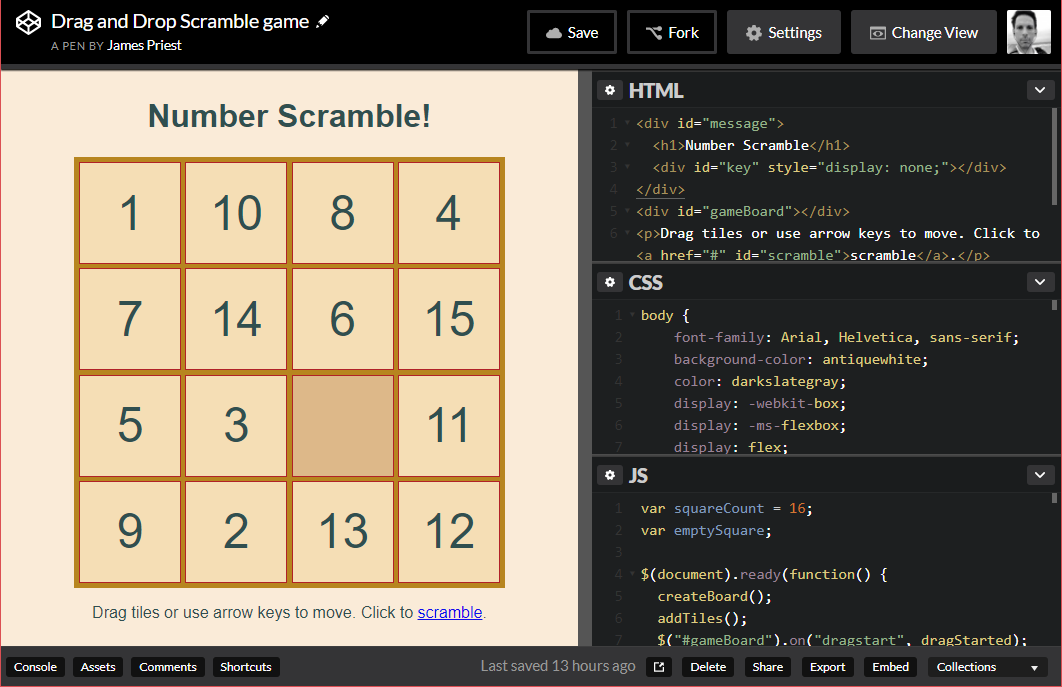
- GitHub Repo - Drag and Drop GitHub Repo
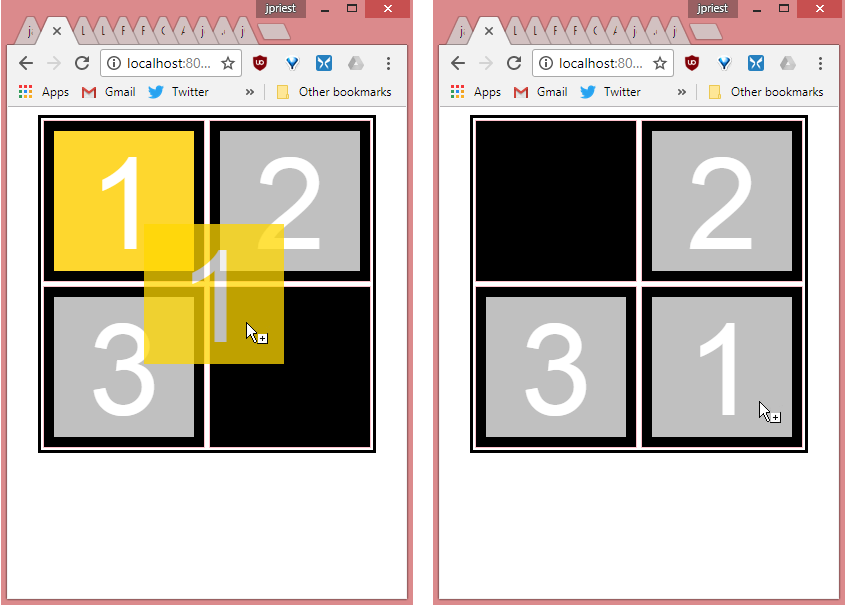
44. Scramble Game Pt2
Day 44: March 11, 2018 - Sunday
Project: Study for MS 70-480 Cert Exam (Programming in HTML5 with JavaScript & CSS3)
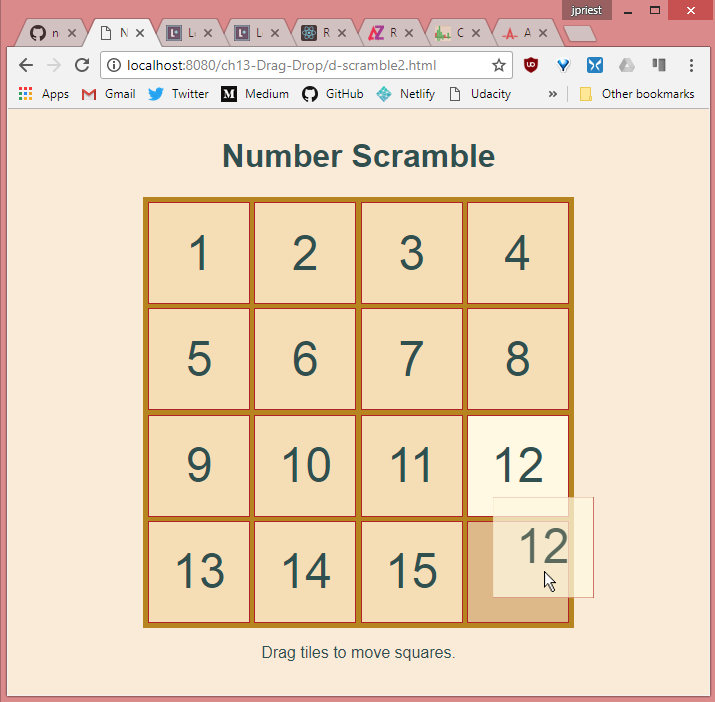
Progress: In part 2 of the HTML5 Drag & Drop number scramble game we actually write the bulk of the actual drag and drop code
This includes:
- Wiring up drag and drop events
- Using the DataTransfer object to send data from the drag source to the drop destination
- Logic to evaluate which drops are allowed and to carry those out
Here’s the work in progress: WIP - Scramble Game v2
Links:
- Course Notes - Chapter 13 - Drag and Drop
- Drag & Drop sample 1- Numbers
- Drag & Drop sample 2- List
- Drag & Drop sample 3- Files
- Drag & Drop sample 4- Scramble Game
- GitHub Repo - Drag and Drop GitHub Repo
43. Scramble Game Pt1
Day 43: March 10, 2018 - Saturday
Project: Study for MS 70-480 Cert Exam (Programming in HTML5 with JavaScript & CSS3)
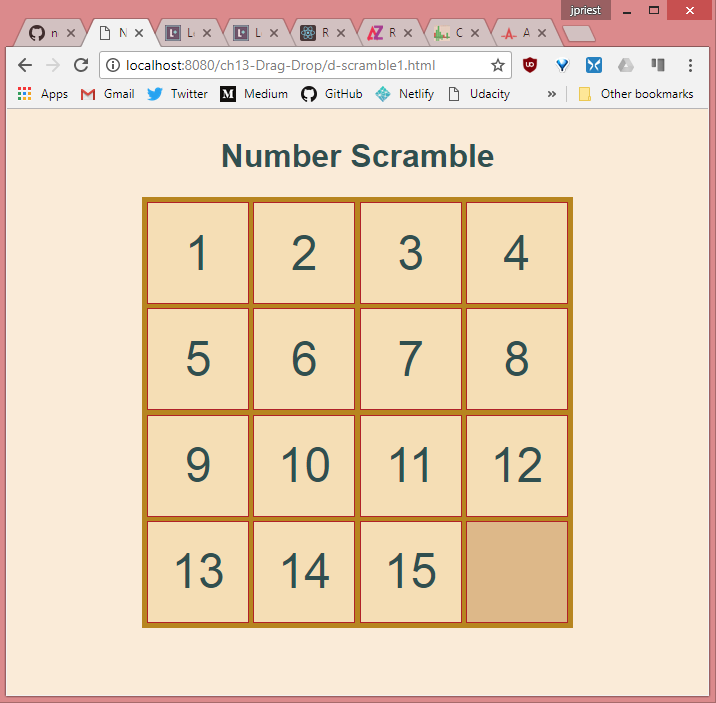
Progress: Here we gain experience implementing HTML5 Drag & Drop by building a number scramble game.
The first section covers:
- Basic layout and structure of the game
- Starting point for HTML, CSS, JavaScript, & jQuery
The work in progress page is here : Scramble Game v1
Links:
- Course Notes - Chapter 13 - Drag and Drop
- Drag & Drop sample 1- Numbers
- Drag & Drop sample 2- List
- Drag & Drop sample 3- Files
- Drag & Drop sample 4- Scramble Game
- GitHub Repo - Drag and Drop GitHub Repo
42. HTML5 Drag & Drop Pt2
Day 42: March 9, 2018 - Friday
Project: Study for MS 70-480 Cert Exam (Programming in HTML5 with JavaScript & CSS3)
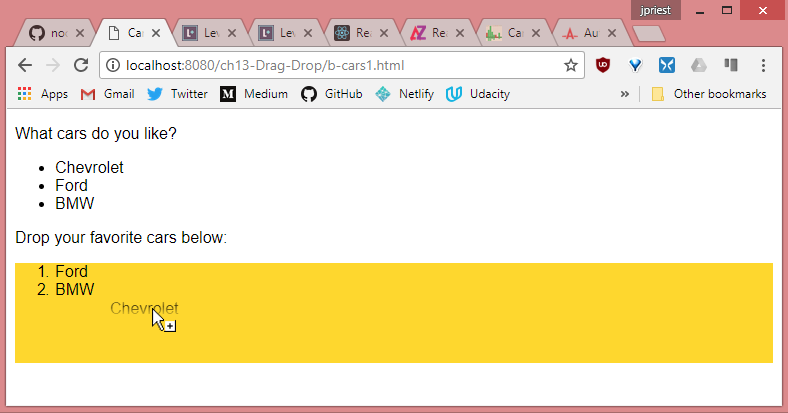
Progress: This lesson got into the DataTransfer object and how to use it to effectively move data from the drag location to the drop location.
This covered:
- Using DataTransfer with jQuery
- Using DataTransfer methods
getData(),setData(), &clearData() - Using DataTransfer properties
dropeffect,effectAllowed,files, andtypes - Working with the
dropevent - Dragging and dropping files with FileList and the Files API object
Links:
- Course Notes - Chapter 13 - Drag and Drop
- Drag & Drop sample 1- Numbers
- Drag & Drop sample 2- List
- Drag & Drop sample 3- Files
- GitHub Repo - Drag and Drop GitHub Repo
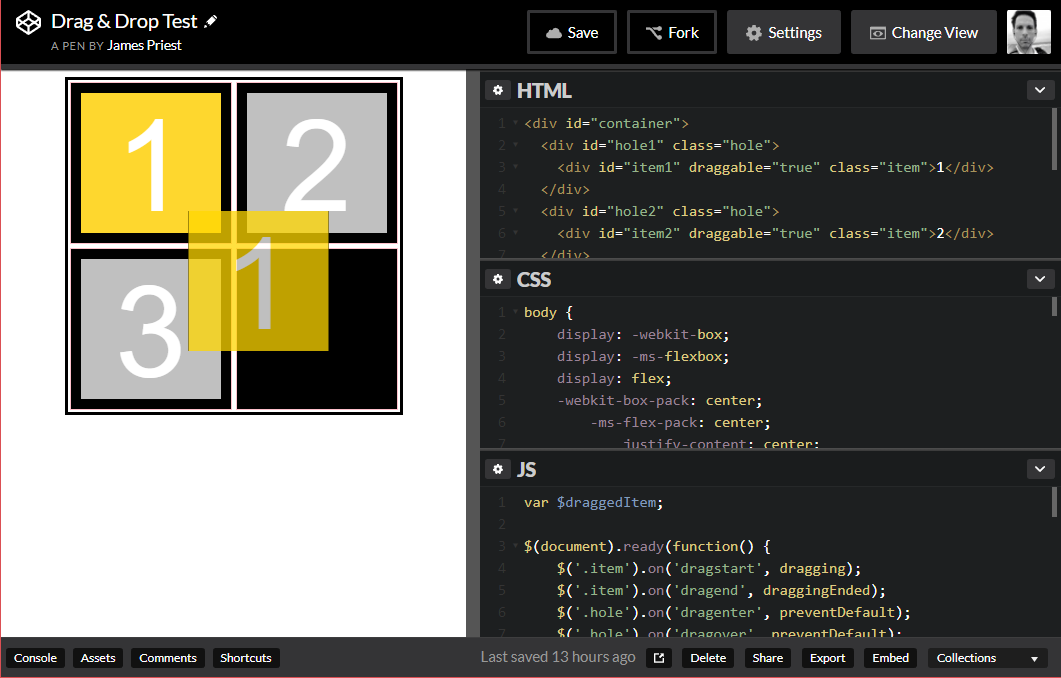
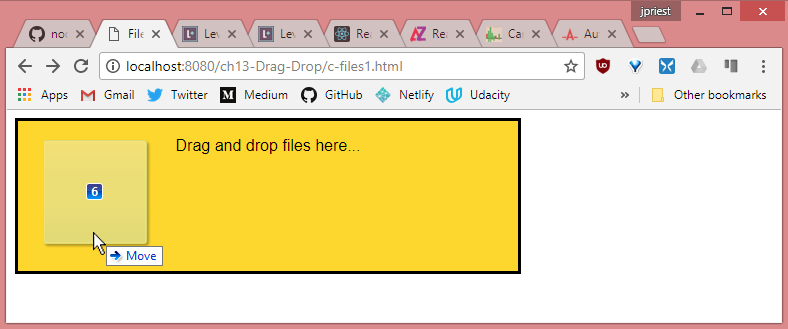
41. HTML5 Drag & Drop Pt1
Day 41: March 8, 2018 - Thursday
Project: Study for MS 70-480 Cert Exam (Programming in HTML5 with JavaScript & CSS3)
Progress: This lesson covered some of the basics behind of Drag and Drop with HTML5. This includes:
- HTML5
draggableattribute - CSS autoprefixing (https://autoprefixer.github.io/) and https://caniuse.com/
- Drag events (
dragstart,drag, anddragend) - Drop events (
dragenter,dragover,dragleave, anddrop) - Moving the dropped node from one part of the DOM to another
Links:
- Course Notes - Chapter 13 - Drag and Drop
- Drag & Drop sample - Scramble
- GitHub Repo - Drag and Drop GitHub Repo
40. HTML5 SVG
Day 40: March 7, 2018 - Wednesday
Project: Study for MS 70-480 Cert Exam (Programming in HTML5 with JavaScript & CSS3)

Progress: This lesson covered some of the basics behind SVG. This included:
- Use of
<svg>,<path>, and<circle>elements - Various path commands to create complex shapes
- Assigning an
.svgfile to an<img>element - Making SVG’s scalable
Links:
- Course Notes - Chapter 12 - SVG
- Online SVG Editor - SVG-edit
- GitHub Repo - SVG GitHub Repo
39. HTML5 Canvas Pt4
Day 39: March 6, 2018 - Tuesday
Project: Study for MS 70-480 Cert Exam (Programming in HTML5 with JavaScript & CSS3)
Progress: This completes the lesson on HTML5 <canvas> element. In the last section we covered:
- Using the
arc()method to create circles and circle fragments - Setting text with the
fontproperty - Drawing text on the canvas with
fillText()andstrokeText()methods - Including images on the canvas with
drawImage() - Tying it all together by including text, lines, and images.

Links:
- Course Notes - Chapter 12 - HTML5 Canvas
- Code samples - Index page of code samples
- GitHub Repo - HTML5 Canvas GitHub Repo
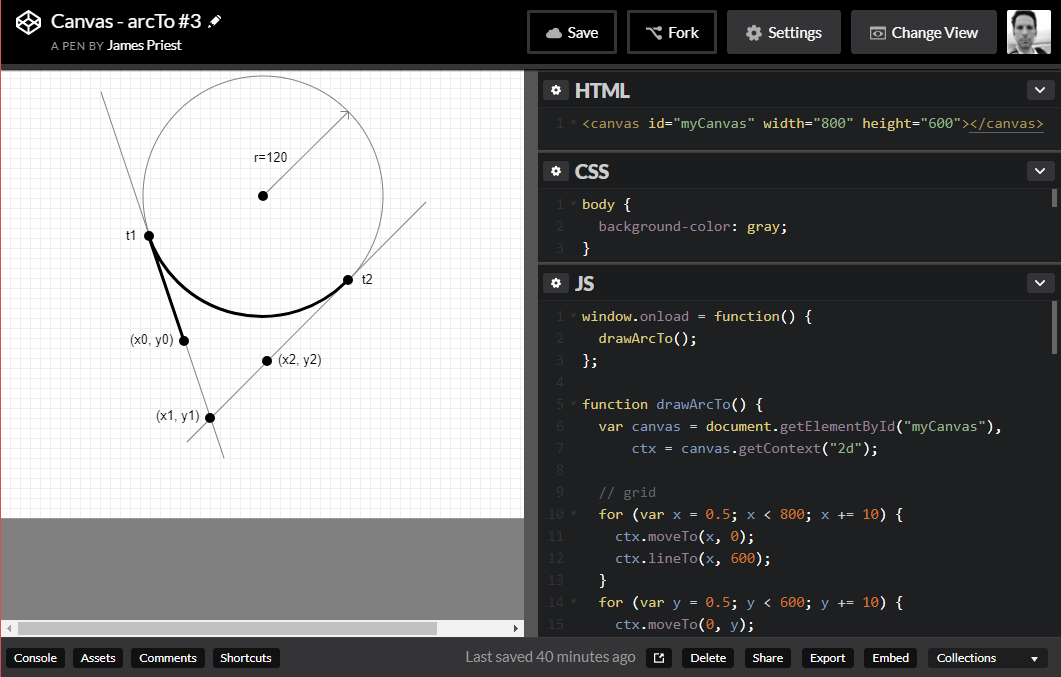
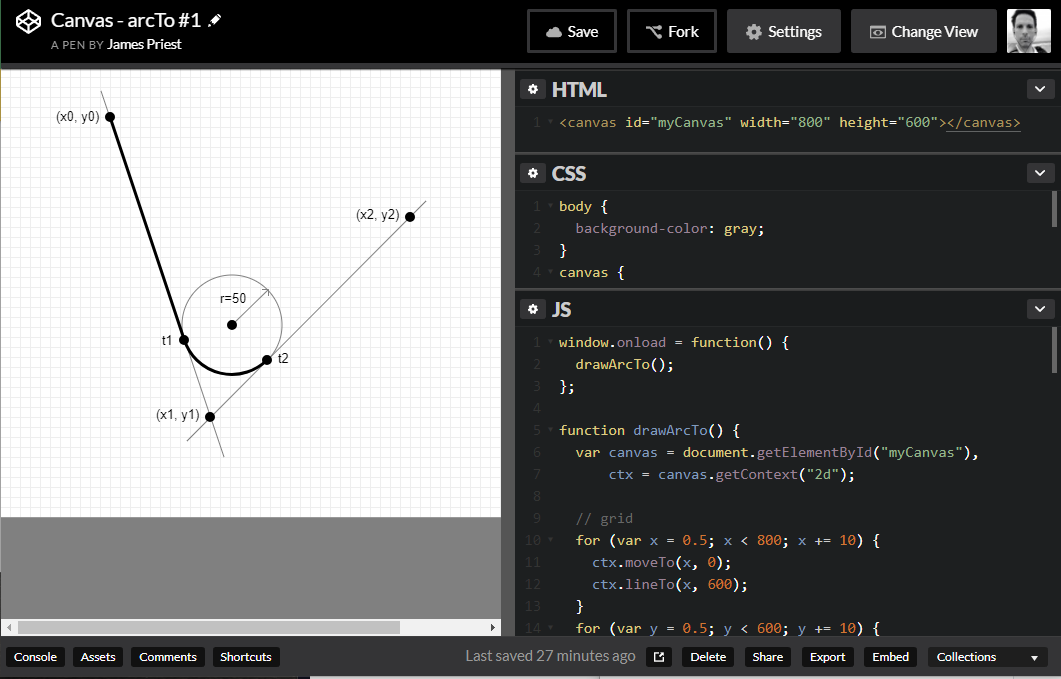
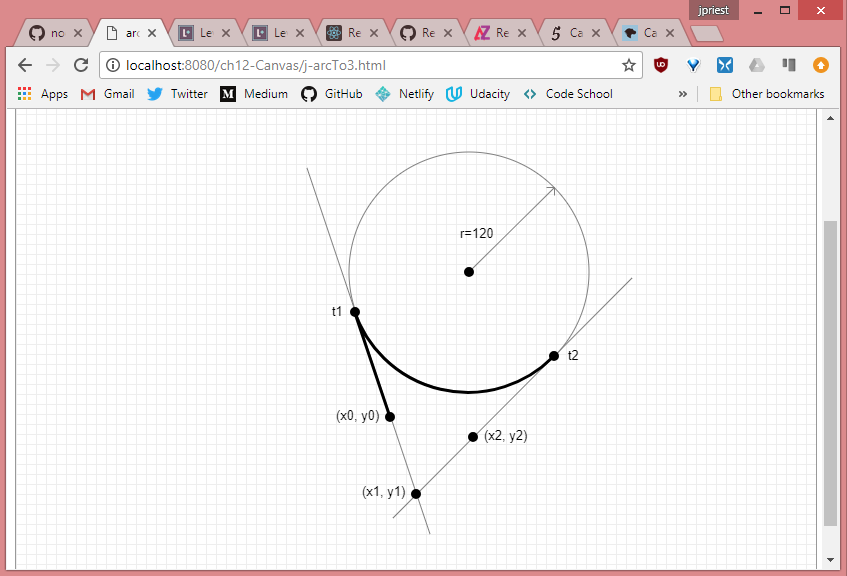
38. HTML5 Canvas Pt3
Day 38: March 5, 2018 - Monday
Project: Study for MS 70-480 Cert Exam (Programming in HTML5 with JavaScript & CSS3)
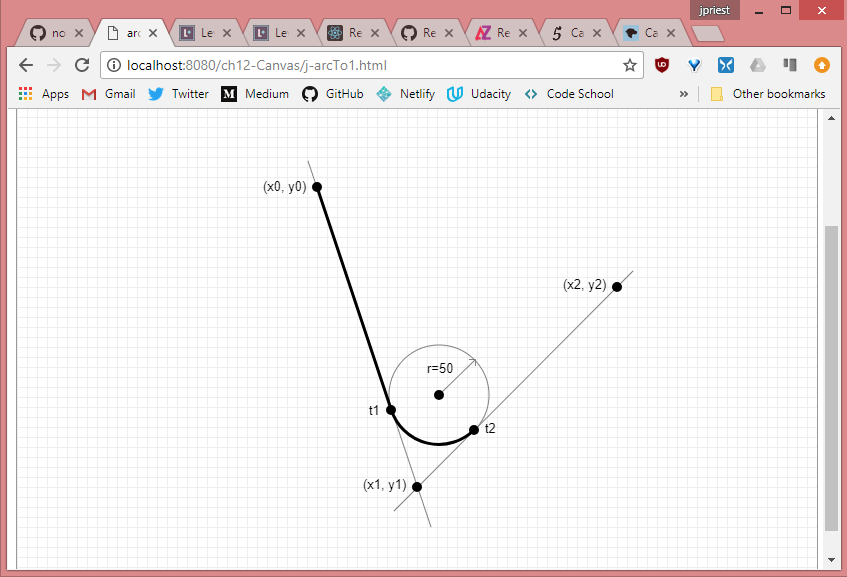
Progress: This lesson covered lots of areas, including:
- Setting lineWidth, lineJoin, & strokeStyle
- Saving and restoring drawing state
- Drawing with paths
- Creating lines & rectangles
- Using fill & stroke methods
- Order of method calls
- Creating arcs using arcTo method
Links:
- Course Notes - Chapter 12 - HTML5 Canvas
- Code samples - Index page of code samples
- GitHub Repo - HTML5 Canvas GitHub Repo
37. HTML5 Canvas Pt2
Day 37: March 4, 2018 - Sunday
Project: Study for MS 70-480 Cert Exam (Programming in HTML5 with JavaScript & CSS3)

Progress: This lesson got into combining fillStyle with fillRect() for some interesting drawings.
Specifically covered:
- Using CSS color with
fillStyle - Using gradients with
fillStyle - Using patterns with
fillStyle
Links:
- Course Notes - Chapter 12 - HTML5 Canvas
- Code samples - Index page of code samples
- GitHub Repo - HTML5 Canvas GitHub Repo
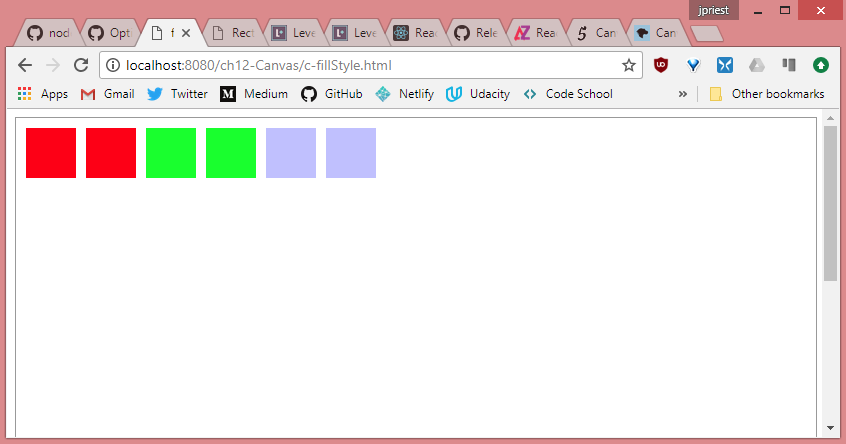
36. HTML5 Canvas Pt1
Day 36: March 3, 2018 - Saturday
Project: Study for MS 70-480 Cert Exam (Programming in HTML5 with JavaScript & CSS3)
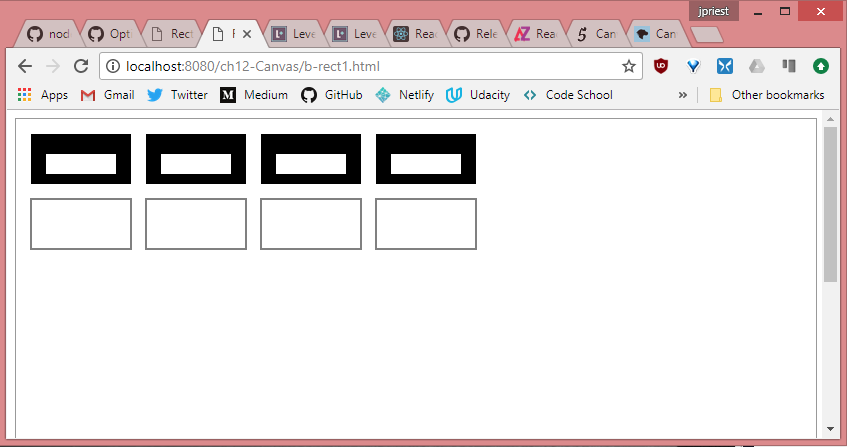
Progress: This lesson covered the use of the <canvas> element as well as the CanvasRenderingContext2D object and API.
Also covered:
- Properties and methods of context object for drawing with JavaScript
- Implementing the canvas
- Basic rectangle methods:
fillRect(),strokeRect(), &clearRect()
Links:
- Course Notes - Chapter 12 - HTML5 Canvas
- Code samples - Index page of code samples
- GitHub Repo - HTML5 Canvas GitHub Repo
35. HTML5 Media
Day 35: March 2, 2018 - Friday
Project: Study for MS 70-480 Cert Exam (Programming in HTML5 with JavaScript & CSS3)
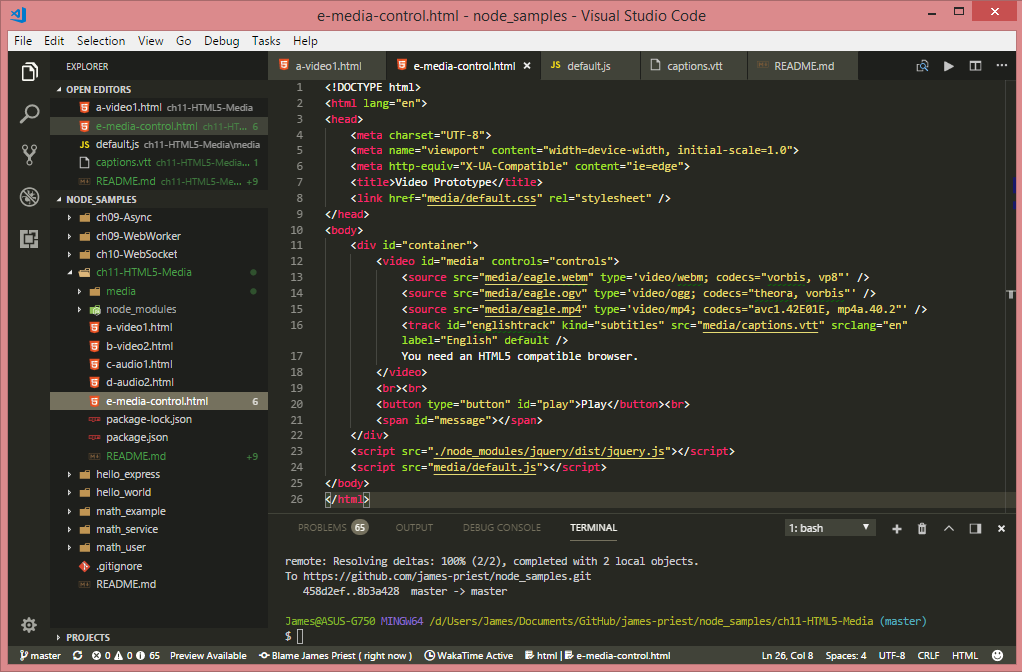
Progress: This lesson covered the use of the <video> and <audio> HTML elements as well as the HTMLMediaElement object and API.
Also covered:
<source>&<track>elements- Video formats
- Closed captioning and subtitles
- HTMLMediaElement properties, methods, & events
- Controlling media playback through code
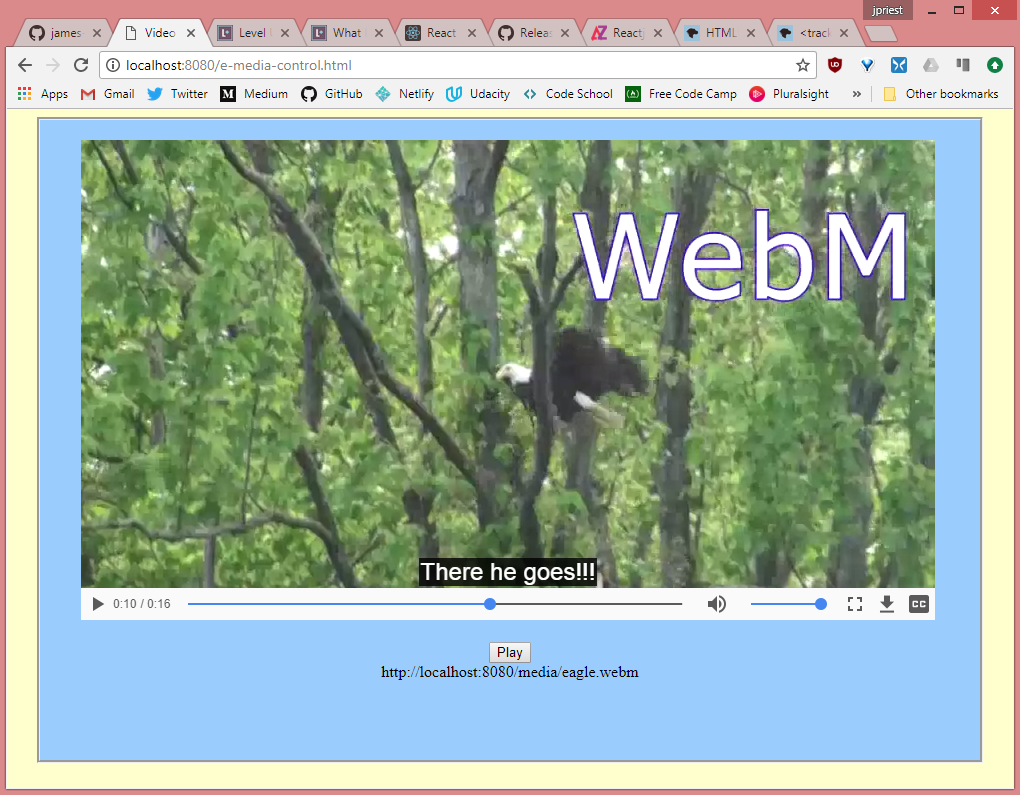
Links:
- Course Notes - Chapter 11 - HTML5 Media
- HTML5 Media code on GitHub - Sample code showing how to embed video and audio elements in page.
34. WebSocket API
Day 34: March 1, 2018 - Thursday
Project: Study for MS 70-480 Cert Exam (Programming in HTML5 with JavaScript & CSS3)
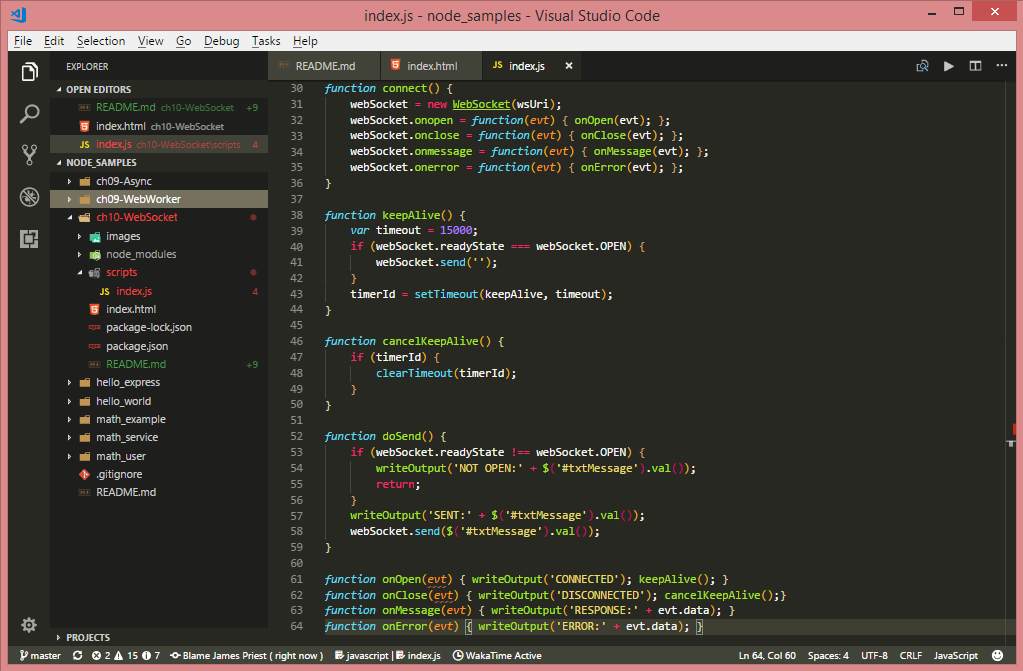
Progress: This lesson covered the use of the WebSocket protocol which establishes a two-way, bidirectional connection between the browser and the web server.
This is done with little overhead (2 bytes) and no headers. The light weight structure of the WebSocket protocol makes is an easy choice for any real-time applications such as chat, gaming, and live content.
Here’s a quick bullet list of take-away’s:
- The WebSocket protocol provides a standardized way to establish a two-way (bi-directional) connection between the browser and the web server while keeping the connection open.
- The WebSocket object contains methods to open connections, send data, & close connections
- It contains the following events:
onclose,onmessage,onerror, andonopen. - You can check the
readyStateproperty on the WebSocket object to obtain the state of the connection. - Use
ws://for WebSocket protocol orwss://for secure WebSocket protocol. - Timeouts, dropped connections, web farm implementations, and browser incompatibility are problems you must resolve when implementing WebSocket or you can use a pre-built library such as SignalR or Socket.IO.
Links:
- Course Notes - Chapter 10 - WebSocket Communications
- WebSocket example on GitHub - A basic WebSocket proof-of-concept app that calls the WebSocket.org echo server and returns a message sent to it.
33. Web Workers
Day 33: February 28, 2018 - Wednesday
Project: Study for MS 70-480 Cert Exam (Programming in HTML5 with JavaScript & CSS3)
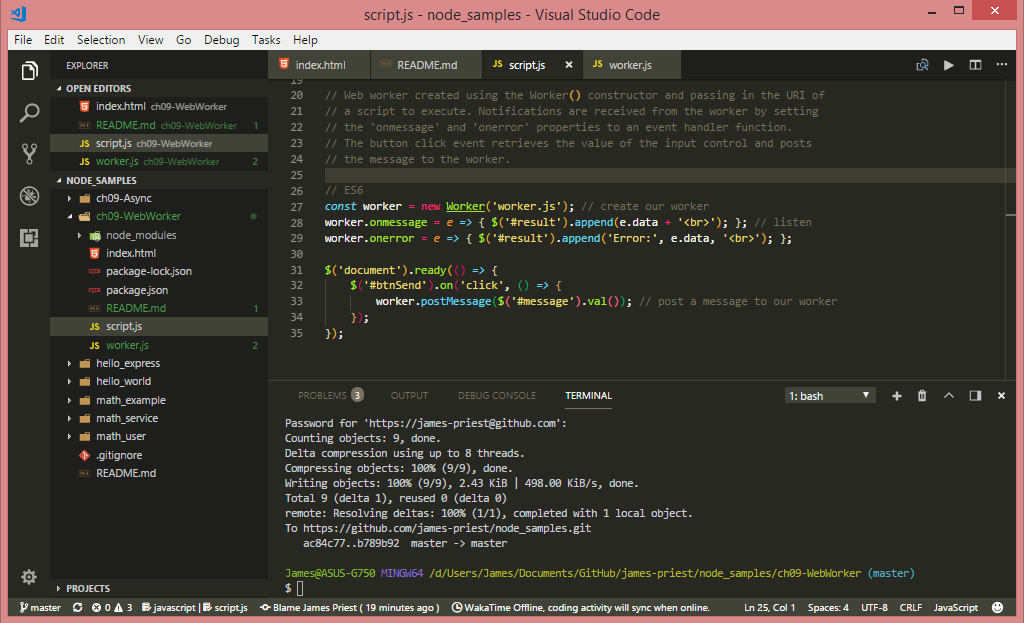
Progress: This lesson covered the use of Web Workers as a non-blocking (async) way of performing work. The worker can send messages back to the spawning task by posting messages to an event handler specified by the creator (calling script). Messages can be any object that can be serialized.
When messages are posted to and from the web worker, the message object is serialized. This creates a copy of the message, so the web worker and the creator never reference the same object.
Web workers also don’t have access to the DOM. If something needs to be posted to the DOM then that has to happen in the form of a message sent back to the creator, and the creator must access the DOM as needed.
Here’s a quick bullet list of take-away’s:
- A web worker provides asynchronous code execution.
- Communication to and from the web worker is accomplished by using the
postMessage()method. - The
postMessage()method accepts a serializable object. - The web worker and the creator cannot access the same object since a copy is made.
- The web worker does not have access to DOM elements.
Links:
- Web Worker example on GitHub - A very basic set of scripts that converts a string to uppercase.
- Demystifying Web Workers and Service Workers - Awesome slide deck with a big picture overview of Web Workers and Service Workers.
- Web Workers vs Service Workers in JavaScript - Great article with sample code.
32. jQuery Ajax & Promises
Day 32: February 27, 2018 - Tuesday
Project: Study for MS 70-480 Cert Exam (Programming in HTML5 with JavaScript & CSS3)
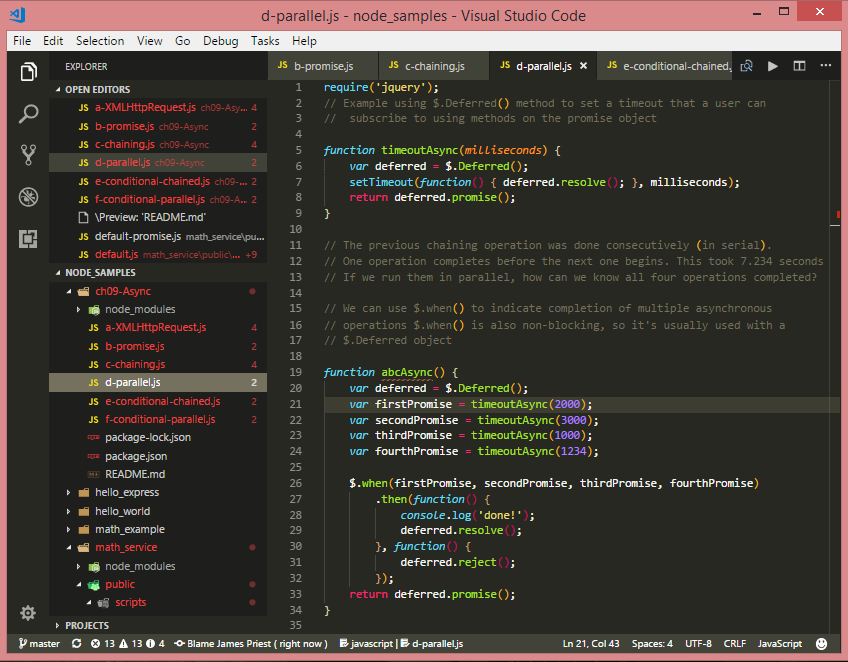
Progress: This lesson went into various asynchronous operations using jQuery ajax and jQuery promises. These are still in use as part of the jQuery library but not as modern an implementation as using ES6 Promises with the Fetch API.
Nonetheless, it’s still helpful to know these patterns since a huge majority of code-bases are using jQuery’s implementation. What was covered is the following:
- $.Deferred() object as a wrapper to the jquery promise() object
- jQuery .pipe() method for serialized(chained) async operations
- $.when() method for parallel async operations
- conditional async operations based on the result of prior async calls for both parallel and chained patterns
Links:
- Asynchronous operations examples on GitHub - These are some jQuery $.ajax() $.Deferred object and .promise() method examples
- Ajax - Async, Callback & Promise - Great Medium article on XMLHttpRequest, jQuery Ajax, & Promises
31. XMLHttpRequest & Ajax
Day 31: February 26, 2018 - Monday
Project: Study for MS 70-480 Cert Exam (Programming in HTML5 with JavaScript & CSS3)

Progress: Covered using Ajax to access Web Services created with node.js. The web services were created to use Representational State Transfer (REST) and are also known as RESTful services.
REST attempts to use standard operations of HTTP by mapping create, retrieve, update, & _delete (CRUD) operations to HTTP methods.
The object that makes this call from the browser DOM is the XMLHttpRequest object. It is either invoked directly, or through one of jQuery’s many wrapper methods. The ones I used were the following:
- Async XMLHttpRequest (for old-school backwards compatibility)
- $.ajax()
- $.get()
- $.getJSON()
- $.post()
Links: AJAX examples on GitHub - These are some XMLHttpRequests() & jQuery $.ajax() methods
30. ES6 Transpiling & Babel
Day 30: February 25, 2018 - Sunday
Project: Grow with Google Scholarship Challenge: Mobile Web track
Progress: Completed ES6 JavaScript Improved Google Udacity course.
This completes the Google Udacity Scholarship challenge! It took 30 days from start to finish and was exactly the push I needed to stay on track with my 100DaysOfCode challenge.
Now I wait until April 17th to see if I’m selected to complete the remainder of the Mobile Web Nanodegree program!
The lessons covered:
- Transpiling defined
- babel-cli & babel-preset-es2015
- package.json & build scripts
My notes on ES6 JavaScript Improved (4) - Professional Developer-fu.
Links:
- Course Notes - Offline First (1) - Introducing the Service Worker
- Course Notes - Offline First (2) - IndexedDB and Caching
- Course Notes - ES6 JavaScript Improved (1) - Syntax
- Course Notes - ES6 JavaScript Improved (2) - Functions
- Course Notes - ES6 JavaScript Improved (2.5) - Classes
- Course Notes - ES6 JavaScript Improved (3) - Built-ins
- Course Notes - ES6 JavaScript Improved (3.5) - Built-ins-Pt2
-
Course Notes - ES6 JavaScript Improved (4) - Professional Developer-fu.
- ES6 JavaScript Improved (free 4 week course) on Udacity
29. ES6 Polyfills
Day 29: February 24, 2018 - Saturday
Project: Grow with Google Scholarship Challenge: Mobile Web track

Progress: Continued with my ES6 JavaScript Improved Google Udacity course.
The lessons covered:
- Overview of browser support for ES6
- Feature testing
- Polyfills to patch missing JS features
- Polyfills for areas other than JavaScript core. Includes the following
- SVG, Canvas, Accessibility
- WebStorage (local / session), Web Sockets
- HTML5 elements & more…
My notes on ES6 JavaScript Improved (4) - Professional Developer-fu.
Links:
- Course Notes - Offline First (1) - Introducing the Service Worker
- Course Notes - Offline First (2) - IndexedDB and Caching
- Course Notes - ES6 JavaScript Improved (1) - Syntax
- Course Notes - ES6 JavaScript Improved (2) - Functions
- Course Notes - ES6 JavaScript Improved (2.5) - Classes
- Course Notes - ES6 JavaScript Improved (3) - Built-ins
- Course Notes - ES6 JavaScript Improved (3.5) - Built-ins-Pt2
-
Course Notes - ES6 JavaScript Improved (4) - Professional Developer-fu.
- ES6 JavaScript Improved (free 4 week course) on Udacity
28. ES6 Promises, Proxies, & Generators
Day 28: February 23, 2018 - Friday
Project: Grow with Google Scholarship Challenge: Mobile Web track
// Proxy code
const richard = {status: 'looking for work'};
const handler = {
    get(target, propName) {
        console.log(target);
        console.log(propName);
        return target[propName];
    }
};
const agent = new Proxy(richard, handler);
agent.status; // (1)logs the richard object, (2)logs the property being accessed,
              // (3)returns the text in richard.status
Progress: Continued with my ES6 JavaScript Improved Google Udacity course.
The lessons covered:
- Promises, Successful & Failed requests, Async operations
- Proxies, handlers, & traps
- Generators, Iterators, & yield
My notes on ES6 JavaScript Improved (3.5) - Built-ins-Pt2.
Links:
- Course Notes - Offline First (1) - Introducing the Service Worker
- Course Notes - Offline First (2) - IndexedDB and Caching
- Course Notes - ES6 JavaScript Improved (1) - Syntax
- Course Notes - ES6 JavaScript Improved (2) - Functions
- Course Notes - ES6 JavaScript Improved (2.5) - Classes
- Course Notes - ES6 JavaScript Improved (3) - Built-ins
- Course Notes - ES6 JavaScript Improved (3.5) - Built-ins-Pt2
- ES6 JavaScript Improved (free 4 week course) on Udacity
27. ES6 Maps & WeakMaps
Day 27: February 22, 2018 - Thursday
Project: Grow with Google Scholarship Challenge: Mobile Web track
/*
 * Using array destructuring, fix the following code to print the
 * keys and values of the `members` Map to the console.
 */

const members = new Map();

members.set('Evelyn', 75.68);
members.set('Liam', 20.16);
members.set('Sophia', 0);
members.set('Marcus', 10.25);

for (const member of members) {
    const [key, value] = member;
    console.log(key, value);
}
Progress: Continued with my ES6 JavaScript Improved Google Udacity course.
The lessons covered:
- Maps & WeakMaps
- Iteration & Looping
- Creating & modifying Map objects
My notes on ES6 JavaScript Improved (3) - Built-ins.
Links:
- Course Notes - Offline First (1) - Introducing the Service Worker
- Course Notes - Offline First (2) - IndexedDB and Caching
- Course Notes - ES6 JavaScript Improved (1) - Syntax
- Course Notes - ES6 JavaScript Improved (2) - Functions
- Course Notes - ES6 JavaScript Improved (2.5) - Classes
- Course Notes - ES6 JavaScript Improved (3) - Built-ins
- ES6 JavaScript Improved (free 4 week course) on Udacity
26. ES6 Built-ins, Symbols, Sets & WeakSets
Day 26: February 21, 2018 - Wednesday
Project: Grow with Google Scholarship Challenge: Mobile Web track
const bowl = {
  [Symbol('apple')]: { color: 'red', weight: 136.078 },
  [Symbol('banana')]: { color: 'yellow', weight: 183.15 },
  [Symbol('orange')]: { color: 'orange', weight: 170.097 },
  [Symbol('banana')]: { color: 'yellow', weight: 176.845 }
};
console.log(bowl);
Progress: Continued with my ES6 JavaScript Improved Google Udacity course.
The lessons covered:
- Symbols
- Iteration & Iterable protocols
- Sets & Weak Sets
My notes on ES6 JavaScript Improved (3) - Built-ins.
Links:
- Course Notes - Offline First (1) - Introducing the Service Worker
- Course Notes - Offline First (2) - IndexedDB and Caching
- Course Notes - ES6 JavaScript Improved (1) - Syntax
- Course Notes - ES6 JavaScript Improved (2) - Functions
- Course Notes - ES6 JavaScript Improved (2.5) - Classes
- Course Notes - ES6 JavaScript Improved (3) - Built-ins
- ES6 JavaScript Improved (free 4 week course) on Udacity
25. ES6 Classes, Subclasses, & Prototypal Inheritance
Day 25: February 20, 2018 - Tuesday
Project: Grow with Google Scholarship Challenge: Mobile Web track
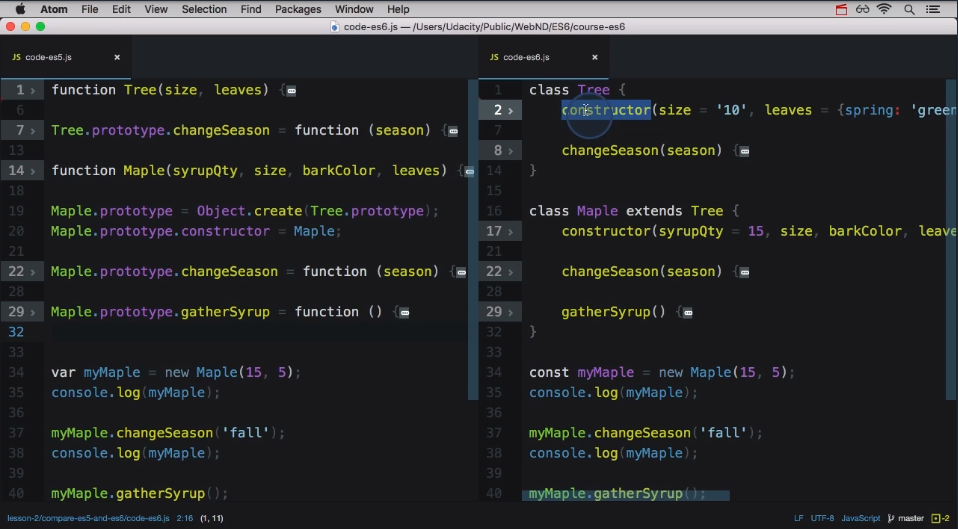
Progress: Continued with my ES6 JavaScript Improved Google Udacity course.
The lessons covered:
- JavaScript prototypal inheritance
- ES5 vs. ES6 Classes
class,super, andextendskeywords- Working with subclasses
My notes on ES6 JavaScript Improved (2.5) - Classes.
Links:
- Course Notes - Offline First (1) - Introducing the Service Worker
- Course Notes - Offline First (2) - IndexedDB and Caching
- Course Notes - ES6 JavaScript Improved (1) - Syntax
- Course Notes - ES6 JavaScript Improved (2) - Functions
- Course Notes - ES6 JavaScript Improved (2.5) - Classes
- ES6 JavaScript Improved (free 4 week course) on Udacity
24. ES6 ‘this’ Keyword & Default Parameters
Day 24: February 19, 2018 - Monday
Project: Grow with Google Scholarship Challenge: Mobile Web track
// object defaults with object destructuring
function buildHouse({floors = 1, color = 'red', walls = 'brick'} = {}) {
    return `Your house has ${floors} floor(s) with ${color} ${walls} walls.`;
}

// tests
console.log(buildHouse());
console.log(buildHouse({}));
console.log(buildHouse({floors: 3, color: 'yellow'}));

// Your house has 1 floor(s) with red brick walls.
// Your house has 1 floor(s) with red brick walls.
// Your house has 3 floor(s) with yellow brick walls.
Progress: Continued with my ES6 JavaScript Improved Google Udacity course.
The lessons covered:
thiskeyword with standard functionsthiskeyword with arrow functions- Default function parameters using arrays
- Default function parameters using objects
- Array defaults with array destructuring
- Object defaults with object destructuring
My notes on ES6 JavaScript Improved (2) - Functions.
Links:
- Course Notes - Offline First (1) - Introducing the Service Worker
- Course Notes - Offline First (2) - IndexedDB and Caching
- Course Notes - ES6 JavaScript Improved (1) - Syntax
- Course Notes - ES6 JavaScript Improved (2) - Functions
- ES6 JavaScript Improved (free 4 week course) on Udacity
23. ES6 Arrow Functions
Day 23: February 18, 2018 - Sunday
Project: Grow with Google Scholarship Challenge: Mobile Web track
Before
// convert to an arrow function
const squares = [1, 2, 3, 4, 5, 6, 7, 8, 9, 10].map(function(square) {
  return square * square;
});

let output = '';
squares.forEach(function(square){
  output += ` ${square}`;
});
console.log(output.trim());
After
const squares = [1, 2, 3, 4, 5, 6, 7, 8, 9, 10].map(square => square * square);
console.log(...squares);
Output: 1 4 9 16 25 36 49 64 81 100
Progress: Continued with my ES6 JavaScript Improved Google Udacity course.
The lessons covered:
- Spread (
...) operator - (
...) Rest parameter - Arrow functions
- Syntactic variations of arrow functions
- Parens / no parens / empty parens / underscore
- “Concise body syntax” vs. “block body syntax”
Links:
- ES6 JavaScript Improved (free 4 week course) on Udacity
- Course Notes - Offline First (1) - Introducing the Service Worker
- Course Notes - Offline First (2) - IndexedDB and Caching
- Course Notes - ES6 JavaScript Improved (1) - Syntax
- Course Notes - ES6 JavaScript Improved (2) - Functions
22. ES6 Object Literal Shorthand & For..of Loops
Day 22: February 17, 2018 - Saturday
Project: Grow with Google Scholarship Challenge: Mobile Web track
// Object Literal shorthand
let type = 'quartz';
let color = 'rose';
let carat = 21.29;

let gemstone = { type, color, carat };

console.log(gemstone);

// for..of loop
const digits = [0, 1, 2, 3, 4, 5, 6, 7, 8, 9];

for (const digit of digits) {
  console.log(digit);
}
Progress: Continued with my ES6 JavaScript Improved Google Udacity course.
The lessons covered:
- Object literal shorthand
- Iteration
- Family of For loops
- For..of loop
Links:
- ES6 JavaScript Improved (free 4 week course) on Udacity
- Course Notes - Offline First (1) - Introducing the Service Worker
- Course Notes - Offline First (2) - IndexedDB and Caching
- Course Notes - ES6 JavaScript Improved (1) - Syntax
21. ES6 Template Literals & Destructuring Arrays
Day 21: February 16, 2018 - Friday
Project: Grow with Google Scholarship Challenge: Mobile Web track
// Template Literal syntax
var note = `${teacher.name},

  Please excuse ${student.name}.
  He is recovering from the flu.

  Thank you,
  ${student.guardian}`;
Progress: Continued with my ES6 JavaScript Improved Google Udacity course.
The lesson covered:
letandconstsyntax and when to use each- Use of Template Literals for true string interpolation
- Destructuring of arrays & objects with simpler ES6 syntax
You can read more here: My notes - ES6 JavaScript Improved - Syntax.
Link to Work:
- Full Course Notes - ES6 JavaScript Improved - Syntax
- 4-part Udacity course ES6 JavaScript Improved (free 4 week course)
20. ES6 JavaScript Improved
Day 20: February 15, 2018 - Thursday
Project: Grow with Google Scholarship Challenge: Mobile Web track
Progress: Started my new Google Udacity course called ES6 JavaScript Improved.
The course is broken down into the following lessons:
- Syntax - let, const, destructuring, for..of loops
- Functions - arrow functions,
thiskeyword, classes & subclasses - Built-ins - Sets, Maps, WeakSets, & WeakMaps, Promises, generators
- Polyfills & transpilers - This lets you convert from ES6 to ES5
You can read more here: My notes - ES6 JavaScript Improved - Syntax.
Link to Work:
- Full Course Notes - ES6 JavaScript Improved - Syntax
- 4-part Udacity course ES6 JavaScript Improved (free 4 week course)
19. Cache Avatars
Day 19: February 14, 2018 - Wednesday
Project: Grow with Google Scholarship Challenge: Mobile Web track
Progress: The final few sections of this course combined all three of the following:
- Service Workers
- IndexedDB
- Cache Storage with Cache API.
You can read more here: My notes - IndexedDB and Caching - Cache Avatars.
Link to Work:
- Full Course Notes - IndexedDB and Caching
- Jake’s IDB Promised Library https://github.com/jakearchibald/idb
- 3-part Udacity course Offline Web Applications by Google (free 3 week course)
18. Cache Photos
Day 18: February 13, 2018 - Tuesday
Project: Grow with Google Scholarship Challenge: Mobile Web track
Progress: This section deals with retrieving requested images from local Cache Storage. If the images do not exists locally then a fetch request is made to the network.
Once the image is retrieved, it is displayed to the screen and and saved to cache for future use.
You can read more here: My notes - IndexedDB and Caching - Cache Photos.
Link to Work:
- Full Course Notes - IndexedDB and Caching
- Jake’s IDB Promised Library https://github.com/jakearchibald/idb
- 3-part Udacity course Offline Web Applications by Google (free 3 week course)
17. Display Data & Clean Database
Day 17: February 12, 2018 - Monday
Project: Grow with Google Scholarship Challenge: Mobile Web track
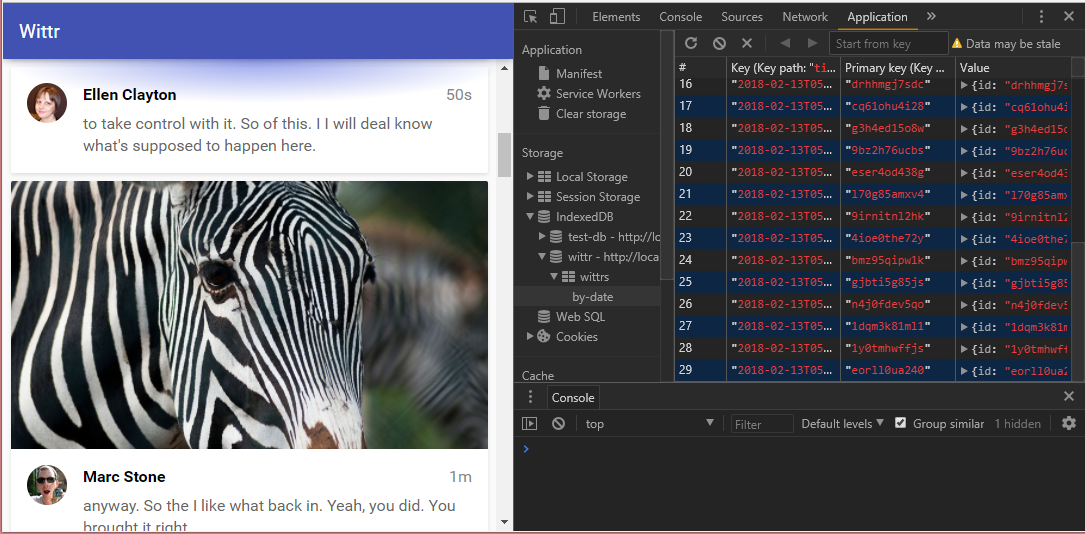
Progress: In this section of the course we take the data from the IndexedDB Object Store and write code to display it on the page.
At the same time we create an index and cursor through it to remove any old and stale posts from our database. This makes room for new data that we stream in through web sockets.
You can read more here: My notes - IndexedDB and Caching - Display IDB Data on Page.
Link to Work:
- Full Course Notes - IndexedDB and Caching
- Jake’s IDB Promised Library https://github.com/jakearchibald/idb
- 3-part Udacity course Offline Web Applications by Google (free 3 week course)
16. Populate the IDB Database
Day 16: February 11, 2018 - Sunday
Project: Grow with Google Scholarship Challenge: Mobile Web track
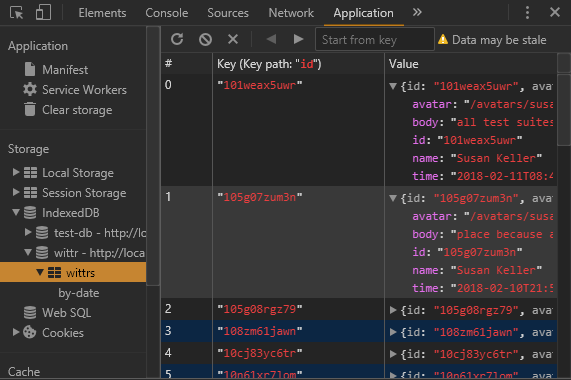
Progress: This section consisted of creating an IDB database (wittr) and then writing data to the IDB object store (wittrs).
Once the database was created and populated an index was also created to sort by date.
You can click the link below to read about the process and see the code required to produce the IDB results.
You can read more here: My notes - IndexedDB and Caching - IDB Cache & Display Entries.
Link to Work:
- Full Course Notes - IndexedDB and Caching
- Jake’s IDB Promised Library https://github.com/jakearchibald/idb
- 3-part Udacity course Offline Web Applications by Google (free 3 week course)
15. IDB Cache & Display Entries
Day 15: February 10, 2018 - Saturday
Project: Grow with Google Scholarship Challenge: Mobile Web track
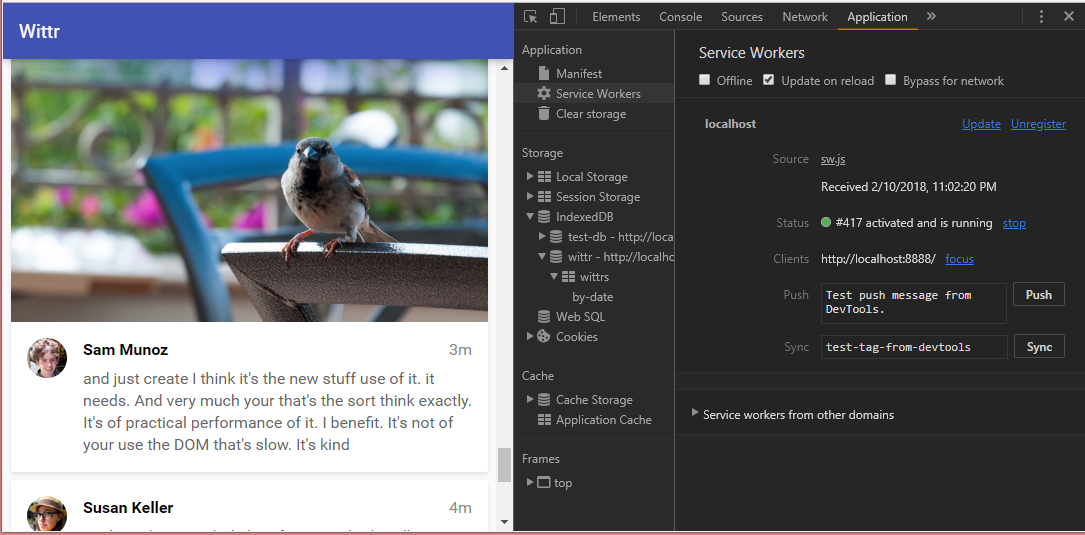
Progress: This section of the lesson covered the data that will be save to the IndexedDB Object Store as well as the structure of data.
The process of retrieving existing posts from local storage and then using web sockets to update the feed is also discussed.
Lastly, specifics such as unique index and keys for the data are discussed.
You can read more here: My notes - IndexedDB and Caching - IDB Cache & Display Entries.
Link to Work:
- Full Course Notes - IndexedDB and Caching
- Jake’s IDB Promised Library https://github.com/jakearchibald/idb
- 3-part Udacity course Offline Web Applications by Google (free 3 week course)
14. IDB Cursors and Indexes
Day 14: February 9, 2018 - Friday
Project: Grow with Google Scholarship Challenge: Mobile Web track
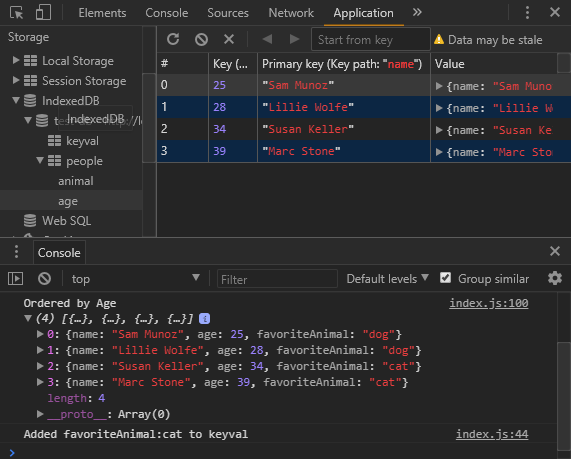
Progress: This is the third and final deep dive into IndexedDB fundamentals. Here we cover using cursors and the syntax required to wrap these in Promises rather than nested callback hell. This includes:
- openCursor()
- cursor.value
- cursor.continue()
- cursor.advance()
- cursor.update()
- cursor.delete()
You can read more here: My notes - IndexedDB and Caching - IDB Cursors and Indexes.
Link to Work:
- Full Course Notes - IndexedDB and Caching
- Jake’s IDB Promised Library https://github.com/jakearchibald/idb
- 3-part Udacity course Offline Web Applications by Google (free 3 week course)
13. Diving Deeper into IDB
Day 13: February 8, 2018 - Thursday
Project: Grow with Google Scholarship Challenge: Mobile Web track

Progress: This section got into deeper into the IDB API. Some of the items covered were:
- Creating, updating, and accessing multiple object stores
- Database versioning with multiple instances
- Transactions with multiple operations
- Creation and use of indexes
- Filtering data on index
Lots of sample code and screen shots for reference.
You can read more here: My notes - IndexedDB and Caching - Diving Deeper with IDB.
Link to Work:
- Full Course Notes - IndexedDB and Caching
- Jake’s IDB Promised Library https://github.com/jakearchibald/idb
- 3-part Udacity course Offline Web Applications by Google (free 3 week course)
12. Getting Started with IDB
Day 12: February 7, 2018 - Wednesday
Project: Grow with Google Scholarship Challenge: Mobile Web track

Progress: Here we got into the code behind IndexedDB. We quickly covered each of the following:
- Opening a database
- Creating an object store
- Writing data to the object store
- Reading data
- Using transactions
- Inspecting IDB in DevTools
You can read more here: My notes - IndexedDB and Caching.
Link to Work:
- Full Course Notes - IndexedDB and Caching
- Jake’s IDB Promised Library https://github.com/jakearchibald/idb
- 3-part Udacity course Offline Web Applications by Google (free 3 week course)
11. IndexedDB Promised Library
Day 11: February 6, 2018 - Tuesday
Project: Grow with Google Scholarship Challenge: Mobile Web track
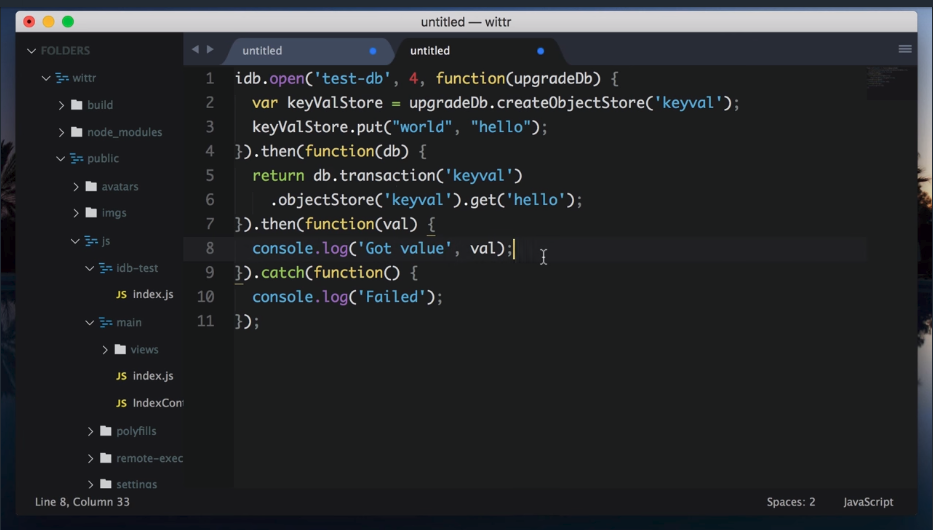
Progress: Learned about IndexedDB and how it can be used by all the major browsers to provide database capabilities. This is a NoSQL rather than relational database and is perfectly suited to persist data related to a site.
This lesson also covers some of the deficiencies inherent in the asynchronous implementations of IndexedDB. It was created before Promises and therefore uses a messy callback architecture.
We look at using a tiny wrapper library written by Jake Archibald which allows us to use Promises rather than events.
You can read more here: My notes - IndexedDB and Caching.
Link to Work:
- Full Course Notes - IndexedDB and Caching
- Jake’s IDB Promised Library https://github.com/jakearchibald/idb
- 3-part Udacity course Offline Web Applications by Google (free 3 week course)
10. Triggering a Service Worker Update
Day 10: February 5, 2018 - Monday
Project: Grow with Google Scholarship Challenge: Mobile Web track
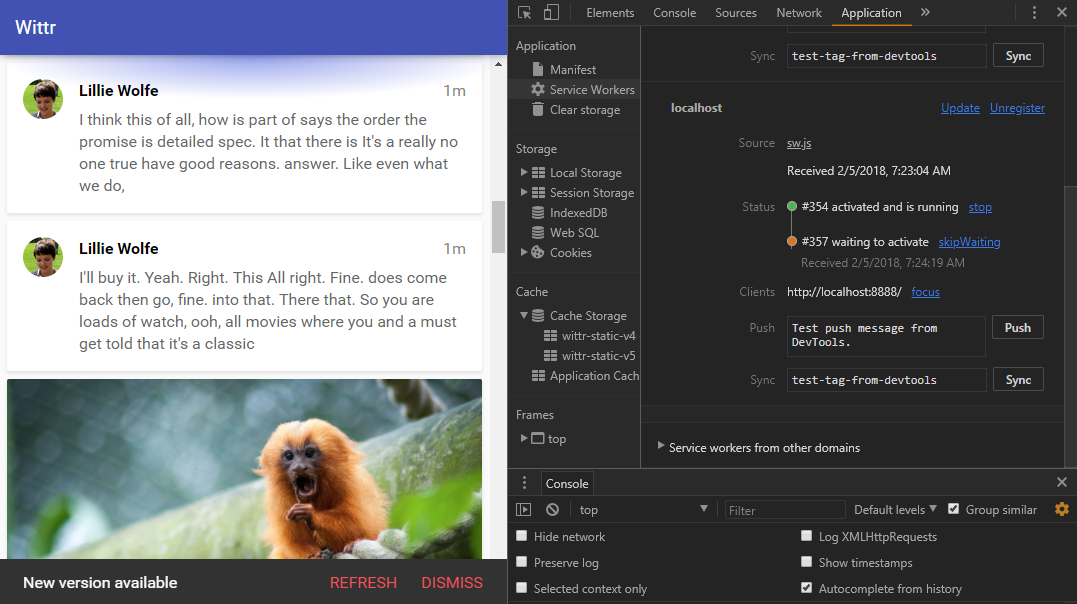
Progress: Learned how to trigger a cache and Service Worker update for versioned web content. This provides the user with a notification and creates a new cache store instance separate from the existing cache store.
The versioning of caches stores ensures that the current Service Worker does not experience any interruptions servicing it’s pages when new content arrives.
The user is given the option of updating immediately or dismissing the notification and updating with the normal Service Worker lifecycle. This occurs when the old Service Worker is released.
You can read more here: My notes - Triggering an Update.
Link to Work:
- Full Course Notes - Introducing the Service Worker
- 3-part Udacity course Offline Web Applications by Google (free 3 week course)
9. Update Notification with Service Workers
Day 9: February 4, 2018 - Sunday
Project: Grow with Google Scholarship Challenge: Mobile Web track

Progress: Learned how to provide the user with an update notification when new content is available through a new Service Worker instance.
When a new Service Worker instance is installed it remains in a ‘waiting’ state until the current Service Worker is done servicing all pages in its scope and is released. This usually requires navigating off site and back again.
These changes alert the user to new content so they may update with a button click.
You can read more here: My notes - Adding UX to the Update Process.
Link to Work:
- Full Course Notes - Introducing the Service Worker
- 3-part Udacity course Offline Web Applications by Google (free 3 week course)
8. Updating Static Cache
Day 8: February 3, 2018 - Saturday
Project: Grow with Google Scholarship Challenge: Mobile Web track
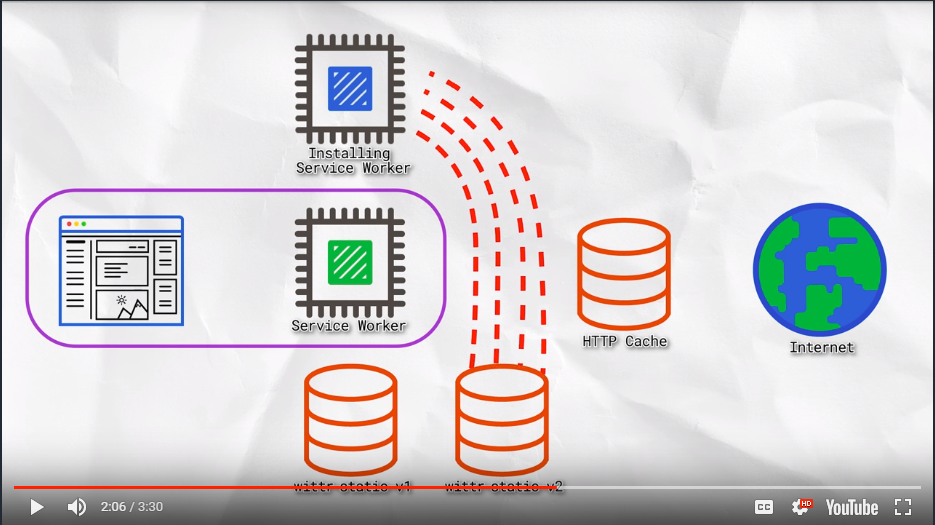
Progress: Learned how to update static cache for a site by creating versioned cache stores.
By changing the name of a cache store from say ‘my-app-v1’ to ‘my-app-v2’ we are causing the service worker to spin up a new instance. The new service worker instance gets installed but not activated until the old service worker is released.
We create a separate cache store because we don’t want to disrupt the cache that’s already being used by the old service worker and the pages it controls.
Once the old service worker is released, we delete the old cache store so the next page load gets the latest resources from the new cache.
You can read more here: My notes - Updating the Static Cache.
Link to Work:
- Full Course Notes - Introducing the Service Worker
- 3-part Udacity course Offline Web Applications by Google (free 3 week course)
7. Cache API
Day 7: February 2, 2018 - Friday
Project: Grow with Google Scholarship Challenge: Mobile Web track
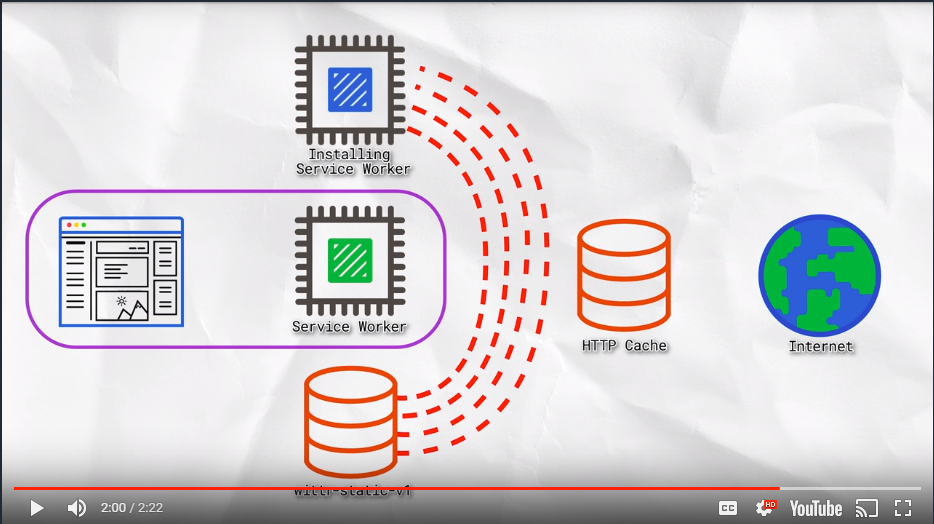
Progress: Learned the basics of the Cache API for storing offline versions of a site. This includes the use of:
- CacheStorage.open()
Returns a Promise that resolves to the Cache object matching the cacheName (a new cache is created if it doesn’t already exist.) - Cache.put(request, response)
Takes both a request and its response and adds it to the given cache. - Cache.add(request)
Takes a URL, retrieves it and adds the resulting response object to the given cache. This is functionally equivalent to calling fetch(), then using Cache.put() to add the results to the cache. - Cache.match(request, options)
Returns a Promise that resolves to the response associated with the first matching request in the Cache object. - Cache.addAll(requests)
Takes an array of URLs, retrieves them, and adds the resulting response objects to the given cache. - Cache.matchAll(request, options)
Returns a Promise that resolves to an array of all matching requests in the Cache object.
Also learned about the install and activate events of a Service Worker.
Full examples can be found in my notes under - Caching and Serving Assets.
Link to Work:
- Introducing the Service Worker - Notes
- 3-part Udacity course Offline Web Applications by Google (free 3 week course)
6. Hijacking Requests
Day 6: February 1, 2018 - Thursday
Project: Grow with Google Scholarship Challenge: Mobile Web track
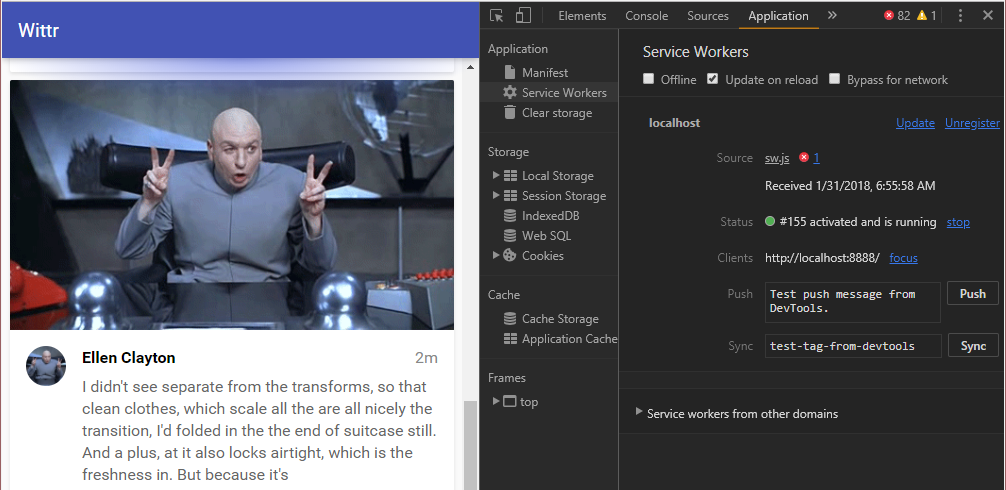
Progress: Learned about the following.
- How to listen for and capture
fetchevents - How to use the
fetchEvent.respondWith()method - Using
Fetch APIas a better and modern alternative to XMLHttpRequest.
Here’s an example of this kind of event handling.
self.addEventListener('fetch', function(event) {
  // TODO: only respond to requests with a url ending in ".jpg"
  if ( event.request.url.endsWith( '.jpg' ) ) {
    event.respondWith(
      fetch( '/imgs/dr-evil.gif' )
    );
  }
});
Full examples can be found in my notes.
Link to Work:
- Introducing the Service Worker - Notes
- 3-part Udacity course Offline Web Applications by Google (free 3 week course)
5. Service Worker Dev Tools
Day 5: January,31 2018 - Wednesday
Project: Grow with Google Scholarship Challenge: Mobile Web track
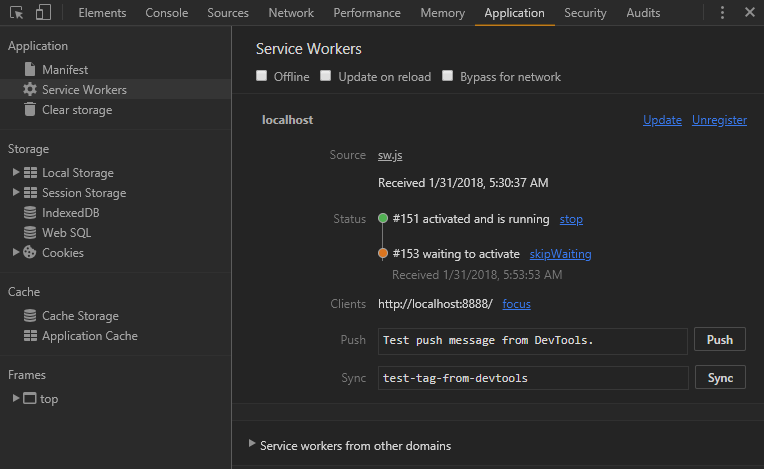
Progress: Learned about Chrome Canary, the nightly build of Chrome with bleeding edge features. It can be run along side Chrome Stable but can often break as well. It receives a new feature push almost daily.
Chrome Stable has the Service Worker features already baked in and might be a better choice to test with since it is less likely to crash. That is what I have pictured above.
Link to Work:
- Introducing the Service Worker - Notes
- 3-part Udacity course Offline Web Applications by Google (free 3 week course)
- Chrome Canary - Nightly build of latest Chrome bits.
4. The Service Worker Lifecycle
Day 4: January,30 2018 - Tuesday
Project: Grow with Google Scholarship Challenge: Mobile Web track

Progress: Learned about the Service Worker Lifecycle.
This is part of a larger, 3-part Udacity series called Offline Web Applications by Google. It contains the following lessons and is FREE!
- The Benefits of Offline First
- Introducing the Service Worker
- IndexedDB and Caching
Link to Work:
- Introducing the Service Worker - Notes
- 3-part Udacity course Offline Web Applications by Google (free 3 week course)
3. An Overview of the Service Worker
Day 3: January,29 2018 - Monday
Project: Grow with Google Scholarship Challenge: Mobile Web track
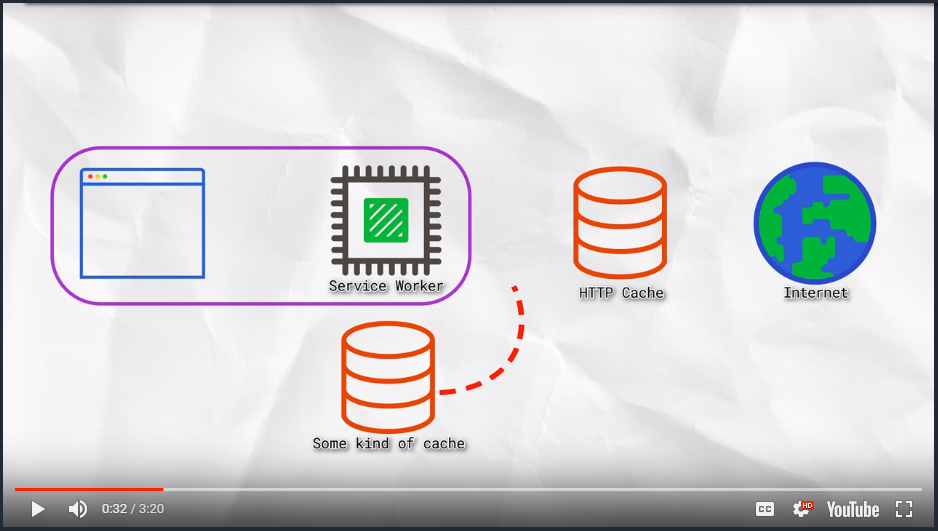
Progress: Learned what the Service Worker is:
- a JavaScript file that sits between you and network requests.
- a type of Web Worker meaning it runs separately from your page.
- a process that is invisible to the user and that can’t access the DOM.
But, it does control pages by intercepting requests as the browser makes them.
To see full notes along with screen captures click the link below.
Link to Work: My notes on: Introducing the Service Worker
2. The Benefits of Offline First
Day 2: January,28 2018 - Sunday
Project: Grow with Google Scholarship Challenge: Mobile Web track
Progress: Lesson 2: The Benefits of Offline First - Jake Archibald
The Benefits of Offline First course was broken down into 13 segments. It discussed the use of HTTP Cache and laid out a new paradigm which loads content from cache first rather than relying on network connectivity to determine if content gets displayed.
This solves for all three of the following use case scenarios:
- Great connectivity
- Poor connectivity
- Offline
Offline First delivers the page (header and/or content) from cache FIRST, and THEN attempts to fetch content from the network.
Lastly, it introduces the Service Worker.

It’s billed as a new browser feature and a total game changer- the greatest paradigm shift since asynchronous operations and one that allows you to control the network rather than the network control you.
1. Grow With Google - Mobile Web - Getting Started
Day 1: January,27 2018 - Saturday
Project: Grow with Google Scholarship Challenge: Mobile Web track
Progress: Lesson 1: Welcome video.
Welcome video got us set up on the discussion forums, Slack, and basically gave a Scholarship Overview.
Looks like the program is broken up into 10 courses. These are:
- Welcome! Important Details on your Scholarship
- The Benefits of Offline First
- Introducing the Service Worker
- IndexedDB and Caching
- Next Up
- JavaScript Syntax Updates
- JavaScript ES6 Functions
- JavaScript Built-ins
- Professional Developer-fu - polyfills & transpiling ES6
- Challenge Course Wrap Up
Looks like some nice coverage of things I want to dive into deeper!
Round 2 Preflight Checklist
Day 0: January 26, 2018 - Friday
Project:
- Create 100 Days of Code Round 2 Log
- Grow with Google Scholarship Challenge: Mobile Web track
Progress: Today was about getting ready to start Round 2! I have created a new R2 repo and log on GitHub and have gone through the Welcome video for my Grow with Google Scholarship: Mobile Web course.
I am excited and ready to jump in with both feet!
Link to work: