Chapter 13 - Drag & Drop
Notes from Programming in HTML5 with JavaScript & CSS3 Training Guide by Glenn Johnson.
This is part of my study material for passing Microsoft’s Exam 70-480: Programming in HTML5 with JavaScript & CSS3 certification exam.
Prior to HTML5, the ability to use drag and drop operations was possible only with certain browsers and was typically implemented by using a third-party library such as jQuery.
Now Drag and drop is a first-class citizen of HTML5. You might still use jQuery for other functionality but it’s not required for drag and drop.
1. Dragging and dropping
Making drag and drop part of HTML5 means that you can get browser compatibility and browser integration. This can even extend to integration with the operating system.
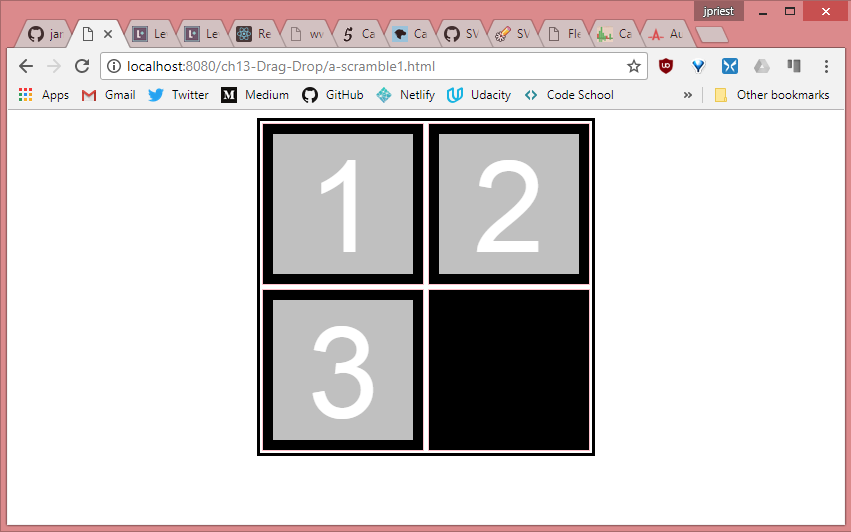
To illustrate the drag and drop technique, consider the following HTML page, which defines a large square container inside it.
<!DOCTYPE html>
<html lang="en">
<head>
    <meta charset="UTF-8">
    <meta name="viewport" content="width=device-width, initial-scale=1.0">
    <meta http-equiv="X-UA-Compatible" content="ie=edge">
    <title>Scramble 1</title>
    <link rel="stylesheet" href="a-scramble.css">
</head>
<body>
    <div id="container">
        <div id="hole1" class="hole"><div id="item1" class="item">1</div></div>
        <div id="hole2" class="hole"><div id="item2" class="item">2</div></div>
        <div id="hole3" class="hole"><div id="item3" class="item">3</div></div>
        <div id="hole4" class="hole"></div>
    </div>

    <script src="https://code.jquery.com/jquery-3.3.1.slim.min.js"
    integrity="sha256-3edrmyuQ0w65f8gfBsqowzjJe2iM6n0nKciPUp8y+7E="
    crossorigin="anonymous"></script>
    <script src="a-scramble1.js"></script>
</body>
</html>
This HTML document contains a <div> element whose id is called container. Inside the container are four <div> elements that are “holes” which can contain an item. The first three are populated.
The CSS uses flexbox for centering and contains the following rules.
body {
    display: flex;
    justify-content: center;
}
#container {
    border: solid;
    width: 332px;
    height: 332px;
    display: flex;
    flex-wrap: wrap;
    align-items: center;
    justify-content: space-around;
}
.hole {
    background-color: black;
    border: 1px pink solid;
    width: 160px;
    height: 160px;
    display: flex;
    align-items: center;
    justify-content: center;
}
.item {
    font-size: 128px;
    font-family: Arial, Helvetica, sans-serif;
    width: 140px;
    height: 140px;
    background-color: #C0C0C0;
    color: #FFF;
    text-align: center;
    user-select: none;
}
The body rule centers the container <div> horizontally on the page. The #container rule sets flexbox display to center and align each hole (<div id="hole">).
The rules under .hole set flexbox display to center each item element (<div id="item">) within each hole. The final rule is for the items and it sets a gray square with a large, centered number. The last part of the style sets user-select: none; to keep the user from accidentally selecting the text when trying to do a drag.
Live sample: https://james-priest.github.io/node_samples/ch13-Drag-Drop/a-scramble1.html
2. Browser support
There are two tools I use to make sure the code I write works in as many browsers and platforms as possible. In other words, I get cross-browser compliance and as wide a coverage as possible for the CSS, JavaScript, and HTML5 features I use.
The two tools are:
- Can I Use… (https://caniuse.com/)
- CSS Autoprefixer (https://autoprefixer.github.io/)
3. Can I Use
This is a brilliant tool that allows you to search for any HTML, JavaScript or CSS feature and see what the current browser coverage is on the feature. This allows you to then make an informed decision on whether to use the feature as is, use it with a polyfill and/or autoprefix, or to find a separate way altogether to implement the functionality.
For instance, we have a CSS rule that implements user-select: none;. If I then go to http://caniuse.com, I can get all sorts of information on that feature.
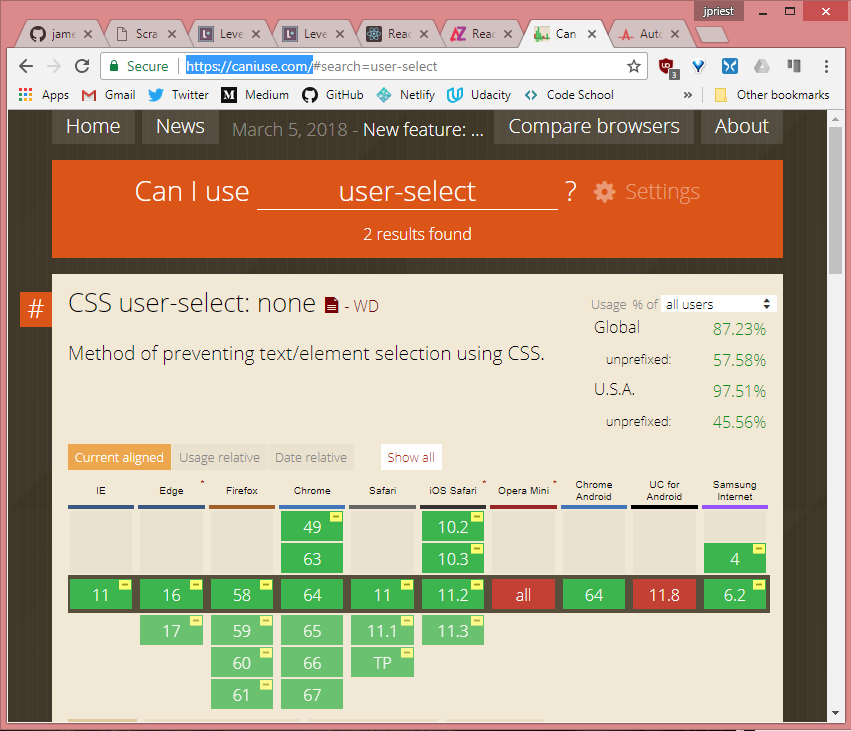
Here I see all the browser that currently support the feature along with the version number that began support for it. This includes IE11, Edge16+, Firefox58+, Chrome64+, etc. Additionally, I can hover over any one of the browser boxes to see support notes, release date, and market share to get the percentage of users using that particular platform!
The information I find really useful though are the statistics on the right hand side of the page. Here we see that globally my user-select feature will be supported in 87.23% of all browser and 97.51% of browsers domestically.
The data that’s particularly interesting are the unprefixed numbers. This shows we’ll only have 57.58% & 45.56% browser support, respectively, without including autoprefixing.
This means we’ll effectively lose half our user-base if we don’t autoprefix our CSS.
4. CSS Autoprefixing
So, what’s autoprefixing? That brings us to tool #2.
Autoprefixing is the process of using browser-specific css to ensure a particular feature is rendered properly on that platform.
Take a look at the interface of CSS Autoprefixer.
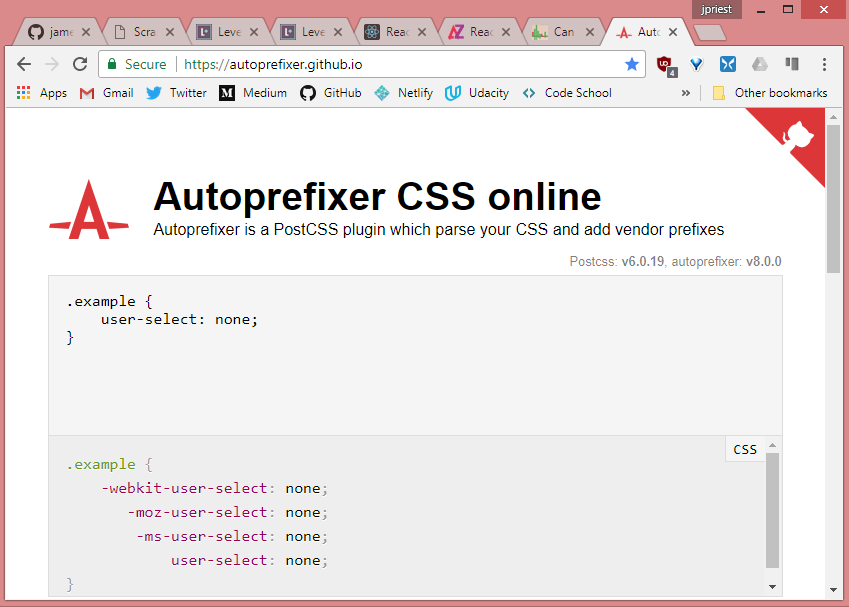
The way it works is, we copy our CSS into the source container and the CSS prefixed output is displayed in the output container. We can then copy and paste this back into our css file.
For the record, this is the manual way of achieving this. There are many pre and post processor solutions that will do this for you automatically, but these require installation and configuration. For now, the quick and dirty solution is to simply copy and paste.
As you can see, user-select: none; outputs four different rules or declarations to be compliant across various browsers.
Using the new CSS ensures the feature functionality will jump back up from 57 & 45 percent to 87 and 97 percent, respectively.
The final step, once we’re done working with our CSS, is to copy the contents of our entire CSS into the source container in order to get a finalized output copy.
For purposes of these notes I will keep the CSS simple and unprefixed.
5. Dragging
To specify to the browser that an element can be dragged, use the draggable attribute. It has three valid values: true, false, and auto. For most browsers auto is the default which means the browser decides whether the element should be draggable. For example, the <img> element is usually draggable by default, but a <div> is not.
In this HTML sample the item is a <div> element, and it’s not draggable by default so we need to add the draggable attribute.
<div id="container">
    <div id="hole1" class="hole">
        <div id="item1" draggable="true"  class="item">1</div>
    </div>
    <div id="hole2" class="hole">
        <div id="item2" draggable="true"  class="item">2</div>
    </div>
    <div id="hole3" class="hole">
        <div id="item3" draggable="true"  class="item">3</div>
    </div>
    <div id="hole4" class="hole"></div>
</div>
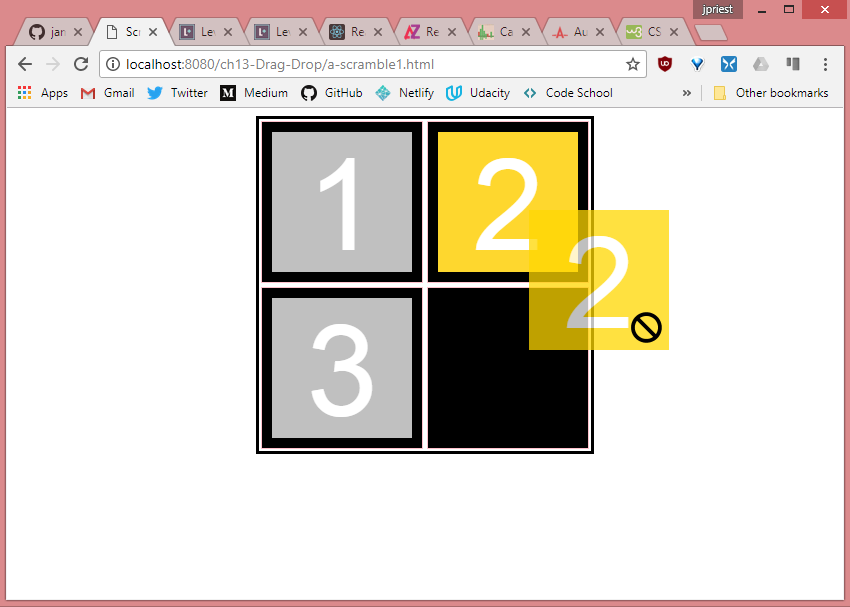
After adding the draggable attribute to the items, you can drag them.
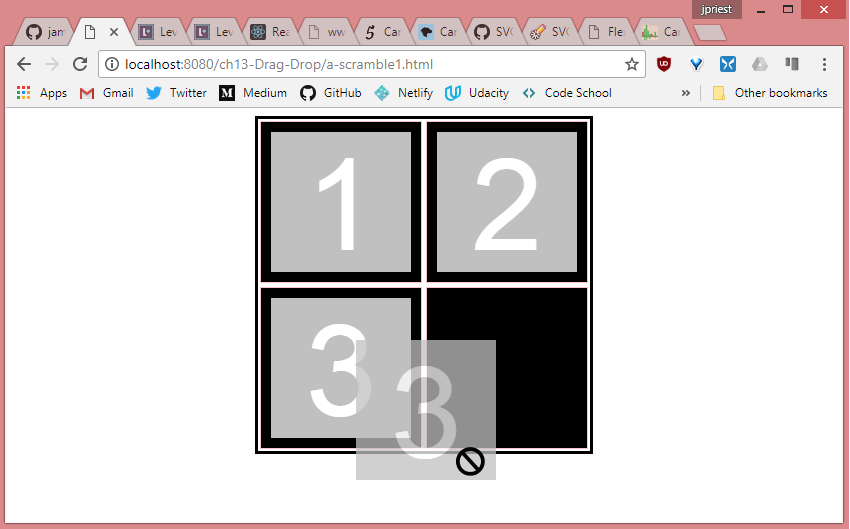
Live sample: https://james-priest.github.io/node_samples/ch13-Drag-Drop/a-scramble2.html
You can drag and item, but the item contains the no-entry cursor symbol to indicate that the item cannot be dropped.
6. Understanding drag events
When dragging and dropping, there are events that are based on the dragged element, and there are events based on the drop target. Using these events, you should be able to customize the drag and drop operation as needed. The following events are based on the dragged element.
- dragstart Triggers when the drag is started
- drag Triggers continuously as the element is being dragged
- dragend Triggers when the drag is finished
The following code is placed in the scramble1.js file and shows the use of the dragstart and dragend events to change the style of the item being dragged until the dragging ends.
var $draggedItem;

$(document).ready(function() {
    $('.item').on('dragstart', dragging);
    $('.item').on('dragend', draggingEnded);
});

function dragging(e) {
    $(e.target).addClass('dragging');
    $draggedItem = $(e.target);
}

function draggingEnded(e) {
    $(e.target).removeClass('dragging');
}
The example uses the jQuery document ready function to subscribe to the dragstart and dragend events on all elements that have the CSS class ‘item’ assigned. The dragging() function add the ‘dragging’ CSS class when the dragging start and then sets $draggedItem with the value of the item being dragged. The draggingEnded() function removes the ‘dragging’ class.
In the CSS file the dragging rule is defined as follows.
.dragging {
    background-color: yellow;
}
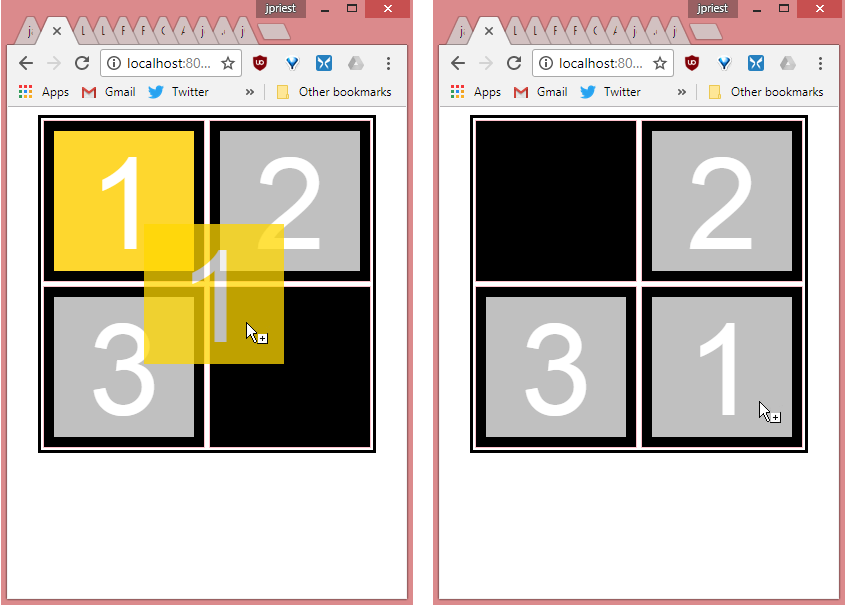
This changes the background of the dragged item until the dragging stops.
Live sample: https://james-priest.github.io/node_samples/ch13-Drag-Drop/a-scramble3.html
7. Dropping
After dragging, the drop must be made operational. The following events are based on the drop target.
- dragenter Triggers when the drag enters a drop zone
- dragover Triggers continuously as the element is dragged over the drop zone
- dragleave Triggers when the dragged item leaves a drop zone
- drop Triggers when the dragged item is dropped
The dragenter and dragover events default to rejecting dragged items, which is why you can’t currently drop an item. You can enable dropping by cancelling the default action on these events.
The drop event removes the dropped item from the document object model (DOM) and then adds it back to the DOM at the drop zone location. The following code subscribes to the dragenter, dragover, and drop events.
var $draggedItem;

$(document).ready(function() {
    $('.item').on('dragstart', dragging);
    $('.item').on('dragend', draggingEnded);
    $('.hole').on('dragenter', preventDefault);
    $('.hole').on('dragover', preventDefault);
    $('.hole').on('drop', dropItem);
});

function dragging(e) {
    $(e.target).addClass('dragging');
    $draggedItem = $(e.target);
}

function draggingEnded(e) {
    $(e.target).removeClass('dragging');
}

function preventDefault(e) {
    e.preventDefault();
}

function dropItem(e) {
    var hole = $(e.target);
    if (hole.hasClass('hole') && hole.children().length === 0) {
        $draggedItem.detach();
        $draggedItem.appendTo(hole);
    }
}
In this example, the document ready function has added statements to subscribe to dragenter, dragover, and drop. Notice that dragenter and dragover call the same preventDefault() function, which prevents the rejection of the dragged items.
The drop event calls the dropItem function. In dropItem, a jQuery object is created from e.target, which is the drop target, and is assigned to a hole variable. The if statement checks whether the drop target has the ‘hole’ CSS class. This is necessary because you might drop something on top of an ‘item’ instead of a ‘hole’.
When the item is in a hole, the drop event bubbles up and executes the drop event on the hole. If the drop target is a hole, the code checks whether there are children; if there is a child, this hole already has an item, and you shouldn’t be able to drop.
If the drop target is a hole with no children, jQuery detaches the dragged item from the DOM and then appends $draggedItem to the drop target.
Live sample: https://james-priest.github.io/node_samples/ch13-Drag-Drop/a-scramble4.html
Quick check
- Which two events’ default operations must be prevented to allow the drop event to operate?
Solution
- The
dragenteranddragoverevents
8. Using the DataTransfer object
The previous example demonstrates a complete drag and drop operation, but you can also use the DataTransfer object to pass data from the dragstart event to the drop event.
By using the DataTransfer object, you don’t need to create a global variable to reference the item being dragged. Using the DataTransfer object also empowers you to pass any data to the drop event as long as it can be represented as a string or URL. The DragStart object is referenced as a dataTransfer property on the dragstart event.
NOTE: Using the DataTransfer object with jQuery
jQuery’s event system normalizes the event object according to W3C standards. Most properties from the original event are copied over and normalized to the new event object.
dataTransferis one property that does not get copied to jQuery’s standardized Event object. ThereforeIt can be accessed using theevent.originalEventobject as follows.
var dt = event.originalEvent.dataTransfer;
You can pass data to the drop event by using the dataTransfer property. The DataTransfer object has the following members.
- clearData() Method that clears the data in the DataTransfer object
- dropeffect Property that gets or sets the type of drag and drop operation and the cursor type. It can be set to
copy,link,move, ornone. - effectAllowed Property that gets or sets the allowed operations on the source element. It can be set to
copy,copyLink,copyMove,link,linkMove,move,all,uninitialized, ornone. - files Property that gets a file list of the files being dragged .If files aren’t involved the property is an empty list.
- getData() Method that gets the data in the DataTransfer object
- setData() Method that sets the data in the DataTransfer object
- types Property that gets a string list of types being sent.
In the following example, the HTML document has an unordered list of cars, from which you can drag and drop any of the cars to a different unordered list of favorite cars as follows.
<!DOCTYPE html>
<html lang="en">
<head>
    <meta charset="UTF-8">
    <meta name="viewport" content="width=device-width, initial-scale=1.0">
    <meta http-equiv="X-UA-Compatible" content="ie=edge">
    <title>Cars 1</title>
    <style>
        #favoriteCars { min-height:100px; background-color:gold; }
    </style>
</head>
<body>
    <p>What cars do you like?</p>
    <ul>
        <li draggable="true" data-value="car,Chevrolet">Chevrolet</li>
        <li draggable="true" data-value="car,Ford">Ford</li>
        <li draggable="true" data-value="car,BMW">BMW</li>
    </ul>
    <p>Drop your favorite cars below:</p>
    <ul id="favoriteCars"></ul>

    <script src="https://code.jquery.com/jquery-3.3.1.slim.min.js"
    integrity="sha256-3edrmyuQ0w65f8gfBsqowzjJe2iM6n0nKciPUp8y+7E="
    crossorigin="anonymous"></script>
    <script src="b-cars1.js"></script>
</body>
</html>
Here, each of the car list items is draggable and uses the data attributes to provide data that will be collected when the dragging starts and then passed to the drop event. The JavaScript file is similar to the previous example, which was used to move numbers, but this time, the data is passed to the drop event by using the DataTransfer object as follows.
$(document).ready(function() {
    $('#carList').on('dragstart', dragging);
    $('#favoriteCars').on('dragenter', preventDefault);
    $('#favoriteCars').on('dragover', preventDefault);
    $('#favoriteCars').on('drop', dropItem);
});

function dragging(e) {
    var val = e.target.dataset.value;
    e.originalEvent.dataTransfer.setData('text/plain', val);
    e.originalEvent.dataTransfer.effectAllowed = 'copy';
}

function preventDefault(e) {
    e.preventDefault();
}

function dropItem(e) {
    var data = e.originalEvent.dataTransfer.getData('text').split(',');
    if (data[0] === 'car') {
        var li = document.createElement('li');
        li.textContent = data[1];
        e.target.appendChild(li);
    }
}
In the document ready function we subscribe to the required events. The dragging() function is called when the dragging starts. It collects the data from the data-value attribute and assigns it to the DataTransfer object. The effectAllowed property is set to ‘copy’, which changes the mouse pointer to a pointer with a plus sign under it. If it were set to ‘move’, the pointer would be a pointer with a small box under it.
The dropItem function is called from the drop event. The DataTransfer object is also available on the drop event through the dataTransfer property. The data is retrieved, split into an array, and assigned to a variable. Next the element is tested to see if its a car. If so, a new list item is created and appended to the drop element. Lastly, we call preventDefault() method of the event that’s handled the drop so that the default browser handling does not handle the dropped data as well.
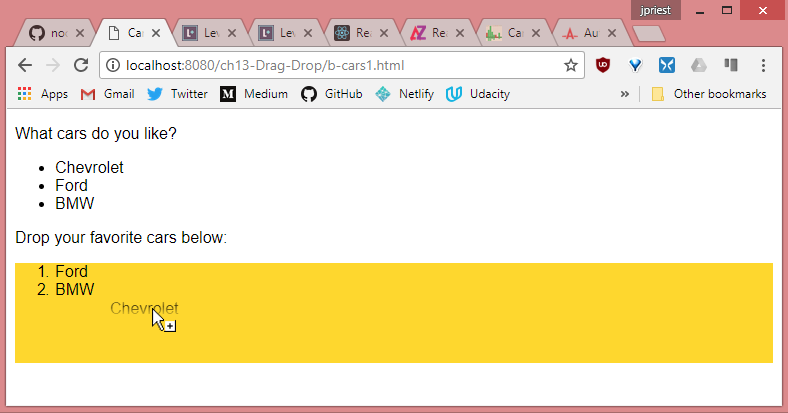
Live sample: https://james-priest.github.io/node_samples/ch13-Drag-Drop/b-cars1.html
9. Summary
- The drag and drop functionality in HTML5 is now consistent and compatible across browsers.
- The drag and drop attribute must be set to true and added to each element that needs to be draggable.
- The
dragstartanddragendevents can be used to change the style of the element being dragged. - The
dragenteranddragoverevents must be coded to prevent the default operation and enable dropping. - The
dropevent triggers when the item is dropped on a drop target. - The DataTransfer object is used to pass data between the
dragstartevent and thedropevent.
10. Review Questions
- Which of the following events trigger continuously during a drag and drop operation?
- dragstart
- drag
- dragend
- dragenter
- dragover
- dragleave
- drop
- Which of the following events are associated with the item being dragged?
- dragstart
- drag
- dragend
- dragenter
- dragover
- dragleave
- drop
- Using the DataTransfer object, what kind of data can you pass to the drop event?
- Any valid string, number, date/time, or Boolean value
- Any URL that is within the dame domain as the webpage
- Any JSON object
- Any object that can be represented as a string or URL
11. Dragging & dropping files
You can drag and drop files using the File API (application programming interface), which is also part of HTML5. The File API provides indirect access to files in a tightly controlled manner.
12. Using FileList & File objects
When dropping a file, the DataTransfer object returns a FileList object which is a collection of File objects that were dropped. The File object has the following properties.
- name Property that gets the file name and extension without a path.
- type Property that gets the MIME type of the file.
- size Property that gets the file size in bytes.
The following HTML document has a <div> element onto which files can be dropped and a <table> element that is populated with information about the dropped files.
<!DOCTYPE html>
<html lang="en">
<head>
<meta charset="UTF-8">
<meta name="viewport" content="width=device-width, initial-scale=1.0">
<meta http-equiv="X-UA-Compatible" content="ie=edge">
<title>Files 1</title>
<link rel="stylesheet" href="c-files1.css">
</head>
<body>
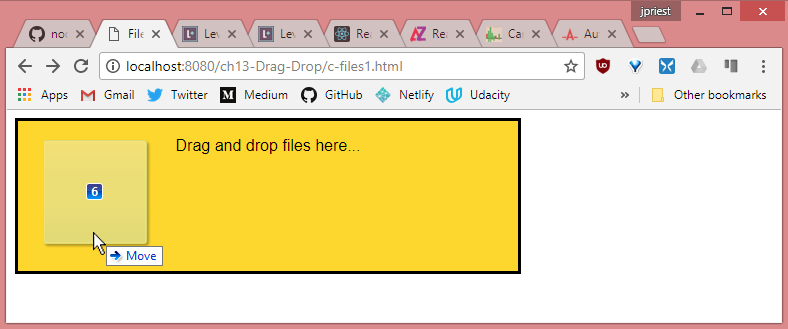
<div id="target">
<p>Drag and drop files here...</p>
</div>
<table id="fileInfo"></table>
<script src="https://code.jquery.com/jquery-3.3.1.slim.min.js"
integrity="sha256-3edrmyuQ0w65f8gfBsqowzjJe2iM6n0nKciPUp8y+7E="
crossorigin="anonymous"></script>
<script src="c-cars1.js"></script>
</body>
</html>
The css file contains rules to size the drag and drop target as well as tules to format the information table.
body { font-family: Arial, Helvetica, sans-serif; }
#target {
    border: solid;
    width: 500px;
    height: 150px;
    background-color: gold;
    text-align: center;
}
#fileInfo {
    width: 500px;
}
table, th, td {
    border-collapse: collapse;
    border: 1px solid #333;
}
th, td {
    padding: 5px;
}
There is no JavaScript yet, so you might think that you can’t drag and drop any files here, but there is a default behavior for files that are dragged and dropped. If you drop a file anywhere on the webpage, the file will open in-page if the browser can render the file otherwise it will open in another window.
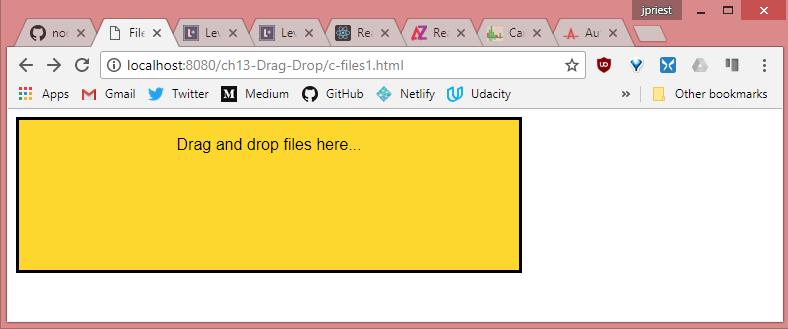
Live sample: https://james-priest.github.io/node_samples/ch13-Drag-Drop/c-files1.html
To process the dropped files and display the file information in a table below the drop box, the following JavaScript is added.
$(document).ready(function() {
  $('#target').on('dragenter', preventDefault);
  $('#target').on('dragover', preventDefault);
});

function preventDefault(e) {
  e.preventDefault();
}
In the document ready function, jQuery is set up to expose the DataTransfer object. The dragenter and dragover events are then programmed to prevent the default operation that prevents dropping. Once the drop event is added, the dragged file can be dropped.
We subscribe to that drop event and add the dropItem() function handler. The JavaScript is completed with the following code.
$(document).ready(function() {
  $('#target').on('dragenter', preventDefault);
  $('#target').on('dragover', preventDefault);
  $('#target').on('drop', dropItem);
});

function preventDefault(e) {
  e.preventDefault();
}

function dropItem(e) {
  var files = e.originalEvent.dataTransfer.files,
      $table = $('#fileInfo'),
      i = 0;

  $table.html('<thead><tr><th>Name</th><th>Type</th><th>Size</th></tr></thead>');
  for (i = 0; i < files.length; i++) {
      $('<tr><td>' + files[i].name +
        '</td><td>' + files[i].type +
        '</td><td>' + files[i].size +
        '</td></tr>').appendTo($table);
  }
  e.preventDefault();
}
The dropItem function retrieves the files collection from the DataTransfer object. The content in the file information table is overwritten with the header, which also clears any existing information that was in the table. Next, a for loop is used to loop over the files and add a row of information to the file info table for each file. Finally, we prevent the browser’s default behavior which is to open each of the files.
Now we can grab a series of files and drag them on the yellow drop area.
Live sample: https://james-priest.github.io/node_samples/ch13-Drag-Drop/c-files2.html
Once several files are dragged and dropped the file information table populates and displays the information.
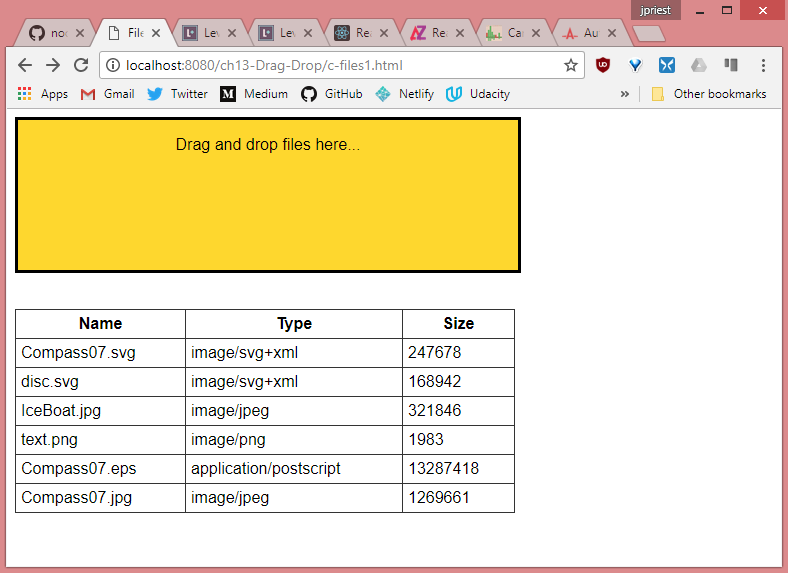
Live sample: https://james-priest.github.io/node_samples/ch13-Drag-Drop/c-files2.html
Quick check
- Which object provides access to the dropped files?
Solution
- The DataTransfer object
13. Lesson summary
- The File object provides the name, type, and size properties.
- To enable dropping of files, the
dragenteranddragoverevents must be programmed to prevent the default behavior that prevents dropping. - The DataTransfer object provides access to the list of dropped files.
- The
dropevent provides access to the DataTransfer object.
14. Lesson review
- To which events do you need to subscribe to program file drag and drop?
- dragstart
- drag
- dragend
- dragenter
- dragover
- dragleave
- drop
- Which of the following is not a property on the File object?
- name
- path
- type
- size
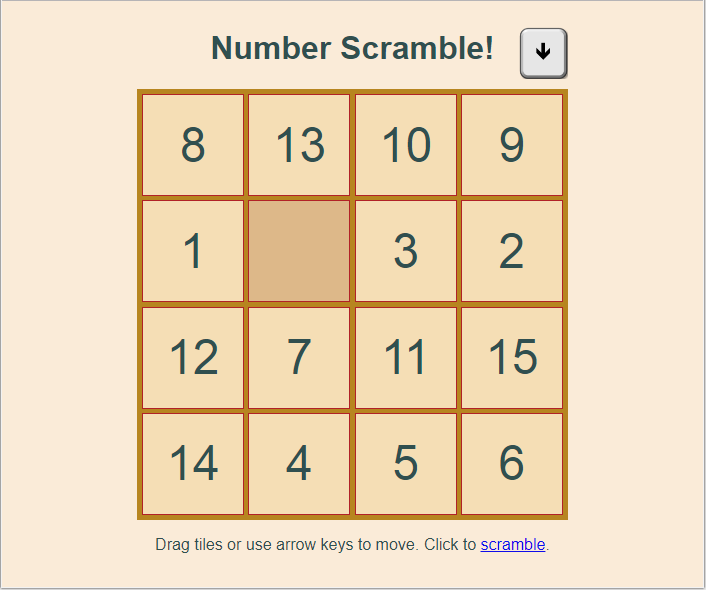
15. Create a number scramble game
In this exercise we apply our knowledge of drag and drop by creating a number scramble game.
The game consists of a board with four rows and four columns providing sixteen squares in which a sliding tile can exist. Fifteen of the squares are occupied by numbered tiles. One square is empty and can be used when moving tiles. Only a tile that is adjacent to the empty square can be moved.
The object of the game is to arrange the tiles in numerical order from a scrambled position.
16. Basic code structure
We first start with a basic HTML page that has a reference to the latest jQuery and references to a supporting stylesheet and JavaScript file.
We add in a ‘message’ and ‘gameBoard’ <div>.
<!DOCTYPE html>
<html lang="en">
<head>
    <meta charset="UTF-8">
    <meta name="viewport" content="width=device-width, initial-scale=1.0">
    <meta http-equiv="X-UA-Compatible" content="ie=edge">
    <title>Number Scramble</title>
    <link rel="stylesheet" href="scramble.css">
</head>
<body>
    <div id="message"><h1>Number Scramble</h1></div>
    <div id="gameBoard"></div>

    <script src="https://code.jquery.com/jquery-3.3.1.min.js"
    integrity="sha256-FgpCb/KJQlLNfOu91ta32o/NMZxltwRo8QtmkMRdAu8="
    crossorigin="anonymous"></script>
    <script src="scramble.js"></script>
</body>
</html>
In the stylesheet we add the following rules for the game board, message and squares which will be programmatically created.
body {
    font-family: Arial, Helvetica, sans-serif;
    background-color: antiquewhite;
    color: darkslategray;
    display: flex;
    flex-direction: column;
    align-items: center;
    justify-content: center;
}
#message {
    position: relative;
    width: 430px;
    height: 80px;
    display: -webkit-box;
    display: -ms-flexbox;
    display: flex;
    justify-content: center;
}
h1 {
    display: inline-block;
}
#gameBoard {
    background-color: darkgoldenrod;
    border: solid darkgoldenrod;
    width: 425px;
    height: 425px;
    display: flex;
    flex-wrap: wrap;
    align-items: center;
    justify-content: space-around;
}
.square {
    background-color: burlywood;
    border: 1px firebrick solid;
    width: 100px;
    height: 100px;
    display: flex;
    align-items: center;
    justify-content: center;
}
.tile {
    font-size: 3em;
    width: 100px;
    height: 100px;
    background-color: wheat;
    color: darkslategrey;
    display: flex;
    align-items: center;
    justify-content: center;
    user-select: none;
}
.dragged {
    background-color: rgb(255, 248, 225);
}
In the scramble.js file we declare two variables. One to specify the square count and the other to track the number position of the empty square.
var squareCount = 16;
var emptySquare;
Then we add a call to a createBoard() and addTiles() methods within jQuery document ready function.
$(document).ready(function() {
    createBoard();
    addTiles();
});
Lastly, we create the createBoard() and addTiles() methods. Each of these use a for loop to create the child squares and child tiles for the game board.
The completed JavaScript looks like this.
var squareCount = 16;
var emptySquare;

$(document).ready(function() {
    createBoard();
    addTiles();
});

function createBoard() {
    for (var i = 0; i < squareCount; i++) {
        var $square = $('<div id="square' + i + '" data-square="' +
            i + '" class="square"></div>');
        $square.appendTo($('#gameBoard'));
    }
}

function addTiles() {
    emptySquare = squareCount - 1;
    for (var i = 0; i < emptySquare; i++) {
        var $square = $('#square' + i);
        var $tile = $('<div draggable="true" id="tile' + i +
            '"  class="tile">' + (i + 1) + '</div>');
        $tile.appendTo($square);
    }
}
NOTE: There are cleaner, more efficient ways to build this code. This includes
- Creating a namespace or object literal for better code organization
- Wrapping everything in an IIFE to avoid polluting the global namespace
- Creating a document fragment and updating this within the for loops so as to avoid the cost of updating the DOM on every iteration
For now though, we will be keeping it simple.
At this point we have the rendered game board with the tiles but there is not drag and drop functionality yet and the numbers don’t scramble.
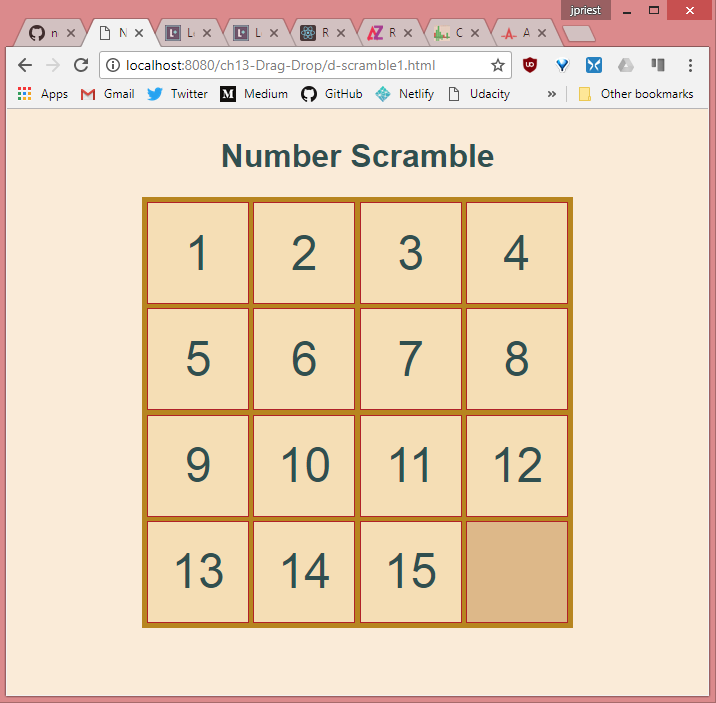
Live sample: https://james-priest.github.io/node_samples/ch13-Drag-Drop/d-scramble1.html
17. Add drag and drop
Next we need to subscribe to the dragstart, dragend, dragenter, dragover, and drop events. This will allow us to handle each of the events necessary to manage drag and drop.
$(document).ready(function() {
    createBoard();
    addTiles();
    $('#gameBoard').on('dragstart', dragStarted);
    $('#gameBoard').on('dragend', dragEnded);
    $('#gameBoard').on('dragenter', preventDefault);
    $('#gameBoard').on('dragover', preventDefault);
    $('#gameBoard').on('drop', drop);
});
For dragstart we create the following code.
function dragStarted(e) {
    var $tile = $(e.target);
    $tile.addClass('dragged');
    var sourceLocation = $tile.parent().data('square');
    e.originalEvent.dataTransfer.setData('text', sourceLocation.toString());
    e.originalEvent.dataTransfer.effectAllowed = 'move';
}
This code creates a $tile variable that is a jQuery wrapper for e.target. We use it to add a ‘dragged’ class to the tile. We then create a sourceLocation variable and assign to it the value of the data-square data attribute of the tile’s parent square.
Lastly, we assign the string value of sourceLocation to the DataTransfer object and set the effectAllowed property to ‘move’.
Next, we handle dragend by removing the ‘dragged’ class. We then prevent the default behavior for both drageneter and dragover which allows us to perform a dra operation.
function dragEnded(e) {
    $(e.target).removeClass('dragged');
}

function preventDefault(e) {
    e.preventDefault();
}
Next, we create the drop() function.
function drop(e) {
    var $square = $(e.target);
    if ($square.hasClass('square')) {
        var destinationLocation = $square.data('square');
        if (emptySquare !== destinationLocation) return;
        var sourceLocation = Number(e.originalEvent.dataTransfer.getData('text'));
        moveTile(sourceLocation);
    }
    e.preventDefault();
}
This function takes an e event parameter. We create a $square variable and use a jQuery wrapper for e.target. We then test that the element which the event is attached to has a class called ‘square’. If so, we read the data-square attribute and place the value in a destinationLocation variable. If the destination location does not equal the available empty square, we exit.
Next we get the sourceLocation from the DataTransfer object & pass that as a parameter to the moveTile() function call.
moveTile() subtracts the empty square number from the source location square number. It then makes the integer positive and if the difference between the two numbers is one (adjacent square) or four (above or below square), the swapTileAndEmptySquare() function is called.
function moveTile(sourceLocation) {
    var distance = sourceLocation - emptySquare;
    if (distance < 0) distance = -(distance);
    if (distance === 1 || distance === 4) {
        swapTileAndEmptySquare(sourceLocation);
    }
}
The swapTileAndEmptySquare() function assigned the source tile (and all its children) to the $draggedItem variable. It then uses jQuery detach() method to remove the tile element from the DOM.
function swapTileAndEmptySquare(sourceLocation) {
    var $draggedItem = $('#square' + sourceLocation).children();
    $draggedItem.detach();
    var $target = $('#square' + emptySquare);
    $draggedItem.appendTo($target);
    emptySquare = sourceLocation;
}
We then get a reference to the empty square and assign it to the $target variable. We then call the appendTo() function to complete the move and lastly, we assign the newly empty square number to the emptySquare variable.
18. Completed drag & drop
This is the completed code thus far.
var squareCount = 16;
var emptySquare;

$(document).ready(function() {
    createBoard();
    addTiles();
    $('#gameBoard').on('dragstart', dragStarted);
    $('#gameBoard').on('dragend', dragEnded);
    $('#gameBoard').on('dragenter', preventDefault);
    $('#gameBoard').on('dragover', preventDefault);
    $('#gameBoard').on('drop', drop);
});

function createBoard() {
    for (var i = 0; i < squareCount; i++) {
        var $square = $('<div id="square' + i + '" data-square="' +
            i + '" class="square"></div>');
        $square.appendTo($('#gameBoard'));
    }
}

function addTiles() {
    emptySquare = squareCount - 1;
    for (var i = 0; i < emptySquare; i++) {
        var $square = $('#square' + i);
        var $tile = $('<div draggable="true" id="tile' + i +
            '"  class="tile">' + (i + 1) + '</div>');
        $tile.appendTo($square);
    }
}

function dragStarted(e) {
    var $tile = $(e.target);
    $tile.addClass('dragged');
    var sourceLocation = $tile.parent().data('square');
    e.originalEvent.dataTransfer.setData('text', sourceLocation.toString());
    e.originalEvent.dataTransfer.effectAllowed = 'move';
}

function dragEnded(e) {
    $(e.target).removeClass('dragged');
}

function preventDefault(e) {
    e.preventDefault();
}

function drop(e) {
    var $square = $(e.target);
    if ($square.hasClass('square')) {
        var destinationLocation = $square.data('square');
        if (emptySquare !== destinationLocation) return;
        var sourceLocation = Number(e.originalEvent.dataTransfer.getData('text'));
        moveTile(sourceLocation);
    }
    e.preventDefault();
}

function moveTile(sourceLocation) {
    var distance = sourceLocation - emptySquare;
    if (distance < 0) distance = -(distance);
    if (distance === 1 || distance === 4) {
        swapTileAndEmptySquare(sourceLocation);
    }
}

function swapTileAndEmptySquare(sourceLocation) {
    var $draggedItem = $('#square' + sourceLocation).children();
    $draggedItem.detach();
    var $target = $('#square' + emptySquare);
    $draggedItem.appendTo($target);
    emptySquare = sourceLocation;
}
The scramble game will now have working drag and drop capability.
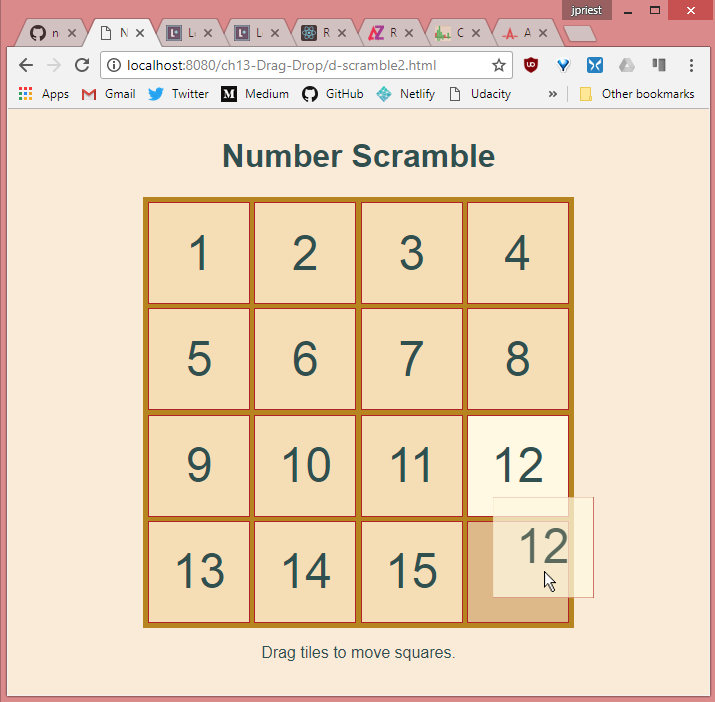
Live sample: https://james-priest.github.io/node_samples/ch13-Drag-Drop/d-scramble2.html
19. Add keyboard controls
In order to provide a faster and smoother method of game play, we allow the player to use the keyboard’s arrow keys to move tiles.
We do this by wiring up a keydown event listener on the page body. This kicks off the keyDown() function passing it the event object with information on which key kicked off the event. We chose to use keydown because keypress doesn’t capture special keys such as Home, End, Delete, Insert, PgDown, PgUp, arrow keys, etc. but keydown does.
We will also display to the user which arrow key was pressed. To do this we fist update our HTML with a <div> that has an id of ‘key’. We also set display: none; for the style attribute since we’ll be using jQuery to animate this notification.
<!DOCTYPE html>
<html lang="en">
<head>
    <meta charset="UTF-8">
    <meta name="viewport" content="width=device-width, initial-scale=1.0">
    <meta http-equiv="X-UA-Compatible" content="ie=edge">
    <title>Number Scramble</title>
    <link rel="stylesheet" href="scramble.css">
</head>
<body>
    <div id="message">
        <h1>Number Scramble</h1>
        <div id="key" style="display: none;"></div>
    </div>
    <div id="gameBoard"></div>
    <p>Drag tiles to move a squares.</p>

    <script src="https://code.jquery.com/jquery-3.3.1.min.js"
    integrity="sha256-FgpCb/KJQlLNfOu91ta32o/NMZxltwRo8QtmkMRdAu8="
    crossorigin="anonymous"></script>
    <script src="scramble.js"></script>
</body>
</html>
Next, we’ll add a rule to our stylesheet for the ‘#key’ <div>.
#key {
    position: absolute;
    background-size: 154px 108px;
    width: 49px;
    height: 52px;
    background-image: url('./assets/images/full-size/arrowKeys.png');
    right: 0;
    bottom: 10px;
}
This sets the <div> background image to use a .png which contains images for each of the arrow keys. We set the background-size to exactly half of the image’s actual size since the button images are too big as is.
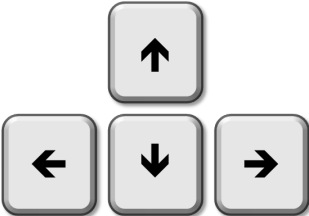
We also set the <div> width & height so that only one arrow image will be visible at a time. We do this by adjusting the background-position in code based on which arrow key pressed. Lastly, we set position : absolute; and specify where in relation to right and bottom the image should appear.
Next, we modify our JavaScript. We start by subscribing to the keydown event. We do this from within jQuery’s document ready function.
$(document).ready(function() {
    createBoard();
    addTiles();
    $('#gameBoard').on('dragstart', dragStarted);
    $('#gameBoard').on('dragend', dragEnded);
    $('#gameBoard').on('dragenter', preventDefault);
    $('#gameBoard').on('dragover', preventDefault);
    $('#gameBoard').on('drop', drop);

    $('body').on('keydown', keyDown);
});
Next we create the keyDown() function. This creates a sourceLocation variable to track the source tile position. Next, we add a switch statement to capture which arrow key was pressed. If none were pressed we have a default: case that returns from the function.
function keyDown(e) {
    var sourceLocation = 0;
    switch (e.key) {
        case 'ArrowUp':
            if (emptySquare > 11) return;
            sourceLocation = emptySquare + 4;
            $('#key').css('background-position', 'top center');
            break;
        case 'ArrowDown':
            if (emptySquare < 4) return;
            sourceLocation = emptySquare - 4;
            $('#key').css('background-position', 'bottom');
            break;
        case 'ArrowRight':
            if (emptySquare < 1 || (emptySquare) % 4 === 0) return;
            sourceLocation = emptySquare - 1;
            $('#key').css('background-position', 'bottom right');
            break;
        case 'ArrowLeft':
            if (emptySquare > 14 || (emptySquare+1) % 4 === 0) return;
            sourceLocation = emptySquare + 1;
            $('#key').css('background-position', 'bottom left');
            break;
        default:
            return;
    }
    $('#key').show().delay(200).fadeOut('fast');
    moveTile(sourceLocation);
}
Within each case statement we test if the last tile in a particular direction has been moved. If so, we exit with a return. Next we determine the sourceLocation based on the empty square plus the arrow key direction. Then we set the style rule to target the proper arrow graphic based on the arrow key that was pressed.
Finally, we display the key pressed by chaining some jQuery animation methods. Lastly, we call moveTile() to perform the swap.
20. Add tile scramble code
We will also be creating code to scramble the tiles.
We’ll provide a ‘scramble’ link to allow the player to do this from the game page. We update the HTML by adding the following below <div id="gameBoard"></div>.
<p>Drag tiles or use arrow keys to move.
    Click to <a href="#" id="scramble">scramble</a>.
</p>
Next, we wire up the link’s click event from within the jQuery document ready function.
$(document).ready(function() {
    createBoard();
    addTiles();
    $('#gameBoard').on('dragstart', dragStarted);
    $('#gameBoard').on('dragend', dragEnded);
    $('#gameBoard').on('dragenter', preventDefault);
    $('#gameBoard').on('dragover', preventDefault);
    $('#gameBoard').on('drop', drop);

    $('body').on('keydown', keyDown);
    $('#scramble').on('click', scramble);
    // scramble();
});
If we want the game to start in a scrambled state we can uncomment the scramble() function call as well. Next we create the scramble() function.
function scramble(e) {
    for (var i = 0; i < 128; i++) {
        var random = Math.random();
        var sourceLocation;
        if (random < 0.5) {
            var column = emptySquare % 4;
            if (column === 0 || (random < 0.25 && column != 3)) {
                sourceLocation = emptySquare + 1;
            } else {
                sourceLocation = emptySquare - 1;
            }
        } else {
            var row = Math.floor(emptySquare / 4);
            if (row === 0 || (random < 0.75 && row != 3)) {
                sourceLocation = emptySquare + 4;
            } else {
                sourceLocation = emptySquare - 4;
            }
        }
        swapTileAndEmptySquare(sourceLocation);
    }
    e.preventDefault();
}
This function executes a loop of 128 random movements to scramble the tiles. Each time the loop executes, a new random number is created, and, based on its value, an adjacent tile is moved to an empty square.
21.Add win check
First we add a call to checkForWinner() at the end of the moveTile() function. It should look like this.
function moveTile(sourceLocation) {
    var distance = sourceLocation - emptySquare;
    if (distance < 0) { distance = -(distance); }
    if (distance === 1 || distance === 4) {
        swapTileAndEmptySquare(sourceLocation);
    }
    checkForWinner();
}
Next we add the following checkForWinner() function.
function checkForWinner() {
    if (emptySquare !== squareCount - 1) {
        $('#message>h1').html('Number Scramble!');
        return;
    }
    for (var i = 0; i < emptySquare; i++) {
        if ($('#tile' + i).parent().attr('id') !== 'square' + i) {
            $('#message>h1').html('Number Scramble!');
            console.log('old');
            return;
        }
    }
    $('#message>h1').html('Winner!');
}
This will check if the final square is empty. If not, we exit. Next we loop through each of the tiles and check if the square number and tile numbers match (e.g. tile1 in square1, tile2 in square2, etc.). If the numbers don’t match we exit.
Lastly, we update the message to indicate a winner.
Live sample: https://james-priest.github.io/node_samples/ch13-Drag-Drop/d-scramble3.html
That wraps up the Number Scramble game.