Chapter 11 - HTML5 Media
Notes from Programming in HTML5 with JavaScript & CSS3 Training Guide by Glenn Johnson.
This is part of my study material for passing Microsoft’s Exam 70-480: Programming in HTML5 with JavaScript & CSS3 certification exam.
One of the most popular features of HTML5 is its support for multimedia. In the past, you needed to load a plug-in to play video or audio. This chapter examines the HTML5 support for playing video and audio.
1. Playing video
Currently the W3C does not specify which video formats browsers should support. Browsers can decide which format they want to support, so the developer must provide formats that are available across most browsers.
2. Video formats
The following are the most popular formats:
- Ogg/Theora (.ogv extension)
- WebM/VP8-9 (.webm extension)
- MPEG-4/H.264 (.mp4 extension)
MPEG-4/H.264 is the most common format for most video-editing software. It provides the best performance when comparing data-stream size to picture quality.
3. Implementing the video element
The <video> element is used to play video. The following is a sample implementation of the <video> element.
<video width="320" height="240" controls="controls">
    <source src="movie.mp4" />
    You need a browser that supports HTML5!
</video>
In this example, the <video> element size is set to 320 pixels by 240 pixels. The controls attribute provides controls to start and stop the video, to view and set the video cursor location, and to maximize and restore the video size on the screen. The <video> element contains a <source> element that describes the video source as .mp4. The <video> element also contains text that is displayed on browsers that don’t support the <video> element.
4. Setting the source
When the developer provides multiple formats, the browser can choose the format it can use to display the video, which provides the most compatible experience to users.
<video controls="controls" height="480">
    <source src="eagle.webm" type="video/webm" />
    <source src="eagle.ogv" type="video/ogg" />
    <source src="eagle.mp4" type="video/mp4" />
</video>
The position of the <source> elements is important because a browser starts looking at the top and stops when it finds a file it can display.
The recommended order is to start with th e.webm file because it’s royalty free and open source. Next, use the .ogv file because it is also royalty free, but the quality is not as good as the .webm file. Finally, use the .mp4 format for the browser that don’t support .webm or .ogv files.
5. Configuring the video element
The following is the list of attributes you can use to configure the <video> element.
- autoplay Specifies the video starts playing immediately.
- buffered An attribute you can read to determine the time ranges of the buffered media. This attribute contains a
TimeRangesobject. - controls Specifies that the play/pause button, video cursor, and maximize be displayed.
- crossorigin This enumerated attribute indicates whether to use CORS to fetch the related video.
anonymous: Sends a cross-origin request without a credential.use-credential: Sends a cross-origin request with a credential.
- height Indicates the height in pixels of the rendered
<video>element - loop Specifies the video will repeat when it has reached the end of its stream.
- muted Specifies that the audio is silent.
- played A
TimeRangesobject indicating all the ranges of the video that have been played. - poster Specifies that the URL of an image is to be shown when the video is not playing.
- preload Specifies how the video should be loaded when the page loads. It can be set to:
none: the video should not be preloadedmetadata: indicates only metadata (e.g. length) is fetchedauto: starts loading the video when the page loads
- src Specifies the URL of the video.
- width Indicates the width in pixels of the rendered
<video>element.
6. Accessing tracks
The W3C has developed a new standard, called WebVTT (Web Video Text Tracks), that provides the ability to display captions on the video.
The WebVTT file format is simple and easily readable by browsers and developers.
<video controls poster="/images/sample.gif">
   <source src="sample.mp4" type="video/mp4">
   <source src="sample.ogv" type="video/ogv">
   <track kind="captions" src="sampleCaptions.vtt" srclang="en">
   <track kind="chapters" src="sampleChapters.vtt" srclang="en">
   <track kind="subtitles" src="sampleSubtitles_de.vtt" srclang="de">
   <track kind="subtitles" src="sampleSubtitles_en.vtt" srclang="en">
   <track kind="subtitles" src="sampleSubtitles_ja.vtt" srclang="ja">
</video>
7. Configuring the track
The HTML <track> element is used as a child of the media elements <audio> and <video>. It lets you specify timed text tracks (or time-based data), to handle subtitles, captions, descriptions, chapters, or metadata.
The following is a list of attributes you can use to configure the <track> element.
- default Indicates that the track should be enabled. Only one
defaultper media element. - kind How the track is meant to be used. If omitted the default kind is
subtitles. The following keywords are allowed.subtitles- They provide translation of content to another language.
- They may provide additional background information as well. (think opening of Star Wars)
captions- Closed captions provide a transcription of the audio
- It may include important non-verbal information such as music cues ro sound effect.
- Suitable for the deaf.
descriptions- Textual descriptions of the video content.
- Suitable for the blind.
chapters- Chapter titles are intended to be used when the use is navigating the media resource.
metadata- Tracks used by scripts. Not visible to the user.
- label A user readable title of the text track which is used by the browser when listing available text tracks
- src URL of the track (
.vttfile). Attribute must be defined. - srclang Language of the track text data. Must be a valid BCP 47 language tag. If the
kindattribute is set thensrclangmust also be defined.
<!-- Video with subtitles -->
<video src="foo.webm">
  <track kind="subtitles" src="foo.en.vtt" srclang="en"
    label="English">
  <track kind="subtitles" src="foo.sv.vtt" srclang="sv"
    label="Svenska">
</video>
8. Using the WebVTT format
WebVTT format is very simple. The file starts with a declaration of the WebVTT file, a line is skipped, and a cue is defined. The cue is composed of a timespan on the first line, and the caption follows on the next line or lines. After that, a new line separator is provided, and the next cue is defined. The following is a WebVTT file.
WEBVTT FILE

00:00:07.500 --> 00:00:08.750
He's fidgety.

NOTE I think the timing should be adjusted to span to the end of the video
00:00:09.000 --> 00:00:12.000
There he goes!!!
You an include comments by using the word NOTE followed by a space or a new line, as shown above.
9. Video Summary
- The
<video>element is new in HTML5 - The most common formats for the web are
.ogg,.webm, and.mp4 - When implementing the
<video>element, at a minimum you must provide a video source. autoplayattribute is used to start playing immediately. Although this is often discouraged as being annoying to the user.- It’s best to provide multiple video sources to be compatible with most browsers.
- Use the
autoplayattribute to start playing immediately. - Use the
posterattribute to specify an image to display when not playing the video - You can provide captions in WebVTT format.
10. Playing audio
The W3C introduced the <audio> element for the purpose of playing music and sounds. Liek the <video> element, the intent was to offer a standard way to play media without requiring a plug-in.
Much of the content is similar to that of the <video> element since they both inherit from the `HTMLMediaElement.
11. Audio formats
The following are the most popular:
- Ogg/Vorbis (.oga, .ogg extension)
- MP3 (.mp3 extension)
- MP4 (.mp4, mp4a, .aac extension)
- WAV (.wav extension)
12. The audio element
The following is an example of the <audio> element.
<audio controls="controls">
    <source src="song.mp3" />
    You need a browser that supports HTML5!
</audio>
13. Setting the source
At a minimum, you need to set the src attribute to the URL of the audio.
<audio controls="controls" height="480">
    <source src="kittycat.oga" type="audio/ogg" />
    <source src="kittycat.wav" type="audio/wav" />
    <source src="kittycat.mp3" type="video/mpeg" />
</audio>
14. Configuring the audio element
The following is the list of attributes you can use to configure the <audio> element.
- autoplay Specifies the video starts playing immediately.
- buffered An attribute you can read to determine the time ranges of the buffered media. This attribute contains a
TimeRangesobject. - controls Specifies that the play/pause button, video cursor, and maximize be displayed.
- loop Specifies the video will repeat when it has reached the end of its stream.
- muted Specifies that the audio is silent.
- played A
TimeRangesobject indicating all the ranges of the video that have been played. - poster Specifies that the URL of an image is to be shown when the video is not playing.
- preload Specifies how the video should be loaded when the page loads. It can be set to:
none: the video should not be preloadedmetadata: indicates only metadata (e.g. length) is fetchedauto: starts loading the video when the page loads
- src Specifies the URL of the video.
- volume The playback volume, in the range 0.0 (silent) to 1.0 (loudest).
15. Audio Summary
- The
<audio>element is new in HTML5. - The most common audio formats for the web are
.ogg,.mp3, and.wav. - When implementing the
<audio>element, at a minimum you must provide an audio source. - It’s best to provide multiple audio sources to be compatible with most browsers.
- Use the
autoplayattribute to start playing immediately.
16. HTMLMediaElement object
The <audio> and <video> elements inherit from an HTMLMediaElement object, so they inherit the properties, methods, and events that are defined on the HTMLMediaElement object.
17. HTMLMediaElement methods
You can use the members of the HTMLMediaElement object to control the video and audio playback. You can also get notifications of status changes. The following is a partial list of <video> element methods.
- addTextTrack() Adds a new text track to the audio or video
- canPlayType() Determines whether the browser can play the specified audio or video type
- load() Reloads the audio or video
- play() Plays the audio or video
- pause() Pauses the currently playing audio or video
18. HTMLMediaElement properties
In addition to the methods that enable you to control playback, you can use many properties to view or set the state of teh audio or video element. The following is a list of properties.
- audioTrack Gets a reference to the
AudioTrackListobject that has the available audio tracks - autoPlay Sets or gets the indicator that determines whether the audio or video should start playing when it’s loaded
- buffered Gets a reference to the
TimeRangesobject that represents the buffered parts of the audio or video - controller Gets a reference to the
MediaControllerobject representing the current media controller of the audio or video - controls Sets or gets the indicator that determines whether the audio ro video should display playback controls to the user
- crossOrigin Sets or gets the CORS settings of the audio or video
- currentSrc Gets the URL of the current audio or video
- currentTime Sets or gets the current playback position in seconds
- defaultMuted Sets or gets the indicator that determines whether the audio or video is muted by default
- defaultPlaybackRate Sets or gets teh default speed of the audio or video playback
- duration Gets the length in seconds of the current audio or video
- ended Gets the indicator that determines whether the playback of the audio or video has ended
- error Gets a reference to a
MediaErrorobject representing the error state of the audio or video - loop Sets or gets as indicator that determines whether the audio or video should automatically restart when it reaches the end of the stream
- mediaGroup Sets or gets the group to which the audio or video belongs, which is used to link multiple audio or video elements.
- muted Sets or gets an indicator that determines whether the audio or video is muted
- networkState Gets a reference to the current network state of the audio or video
- paused Sets or gets an indicator that determines whether the audio or video is paused
- playbackRate Sets or gets the speed of the audio or video playback
- played Gets a reference to a
TimeRangesobject that represents the played parts of the audio or video - preload Sets or gets an indicator that determines whether the audio or video should be loaded when the page loads
- readyState Gets an indicator of the current ready state of the audio or video
- seekable Gets a reference to a
TimeRangesobject that represents the seekable parts of the audio or video - seeking Gets a indicator that determines whether the user is currently seeking in the audio or video
- src Sets or gets the current source of the audio or video
- startDate Gets a
Dateobject representing the current time offset - textTracks Gets a reference to a
TextTrackListobject that represents the available text tracks - videoTracks Gets a reference to a
VideoTrackListobject that represents the available video tracks - volume Sets or gets the volume of the audio or video
19. HTMLMediaElement events
In addition to the methods and properties of HTMLMediaElement, the following is a list of the events that you can subscribe to.
- onabort Triggers on abort
- oncanplay Triggers when a file has been buffered enough to start playing
- oncanplaythrough Triggers when a file can be played all the way to the end without pausing for buffering
- ondurationchange Triggers when the length of the media changes
- onempties Triggers when an erro occurs and the file is suddenly unavailable
- onended Triggers when the media has reached the end of the stream
- onerror Triggers when an error occurs as the file is being loaded
- onloadeddata Triggers when the media data is loaded
- onloadedmetadata Triggers when metadata such as duration and dimensions are loaded
- onloadstart Triggers when the file begins to load but before anything is actually loaded
- onpause Triggers when the media is paused
- onplay Triggers when the media starts playing
- onplaying Triggers when the media actually has started playing
- onprogress Triggers when the browser is retrieving the media
- onplay Triggers when the media starts playing
- onratechange Triggers each time the playback rate changes
- onreadystatechange Triggers each time the ready state changes
- onseeked Triggers to indicate that seeking has ended
- onseeking Triggers to indicate that seeking is active
- onstalled Triggers when the browser is unable to retrieve the media
- onsuspend Triggers when media retrieval stops prior to being completely loaded
- ontimeupdate Triggers when the playing position has changed
- onvolumechange Triggers each time the volume or mute is changed
- onwaiting Triggers when the media has paused but is expected to resume
20. Controlling the media
Given that HTMLMediaElement has many methods, properties, and events, you can provide custom controls for the media and a custom means to start and stop playback.
The following is an example of using the methods, properties, and events. Consider the following HTML document.
<!DOCTYPE html>
<html lang="en">
<head>
    <meta charset="UTF-8">
    <meta name="viewport" content="width=device-width, initial-scale=1.0">
    <meta http-equiv="X-UA-Compatible" content="ie=edge">
    <title>Video Prototype</title>
    <link href="media/default.css" rel="stylesheet" />
</head>
<body>
    <div id="container">
        <video id="media" controls="controls">
            <source src="media/eagle.webm" type='video/webm; codecs="vorbis, vp8"' />
            <source src="media/eagle.ogv" type='video/ogg; codecs="theora, vorbis"' />
            <source src="media/eagle.mp4" type='video/mp4; codecs="avc1.42E01E, mp4a.40.2"' />
            <track id="englishtrack" kind="subtitles" src="media/captions.vtt" srclang="en" label="English" default />
            You need an HTML5 compatible browser.
        </video>
        <br><br>
        <button type="button" id="play">Play</button><br>
        <span id="message"></span>
    </div>
    <script src="./node_modules/jquery/dist/jquery.js"></script>
    <script src="media/default.js"></script>
</body>
</html>
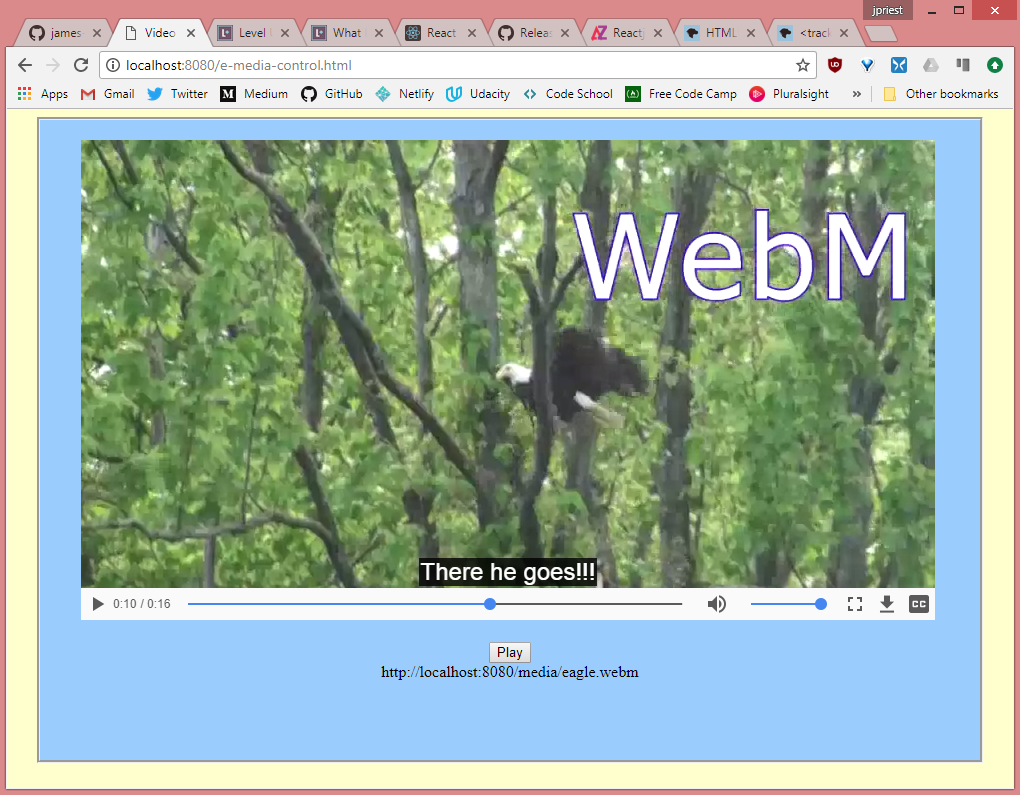
This document contains a <video> element with three child <source> elements and a <track> element. The <source> elements are for .webm, .ogv, and .mp4 video files. The subtitle file is in WebVTT format. We’ve also included a button set to id='play'.
The play button behavior is detailed in the default.js file.
$(document).ready(function () {
    $('#play').on('click', playStop);

    $('#media').on('play', function() {
        $('#play').html('Pause');
        $('#message').html($('#media')[0].currentSrc);
    });
    $('#media').on('pause', function() { $('#play').html('Play'); });
});

function playStop() {
    var media = $('#media')[0];
    if (media.paused) {
        media.play();
    } else {
        media.pause();
    }
}
Here the document ready method is added with code to subscribe to events. The click event on the play button executes the playStop() function. The playStop() function toggles play/pause on the media control. The button label is updated based on subscribing to the play and pause media events.
21. HTMLMediaElement Summary
- The
<video>and<audio>elements inherit from the HTMLMediaElement object. - Use the
play()method to start playing the media and thepause()method to pause the playing media. - The
pausedproperty can be used to determine whether the media is playing. - The
onplayand theonpauseevents can be subscribed to and provide notifications when the media is played or paused.