React Fundamentals
<– back to React Nanodegree homepage
1. Why React
1.1 Introduction

Before we actually dive into the syntax of React, let’s take a step back and talk about what makes React special.
- It’s compositional model
- It’s declarative nature
- The way data flows through a Component
- That React is really just JavaScript
1.2 What is Composition
Benefits of Composition
Because the concept of composition is such a large part of what makes React awesome and incredible to work with, let’s dig into it a little bit. Remember that composition is just combining simple functions together to create complex functions. There are a couple of key ingredients here that we don’t want to lose track of. These ingredients are:
- simple functions
- combined to create another function
Composition is built from simple functions. Let’s look at an example:
function getProfileLink (username) {
 return 'https://github.com/' + username
}
This function is ridiculously simple, isn’t it? It’s just one line! Similarly, the getProfilePic function is also just a single line:
function getProfilePic (username) {
 return 'https://github.com/' + username + '.png?size=200'
}
These are definitely simple functions, so to compose them, we’d just combine them together inside another function:
function getProfileData (username) {
 return {
   pic: getProfilePic(username),
   link: getProfileLink(username)
 }
}
Now we could have written getProfileData without composition by providing the data directly:
function getProfileData (username) {
 return {
 pic: 'https://github.com/' + username + '.png?size=200',
 link: 'https://github.com/' + username
 }
}
There’s nothing technically wrong with this at all; this is entirely accurate JavaScript code. But this isn’t composition. There are also a couple of potential issues with this version which isn’t using composition. If the user’s link to GitHub is needed somewhere else, then duplicate code would be needed. A good function should follow the “DOT” rule:
Do One Thing
This function is doing a couple of different (however minor) things; it’s creating two different URLs, storing them as properties on an object, and then returning that object. In the composed version, each function just does one thing:
getProfileLink– just builds up a string of the user’s GitHub profile linkgetProfilePic– just builds up a string the user’s GitHub profile picturegetProfileData– returns a new object
React & Composition
React makes use of the power of composition, heavily! React builds up pieces of a UI using components. Let’s take a look at some pseudo code for an example. Here are three different components:
<Page />
<Article />
<Sidebar />
Now let’s take these simple components, combine them together, and create a more complex component (aka, composition in action!):
<Page>
 <Article />
 <Sidebar />
</Page>
Now the Page component has the Article and Sidebar components inside. This is just like the earlier example where getProfileData had getProfileLink and getProfilePic inside it.
We’ll dig into components soon, but just know that composition plays a huge part in building React components.
Composition Recap
Composition occurs when simple functions are combined together to create more complex functions. Think of each function as a single building block that does one thing (DOT). When you combine these simple functions together to form a more complex function, this is composition.
Further Research
- Compose me That: Function Composition in JavaScript
- Functional JavaScript: Function Composition For Every Day Use
1.3 Declarative Code
Imperative Code
A lot of JavaScript is imperative code. If you don’t know what “imperative” means here, then you might be scratching your head a bit. According to the dictionary, “imperative” means:
expressing a command; commanding
When JavaScript code is written imperatively, we tell JavaScript how we want something done. Think of it as if we’re giving JavaScript commands on exactly what steps it should take. For example, I give you the humble for loop:
const people = ['Amanda', 'Farrin', 'Geoff', 'Karen', 'Richard', 'Tyler']
const excitedPeople = []

for (let i = 0; i < people.length; i++) {
 excitedPeople[i] = people[i] + '!'
}
If you’ve worked with JavaScript any length of time, then this should be pretty straightforward. We’re looping through each item in the people array, adding an exclamation mark to their name, and storing the new string in the excitedPeople array. Pretty simple, right?
This is imperative code, though. We’re commanding JavaScript what to do at every single step. We have to give it commands to:
- set an initial value for the iterator - (
let i = 0) - tell the
forloop when it needs to stop - (i < people.length) - get the person at the current position and add an exclamation mark - (
people[i] + '!') - store the data in the
ith position in the other array - (excitedPeople[i]) - increment the
ivariable by one - (i++)
Remember the example of keeping the air temperature at 71º? In my old car, I would turn the knob to get the cold air flowing. But if it got too cold, then I’d turn the knob up higher. Eventually, it would get too warm, and I’d have to turn the knob down a bit, again. I’d have to manage the temperature myself with every little change. Doesn’t this sound like an imperative situation to you? I have to manually do multiple steps. It’s not ideal, so let’s improve things!
Declarative Code
In contrast to imperative code, we’ve got declarative code. With declarative code, we don’t code up all of the steps to get us to the end result. Instead, we declare what we want done, and JavaScript will take care of doing it. We tell JavaScript what we want done. This explanation is a bit abstract, so let’s look at an example. Let’s take the imperative for loop code we were just looking at and refactor it to be more declarative.
With the imperative code we were performing all of the steps to get to the end result. What is the end result that we actually want, though? Well, our starting point was just an array of names:
const people = ['Amanda', 'Farrin', 'Geoff', 'Karen', 'Richard', 'Tyler']
The end goal that we want is an array of the same names but where each name ends with an exclamation mark:
["Amanda!", "Farrin!", "Geoff!", "Karen!", "Richard!", "Tyler!"]
To get us from the starting point to the end, we’ll just use JavaScript’s .map() function to declare what we want done.
const excitedPeople = people.map(name => name + '!')
That’s it! Notice that with this code we haven’t:
- created an iterator object
- told the code when it should stop running
- used the iterator to access a specific item in the
peoplearray - stored each new string in the
excitedPeoplearray
…all of those steps are taken care of by JavaScript’s .map() Array method.
.map() and .filter()
A bit rusty on JavaScript’s .map() and .filter() Array methods? Or perhaps they’re brand new to you. In either case, we’ll be diving into them in the React is “just JavaScript” section. Hold tight!
React is Declarative
We’ll get to writing React code very soon, but let’s take another glimpse at it to show how it’s declarative.
<button onClick={activateTeleporter}>Activate Teleporter</button>
It might seem odd, but this is valid React code and should be pretty easy to understand. Notice that there’s just an onClick attribute on the button…we aren’t using .addEventListener() to set up event handling with all of the steps involved to set it up. Instead, we’re just declaring that we want the activateTeleporter function to run when the button is clicked.
Declarative Code Recap
Imperative code instructs JavaScript on how it should perform each step. With declarative code, we tell JavaScript what we want to be done, and let JavaScript take care of performing the steps.
React is declarative because we write the code that we want, and React is in charge of taking our declared code and performing all of the JavaScript/DOM steps to get us to our desired result.
1.3 Further Research
- Tyler’s Imperative vs Declarative Programming blog post
- Difference between declarative and imperative in React.js? from StackOverflow
1.4 Unidirectional Data Flow
Before React, one popular technique for managing state changes in an app over time, was to use data bindings, so that when data changes in one place, those changes are automatically reflected in other places in the app.
Any part of the app that had that data could also change it. But, as the app grows this technique makes it difficult to determine how a change in one place automatically and implicitly affects the rest of the app.
React uses an explicit method for passing data between components that makes it a lot easier to track changes to the state, and how they affect other places of the app.
This is called unidirectional data flow because the data flows one way from parent elements down to children.
Data-Binding In Other Frameworks
Front-end frameworks like Angular and Ember make use of two-way data bindings. In two-way data binding, the data is kept in sync throughout the app no matter where it is updated. If a model changes the data, then the data updates in the view. Alternatively, if the user changes the data in the view, then the data is updated in the model. Two-way data binding sounds really powerful, but it can make the application harder to reason about and know where the data is actually being updated.
1.4 Further Research
React’s Data-flow
Data moves differently with React’s unidirectional data flow. In React, the data flows from the parent component to a child component.
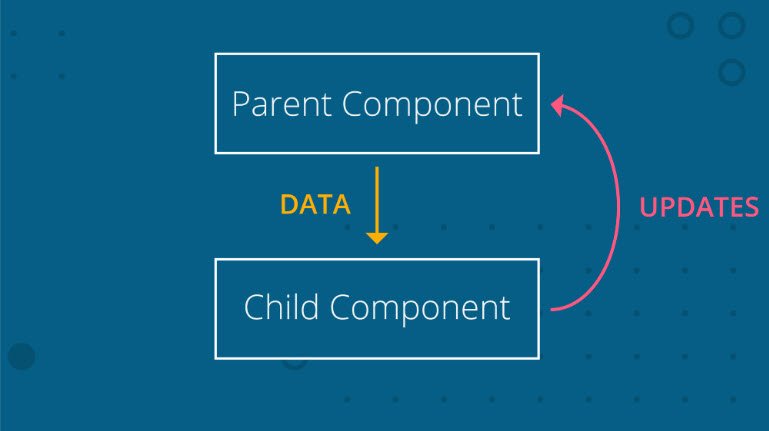
Data flows down from parent component to child component. Data updates are sent to the parent component where the parent performs the actual change.
In the image above, we have two components:
- a parent component
- a child component
The data lives in the parent component and is passed down to the child component. Even though the data lives in the parent component, both the parent and the child components can use the data. However, if the data must be updated, then only the parent component should perform the update. If the child component needs to make a change to the data, then it would send the updated data to the parent component where the change will actually be made. Once the change is made in the parent component, the child component will be passed the data (that has just been updated!).
Now, this might seem like extra work, but having the data flow in one direction and having one place where the data is modified makes it much easier to understand how the application works.
1.4 Quiz
1.4 Question 1 of 2
A FlightPlanner component stores the information for booking a flight. It also contains DatePicker and DestinationPicker as child components. Here’s what the code might look like:
<FlightPlanner>
 <DatePicker />
 <DestinationPicker />
</FlightPlanner>
If this were a React application, which component should be in charge of making updates to the data? Check all that apply.
FlightPlannerDatePickerDestinationPicker
Now let’s say that the FlightPlanner component has two child components: LocationPicker and DatePicker. LocationPicker itself is a parent component that has two child components: OriginPicker and DestinationPicker.
1.4 Question 2 of 2
If the following sample code were a React application, which of the following components should be in charge of making updates to data? Check all that apply.
<FlightPlanner>

 <LocationPicker>
  <OriginPicker />
  <DestinationPicker />
 </LocationPicker>

 <DatePicker />

</FlightPlanner>
FlightPlanner- is the parent component and stores all of the flight data, any changes to the data should be made by this component.DatePicker- receives the data from its parentLocationPicker- is a parent component, it would make sense that it would handle all changes for its child components.OriginPicker- receives the data from its parentDestinationPicker- receives the data from its parent
Data Flow in React Recap
In React, data flows in only one direction, from parent to child. If data is shared between sibling child components, then the data should be stored in the parent component and passed to both of the child components that need it.
1.5 React is Just JavaScript

It’s Just JavaScript
One of the great things about React is that a lot of what you’ll be using is regular JavaScript. To make sure you’re ready to move forward, please take a look at the following code:
const shelf1 = [{name: 'name1', shelf: 'a'},{name: 'name2', shelf: 'a'}];
const shelf2 = [{name: 'name3', shelf: 'b'},{name: 'name4', shelf: 'b'}];
const allBooks = [...shelf1, ...shelf2];

const filter = books => shelf => books.filter(b => {
  return b.shelf === shelf;
});

const filterBy = filter(allBooks);
const booksOnShelf = filterBy('b');
If any of the code above looks confusing, or if you simply need a refresher on E6, please go through our ES6 course before moving forward.
Here’s a couple links for a quick refresher.
- Udacity ES6 course - Syntax notes - destructuring, spread, & rest operators
- Currying and ES6 Arrow Functions - with double arrow functions
Over the past couple of years, functional programming has had a large impact on the JavaScript ecosystem and community. Functional programming is an advanced topic in JavaScript and fills hundreds of books. It’s too complex to delve into the benefits of functional programming (we’ve got to get to React content, right?!?).
React builds on a lot of the techniques of functional programming…techniques that you’ll learn as you go through this program. However, there are a couple of important JavaScript functions that are vital to functional programming that we should look at. These are the Array’s .map() and .filter() methods.
Array’s .map() Method
If you’re not familiar with JavaScript’s Array .map() method, it gets called on an existing array and returns a new array based on what is returned from the function that’s passed as an argument. Let’s take a look:
const names = ['Karen', 'Richard', 'Tyler'];

const nameLengths = names.map( name => name.length );
Let’s go over what’s happening here. The .map() method works on arrays, so we have to have an array to start with:
const names = ['Karen', 'Richard', 'Tyler'];
We call .map() on the names array and pass it a function as an argument:
names.map( name => name.length );
The arrow function that’s passed to .map() gets called for each item in the names array! The arrow function receives the first name in the array, stores it in the name variable and returns its length. Then it does that again for the remaining two names.
.map() returns a new array with the values that are returned from the arrow function:
const nameLengths = names.map( name => name.length );
So nameLengths will be a new array [5, 7, 5]. This is important to understand; the .map() method returns a new array, it does not modify the original array.
This was just a brief overview of how the .map() method works. For a deeper dive, check out .map() on MDN.
.map() Quiz
Use the provided music data array and the .map() method to create a new array that contains items in the format:
<album-name> by <artist> sold <sales> copies
Store the new array in an albumSalesStrings array. So the first item in the albumSalesStrings array should be “25 by Adele sold 1731000 copies”
/* Using .map()
 *
 * Using the musicData array and .map():
 *   - return a string for each item in the array in the following format
 *     <album-name> by <artist> sold <sales> copies
 *   - store the returned data in a new albumSalesStrings variable
 *
 * Note:
 *   - do not delete the musicData variable
 *   - do not alter any of the musicData content
 *   - do not format the sales number, leave it as a long string of digits
 */

const musicData = [
    { artist: 'Adele', name: '25', sales: 1731000 },
    { artist: 'Drake', name: 'Views', sales: 1608000 },
    { artist: 'Beyonce', name: 'Lemonade', sales: 1554000 },
    { artist: 'Chris Stapleton', name: 'Traveller', sales: 1085000 },
    { artist: 'Pentatonix', name: 'A Pentatonix Christmas', sales: 904000 },
    { artist: 'Original Broadway Cast Recording',
      name: 'Hamilton: An American Musical', sales: 820000 },
    { artist: 'Twenty One Pilots', name: 'Blurryface', sales: 738000 },
    { artist: 'Prince', name: 'The Very Best of Prince', sales: 668000 },
    { artist: 'Rihanna', name: 'Anti', sales: 603000 },
    { artist: 'Justin Bieber', name: 'Purpose', sales: 554000 }
];

// SOLUTION
const albumSalesStrings =
  musicData.map(obj => `${obj.name} by ${obj.artist} sold ${obj.sales} copies`);

console.log(albumSalesStrings);
Array’s .filter() Method
JavaScript’s Array .filter() method is similar to the .map() method:
- it is called on an array
- it takes a function as an argument
- it returns a new array
The difference is that the function passed to .filter() is used as a test, and only items in the array that pass the test are included in the new array. Let’s take a look at an example:
const names = ['Karen', 'Richard', 'Tyler'];

const shortNames = names.filter( name => name.length < 6 );
Just as before, we have the starting array:
const names = ['Karen', 'Richard', 'Tyler'];
We call .filter() on the names array and pass it a function as an argument:
names.filter( name => name.length < 6 );
Again, just like with .map() the arrow function that’s passed to .filter() gets called for each item in the names array. The first item (i.e. ‘Karen’) is stored in the name variable. Then the test is performed - this is what’s doing the actual filtering. It checks the length of the name. If it’s 6 or greater, then it’s skipped (and not included in the new array!). But if the length of the name is less than 6, then name.length < 6 returns true and the name is included in the new array!
And lastly, just like with .map() the .filter() method returns a new array instead of modifying the original array:
const shortNames = names.filter( name => name.length < 6 );
So shortNames will be the new array ['Karen', 'Tyler']. Notice that it only has two names in it now, because ‘Richard’ is 7 characters and was filtered out.
This was just a brief overview of how the .filter() method works. For a deeper dive, check out .filter() on MDN.
.filter() Quiz
Use the provided music data array and the .filter() method to create a new array that only contains albums with names between 10 and 25 characters long. Store the new array in a variable called results.
/* Using .filter()
 *
 * Using the musicData array and .filter():
 *   - return only album objects where the album's name is
 *     10 characters long, 25 characters long, or anywhere in between
 *   - store the returned data in a new `results` variable
 *
 * Note:
 *   - do not delete the musicData variable
 *   - do not alter any of the musicData content
 */

const musicData = [
    { artist: 'Adele', name: '25', sales: 1731000 },
    { artist: 'Drake', name: 'Views', sales: 1608000 },
    { artist: 'Beyonce', name: 'Lemonade', sales: 1554000 },
    { artist: 'Chris Stapleton', name: 'Traveller', sales: 1085000 },
    { artist: 'Pentatonix', name: 'A Pentatonix Christmas', sales: 904000 },
    { artist: 'Original Broadway Cast Recording',
      name: 'Hamilton: An American Musical', sales: 820000 },
    { artist: 'Twenty One Pilots', name: 'Blurryface', sales: 738000 },
    { artist: 'Prince', name: 'The Very Best of Prince', sales: 668000 },
    { artist: 'Rihanna', name: 'Anti', sales: 603000 },
    { artist: 'Justin Bieber', name: 'Purpose', sales: 554000 }
];

// SOLUTION
const results =
  musicData.filter(album => album.name.length >= 10 && album.name.length <= 25);

console.log(results);
Combining .map() And .filter() Together
What makes .map() and .filter() so powerful is that they can be combined. Because both methods return arrays, we can chain the method calls together so that the returned data from one can be a new array for the next.
const names = ['Karen', 'Richard', 'Tyler'];

const shortNamesLengths =
  names.filter( name => name.length < 6 ).map( name => name.length );
To break it down, the names array is filtered, which returns a new array, but then .map() is called on that new array, and returns a new array of its own! This new array that’s returned from .map() is what’s stored in shortNamesLengths.
.filter() First!
On a side note, you’ll want to run things in this order - .filter() first and then .map(). Because .map() runs the function once for each item in the array, it will be faster if the array were already filtered.
.filter() and .map() Quiz
Using the same music data, use .filter() and .map() to filter and map over the list and store the result in a variable named popular. Use .filter() to filter the list down to just the albums that have sold over 1,000,000 copies. Then chain .map() onto the returned array to create a new array that contains items in the format:
<artist> is a great performer
The first item in the popular array will be ‘Adele is a great performer’.
/* Combining .filter() and .map()
 *
 * Using the musicData array, .filter, and .map():
 *   - filter the musicData array down to just the albums that have
 *     sold over 1,000,000 copies
 *   - on the array returned from .filter(), call .map()
 *   - use .map() to return a string for each item in the array in the
 *     following format: "<artist> is a great performer"
 *   - store the array returned form .map() in a new "popular" variable
 *
 * Note:
 *   - do not delete the musicData variable
 *   - do not alter any of the musicData content
 */

const musicData = [
    { artist: 'Adele', name: '25', sales: 1731000 },
    { artist: 'Drake', name: 'Views', sales: 1608000 },
    { artist: 'Beyonce', name: 'Lemonade', sales: 1554000 },
    { artist: 'Chris Stapleton', name: 'Traveller', sales: 1085000 },
    { artist: 'Pentatonix', name: 'A Pentatonix Christmas', sales: 904000 },
    { artist: 'Original Broadway Cast Recording',
      name: 'Hamilton: An American Musical', sales: 820000 },
    { artist: 'Twenty One Pilots', name: 'Blurryface', sales: 738000 },
    { artist: 'Prince', name: 'The Very Best of Prince', sales: 668000 },
    { artist: 'Rihanna', name: 'Anti', sales: 603000 },
    { artist: 'Justin Bieber', name: 'Purpose', sales: 554000 }
];

const popular = musicData
  .filter(album => album.sales > 1000000)
  .map(album => `${album.artist} is a great performer`);

console.log(popular);
React is Just JavaScript Recap
React builds on what you already know - JavaScript! You don’t have to learn a special template library or a new way of doing things.
Two of the main methods that you’ll be using quite a lot are:
.map().filter()
It’s important that you’re comfortable using these methods, so take some time to practice using them. Why not look through some of your existing code and try converting your for loops to .map() calls or see if you can remove any if statements by using .filter().
1.6 Recap
Let’s recap on some of the things we covered in this lesson on why React is great:
- its compositional model
- its declarative nature
- the way data flows from parent to child
- and that React is really just JavaScript
Lesson Challenge
Read these 3 articles that cover some of the essentials of React:
Answer the following questions (in your own words) and share your answers with your Study Group.
- What is the “Virtual DOM”?
- Explain what makes React performant.
- Explain the Diffing Algorithm to someone who does not have any programming experience.
2. Rendering UI w/ React
2.1 Rendering UI Intro

React uses JavaScript objects to create React elements. We’ll use these React elements to describe what we want the page to look like, and React will be in charge of generating the DOM nodes to achieve the result.
Recall from the previous lesson the difference between imperative and declarative code. The React code that we write is declarative because we aren’t telling React what to do; instead, we’re writing React elements that describe what the page should look like, and React does all of the implementation work to get it done.
Enough theory, let’s get to it and create some elements!
2.2 Elements and JSX
Watch First
We’ll be looking at using React’s .createElement() method in the next couple of videos. For starters, here is its signature:
React.createElement( /* type */, /* props */, /* content */ );
We’ll take a deep dive into what all that entails in just a bit! We’ll start things out with a project that’s already set up. For now, don’t worry about creating a project or coding along. There will be plenty of hands-on work for you to do soon enough!
We’ll start building our in-class project, Contacts App, in the next section. If you would like to code along for the next few videos, you can use this React Sandbox.
💡 Trying Out React Code 💡
React is an extension of JavaScript (i.e., a JavaScript library), but it isn’t built into your browser. You wouldn’t be able to test out React code samples in your browser console the way you would if you were learning JavaScript. In just a bit, we’ll see how to install and use a React environment!
React.createElement
import React from "react";
import ReactDOM from "react-dom";

const element = React.createElement("div",  null, "hello world");

ReactDOM.render(element, document.getElementById("root"));
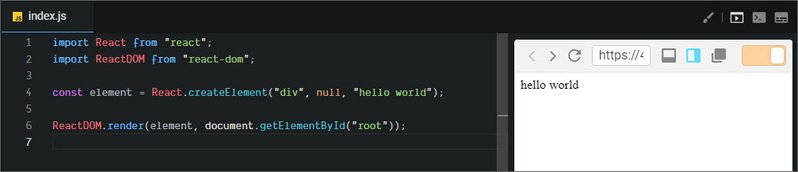
Live Demo: React Element on CodeSandbox
ReactDOM
One thing to keep in mind is that we could be rendering out to different destinations. For that reason, ReactDOM was split out of the React library. Some other destinations include:
- render on the server
- native devices
- VR environments

Rendering Elements onto the DOM
In the previous video, we used ReactDOM’s render() method to render our element onto a particular area of a page. In particular, we rendered the element onto a DOM node called root. But where did this root come from?
Apps built with React typically have a single root DOM node. For example, an HTML file may contain a <div> with the following:
<div id="root"></div>
By passing this DOM node into getElementById(), React will end up controlling the entirety of its contents. Another way to think about this is that this particular <div> will serve as a “hook” for our React app; this is the area where React will take over and render our UI!
2.2 Question 1 of 3
What will myBio hold when the following code is run?
import React from 'react';

const myBio = React.createElement('div', null, 'Hi, I love porcupines.');
- a reference to a DOM node
- a DOM node itself
- a JavaScript object
- a JavaScript class
DOM nodes - className
import React from "react";
import ReactDOM from "react-dom";

const element = React.createElement(
  "div",
  {
    className: "welcome-message"
  },
  "hello world"
);

console.log(element);

ReactDOM.render(element, document.getElementById("root"));
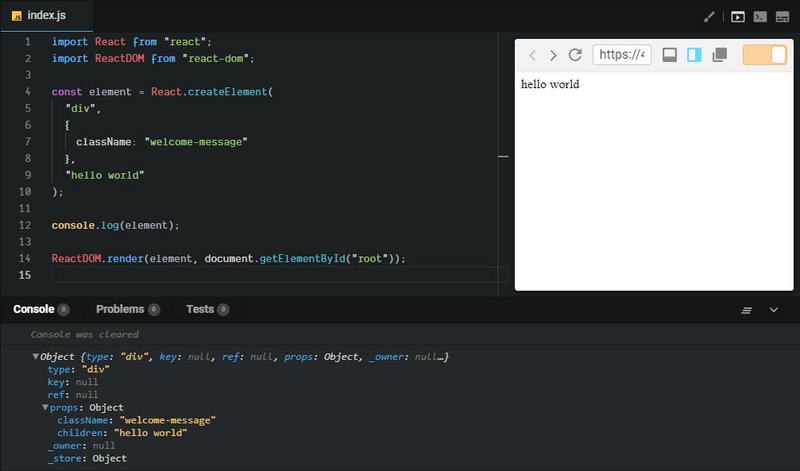
Live Demo: React Element on CodeSandbox
When we’re creating these React elements we must remember that we are describing DOM nodes not HTML elements. For that reason we must use things like ‘className’ rather than ‘class’ since ‘class’ is a reserved word.
Virtual DOM - objects that describe real DOM nodes
When we call
React.createElementwe haven’t actually created anything in the DOM yet. It’s not until we calrender()that the browser actually creates a real DOM element.
2.2 Question 2 of 3
React allows a lot of HTML attributes to be passed along to the React element. Look through all supported HTML attributes in the React docs and select which of the following attributes are allowed:
- poster
- id
- marginWidth
- for - (‘for’ is a reserved word so instead we can use ‘htmlFor’)
I just used React’s .createElement() method to construct a “React element”. The .createElement() method has the following signature:
React.createElement( /* type */, /* props */, /* content */ );
Let’s break down what each item can be:
-
type– either a string or a React ComponentThis can be a string of any existing HTML element (e.g.
'p','span', or'header') or you could pass a React component (we’ll be creating components with JSX, in just a moment). -
props– eithernullor an objectThis is an object of HTML attributes and custom data about the element.
-
content–null, a string, a React Element, or a React ComponentAnything that you pass here will be the content of the rendered element. This can include plain text, JavaScript code, other React elements, etc.
Nested Elements
import React from "react";
import ReactDOM from "react-dom";

const element = React.createElement(
  "ol",
  null,
  React.createElement("li", null, "James"),
  React.createElement("li", null, "Mark"),
  React.createElement("li", null, "Steve")
);

console.log(element);

ReactDOM.render(element, document.getElementById("root"));
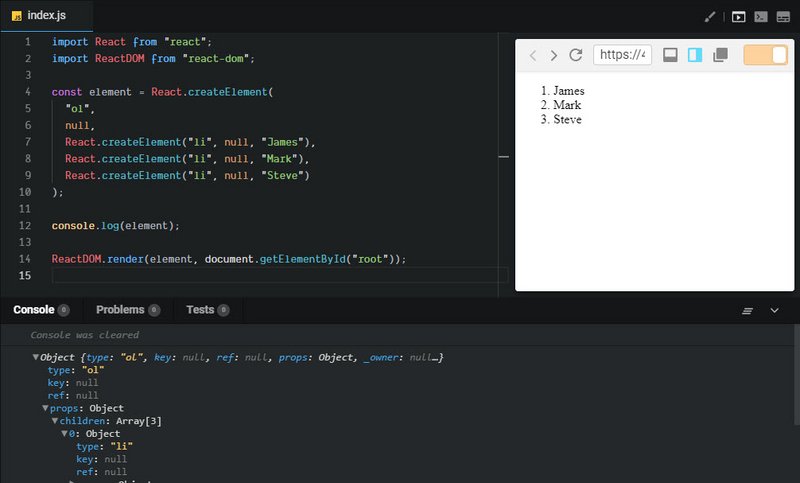
Live Demo: React Element on CodeSandbox
List Data
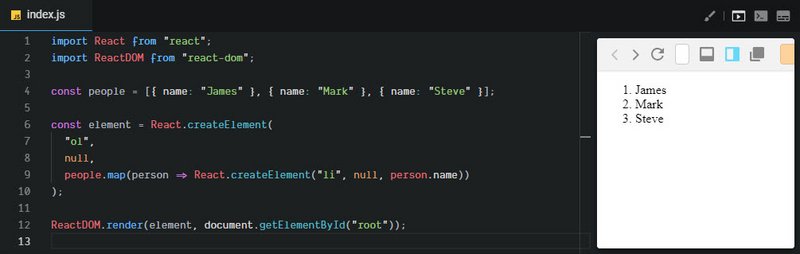
Now, what we currently have is fine but most of the time when you need a list, you’ll probably have the items in an array somewhere.
Instead of writing out child elements one by one, React lets us provide an array of elements to use as children. This makes it easier to work with existing arrays of data.
So, let’s say we have an array here of people that we want to dynamically generate these list items from this array. We could just map over the people array and for each person, we will generate a list item.
And instead of hard-coding the we will just use person.name to get the same result.
import React from "react";
import ReactDOM from "react-dom";

const people = [
  { name: 'James' },
  { name: 'Mark' },
  { name: 'Steve' }
];

const element = React.createElement(
  "ol",
  null,
  people.map((person) => (
    React.createElement('li', null, person.name)
  ))
);

ReactDOM.render(element, document.getElementById("root"));
Live Demo: React Element on CodeSandbox
The thing I like about using JavaScript to generate these elements is that I didn’t need any special syntax to map over the array. Instead, I just used array.map.
I didn’t need a templating language to give me some ‘repeat’ or ‘mapping’ or ‘each’ syntax to loop over the array. I can use JavaScript which I already know.
Another thing that’s interesting here is that this person object was already in scope. So, I didn’t need a templating language to give me that concept of scope. I just use the person object in the JavaScript function scope. There’s nothing new to learn here.
Now one thing to note, when you’re using an array as children is that React is going to complain if you don’t give it a key.
If we look at the console here in the browser, you’ll see a warning.
Each child in an array or iterator should have a unique “key” prop. Check the top-level render call using ol.
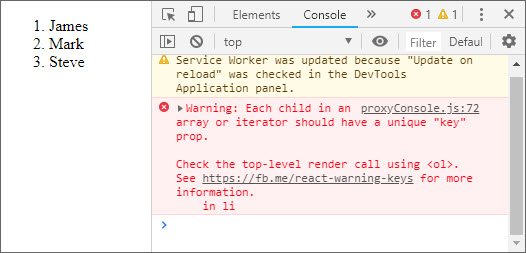
What does that mean? Well, remember, when we added the class name to the div, the second argument which we assigned a null to, is for props to our component.
So, let’s give this item a unique key prop. Something that is unique about each of these objects. In this case, the name would work because that’s unique for each of the objects.
import React from "react";
import ReactDOM from "react-dom";

const people = [{ name: "James" }, { name: "Mark" }, { name: "Steve" }];

const element = React.createElement(
  "ol",
  null,
  people.map(person =>
    React.createElement("li", { key: person.name }, person.name)
  )
);

ReactDOM.render(element, document.getElementById("root"));
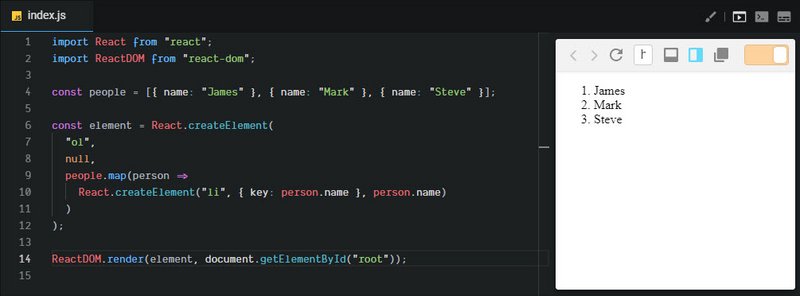
Live Demo: React Element on CodeSandbox
So, you’ll notice here that the warning goes away. Now, we’re not going to go too deep nto the key prop in this lesson. But know that if you are mapping over an array with React and you’re creating elements for each item in that array, each element needs its own unique key prop.
.createElement() Returns only One Root Element
Recall that React.createElement(); creates a single React element of a particular type. We’d normally pass in a tag such as a <div> or a <span> to represent that type, but the content argument can be another React element.
Consider the following example:
const element = React.createElement('div', null,
 React.createElement('strong', null, 'Hello world!')
);
Here, “Hello world!” will be wrapped in a <div> when this React element renders as HTML. While we can indeed nest React elements, remember the overall call just returns a single element.
JSX
Now that we’ve learned how to create elements and how to nest them, it can get pretty tedious if we’re just using these nested create element calls to create large portions of our app.
What we need is an HTML-like syntax that we can use in our JavaScript.
This is exactly what JSX does.
JSX is a syntax extension to JavaScript, that lets us write JavaScript code that looks a little bit more like HTML, making it more concise and easier to follow. Let’s check it out.
import React from 'react';
import ReactDOM from 'react-dom';
import './styles.css';

const people = [{ name: 'James' }, { name: 'Mark' }, { name: 'Steve' }];

const element = (
  <ol>
    <li>{people[0].name}</li>
  </ol>
);

ReactDOM.render(element, document.getElementById('app'));
Whenever we want JSX to evaluate some JavaScript for us, we have to wrap that piece of JavaScript in curly braces. This could be any JavaScript expression you want including some math, a ternary, or any other valid JavaScript.
Let’s create our list again. Everything between curly braces is JavaScript and everything between angle brackets is JSX. The code alternates between the two but is much more concise than the nested createElement calls.
import React from 'react';
import ReactDOM from 'react-dom';
import './styles.css';

const people = [{ name: 'James' }, { name: 'Mark' }, { name: 'Steve' }];

const element = (
  <ol>
    {people.map(person => (
      <li key={person.name}>{person.name}</li>
    ))}
  </ol>
);

ReactDOM.render(element, document.getElementById('app'));
Live Demo: React Simple JSX on CodeSandbox
As we said earlier whenever we give React an array, we need to give a unique key prop to each one of the repeating elements, list item in this case.
You’ll notice it looks like we’re assigning values to HTML attributes. We do this by opening up a JavaScript expression and using person.name as the value of the key prop.
Another thing to note is that event though we’re using JSX which is nice and concise, this code gets compiled down to real JavaScript using createElement inside our ‘bundle.js’.
2.2 Question 3 of 3
Consider the following example in JSX:
const greeting = (
 <div className='greeting'>
 <h2>Hello world!</h2>
 </div>
);
If we want to output the same HTML, what goes into 1, 2, and 3 when calling createElement()?
const greeting = React.createElement(
 __1__,
 { className: 'greeting' },
 React.createElement(
 __2__,
 {},
 __3__
 )
);
- ‘h2’, ‘div’, ‘Hello world!’
- ‘div’, ‘h2’, ‘Hello world!’
- ‘div’, ‘h2’, ‘Hello world!’
- ‘Hello world’, ‘div’, ‘h2’
JSX returns One main element, too
When writing JSX, keep in mind that it must only return a single element. This element may have any number of descendants, but there must be a single root element wrapping your overall JSX (typically a <div> or a <span>). Check out the following example:
const message = (
 <div>
   <h1>All About JSX:</h1>
   <ul>
     <li>JSX</li>
     <li>is</li>
     <li>awesome!</li>
   </ul>
 </div>
);
See how there’s only one <div> element in the code above and that all other JSX is nested inside it? This is how you have to write it if you want multiple elements. To be completely clear, the following is incorrect and will cause an error:
const message = (
 <h1>All About JSX:</h1>
 <ul>
   <li>JSX</li>
   <li>is</li>
   <li>awesome!</li>
 </ul>
);
In this example, we have two sibling elements that are both at the root level (i.e. <h1> and <ul>) . This won’t work and will give the error:
Syntax error: Adjacent JSX elements must be wrapped in an enclosing tag
Since we know that JSX is really just a syntax extension for .createElement(), this makes sense; .createElement() takes in only one tag name (as a string) as its first argument.
Intro to Components
So far we’ve seen how .createElement() and JSX can help us produce some HTML. Typically, though, we’ll use one of React’s key features, Components, to construct our UI. Components refer to reusable pieces of code ultimately responsible for returning HTML to be rendered onto the page. More often than not, you’ll see React components written with JSX.
Since React’s main focus is to streamline building our app’s UI, there is only one method that is absolutely required in any React component class: render().
React provides a base component class that we can use to group many elements together and use them as if they were one element.
You could think about React components as the factories that we use to create React elements. So, by building custom components or classes, we can easily generate our own custom elements.
Let’s go ahead and build our first component class!
import React from 'react';
import ReactDOM from 'react-dom';
import './styles.css';

class ContactList extends React.Component {
  render() {
    const people = [{ name: 'Greg' }, { name: 'Mark' }, { name: 'Steve' }];

    return (
      <ol>
        {people.map(person => (
          <li key={person.name}>{person.name}</li>
        ))}
      </ol>
    );
  }
}

ReactDOM.render(<ContactList />, document.getElementById('app'));
Live Demo: First Component on CodeSandbox
💡 Declaring Components in React 💡
In the previous video, we defined the ContactList component like so:
class ContactList extends React.Component {
  // ...
}
In other words, we are defining a component that’s really just a JavaScript class that inherits from React.Component.
In real-world use (and throughout this course), you may also see declarations like:
class ContactList extends Component {
  // ...
}
Both ways are functionally the same, but be sure your module imports match accordingly! That is, if you choose to declare components like the example directly above, your import from React will now look like:
import React, { Component } from 'react';
Creating Elements Recap
In the end, remember that React is only concerned with the View layer of our app. This is what the user sees and interacts with. As such, we can use .createElement() to render HTML onto a document. More often than not, however, you’ll use a syntax extension to describe what your UI should look like. This syntax extension is known as JSX, and just looks similar to plain HTML written right into a JavaScript file. The JSX gets transpiled to React’s .createElement() method that outputs HTML to be rendered in the browser.
A great mindset to have when building React apps is to think in components. Components represent the modularity and reusability of React. You can think of your component classes as factories that produce instances of components. These component classes should follow the single responsibility principle and just “do one thing”. If it manages too many different tasks, it may be a good idea to decompose your component into smaller subcomponents.
2.2 Further Research
- Rendering Elements from the React docs
2.3 Create React App
Skip past these older instruction to see how Create React App is installed on newer versions of node.js.
Old instructions (for reference)
💡Before Installing create-react-app💡
If you already have Node.js on your machine, it might be a good idea to upgrade or reinstall to make sure you have the latest version. Keep in mind that Node.js now comes with npm by default.
MacOS
- Install Homebrew by running
/usr/bin/ruby -e "$curl -fsSL
https://raw.githubusercontent.com/Homebrew/install/master/install)"
in the terminal
- Check that it was installed by running
brew --version. You should see the version number that was installed.- Run
brew install node.- Run
node --version.- Check that npm was installed as well by running
npm --version.- Run
brew install yarn --without-node.- Run
npm --version.- Run
yarn install && yarn --versionWindows
- Please download the Node.js Installer, go through the installation process, and restart your computer once you’re done.
- Please follow the yarn installation instructions.
- Run
yarn --versionto make sure yarn has been successfully installed.Linux
- Please follow these instructions to install Node.js.
- Run
sudo apt-get install -y build-essential.- Please follow the yarn installation instructions.
- Run
yarn --versionto make sure yarn has been successfully installed.Install create-react-app globally
Install Create React App (through the command-line with npm).
npm install -g create-react-appIf get permission errors, check out this article on global package installs in the npm documentation.
Note that to find out where global packages are installed, you can run
npm list -g --depth=0in your console (more information here).
What is Create React App
JSX is awesome, but it does need to be transpiled into regular JavaScript before reaching the browser. Typically this is done with two tools.
- Babel - a transpiler which converts JSX & ES6 to vanilla JavaScript
- Webpack - a build tool which bundles all our assets (JavaScript, CSS, images, etc.) for web projects
To streamline this initial configuration, Facebook published Create React App to manage the setup for us!
This tool is incredibly helpful to get started in building a React app, as it sets up everything we need with zero configuration!
The Create React App - Quick Overview shows how to use this tool to scaffold a React project without having to do a global install which was detailed in the old instructions.
Scaffolding Your React App
Let’s do the following:
npx create-react-app contacts
cd contacts
npm start
Now, create-react-app installs react, react-dom, and the react-scripts package.
React-scripts encapsulates a lot of powerful libraries.
- It installs Babel so we can use the latest JavaScript syntax as well as JSX.
- It also installs Webpack, so we can generate the build
- It installs Webpack dev server, which gives us the auto-reload behavior we’ve seen up until this point.
As with all abstractions, you can peel back the layers on react-scripts one at a time, if you really want to see what’s under the hood. But for now, create-react-app is a great way to get started quickly with the latest technologies without having to put in all the time needed to learn them before you get started with React.
The Yarn Package Manager
Both in the following video and in the output of create-react-app, we’re told to use yarn start to start the development server.
Yarn is a package manager that’s similar to NPM. Yarn was created from the ground up by Facebook to improve on some key aspects that were slow or lacking in NPM.
If you don’t want to install Yarn, you don’t have to! What’s great about it is that almost every use of yarn can be swapped with npm and everything will work just fine! So if the command is yarn start, you can use npm start to run the same command.
create-react-app Recap
Facebook’s create-react-app is a command-line tool that scaffolds a React application.
Using this, there is no need to install or configure module bundlers like Webpack, or transpilers like Babel. These come preconfigured (and hidden) with create-react-app, so you can jump right into building your app!
Check out these links for more info about create-react-app:
- create-react-app on GitHub
- create-react-app Release Post from the React blog
- Updates to create-react-app from the React blog
2.4 Composing with Components
Earlier, we said that components are the building blocks of React. But what is actually meant by that?
If you look at the API and documentation for React, they’re relatively small. The vast majority of React’s API is all about components. They are the main unit of encapsulation that React gives us.
Components are great, because they help us break down the UI into smaller pieces. These pieces have clear responsibilities and well-defined interfaces. This is valuable when building a large app, because it lets us work on tiny pieces of the app without inadvertently affecting the rest of it.
Another great thing about components, is that they encourage us to build applications using composition instead of inheritance.
So, let’s talk a little bit about what it means to use composition to build user interfaces and how React let’s us do that.
We open up the index.js and paste in the <ContactList /> component. And instead of rendering everything inside of the App, I’m going to render it the ContactList.
import React from 'react';
import ReactDOM from 'react-dom';

class ContactList extends React.Component {
  render() {
    const people = this.props.contacts;

    return (
      <ol>
        {people.map(person => (
          <li key={person.name}>{person.name}</li>
        ))}
      </ol>
    );
  }
}

function App() {
  return (
    <div className="App">
      <ContactList />
      <ContactList />
      <ContactList />
    </div>
  );
}

const rootElement = document.getElementById('root');
ReactDOM.render(<App />, rootElement);
Live Demo: Simple Composition on CodeSandbox
We can already see how easy it is to create our own custom elements as we’ve talked about before, and compose them together. We can take the ContactList and put it right inside the application.
Encapsulating many elements inside of a component gives us a few advantages.
For one, it’s really easy to reuse all of those elements. For example, if I wanted multiple copies of the ContactsLists, I could just copy and paste this line three times and get three identical copies of those elements.
Another nice property of these components is that they have a very clean interface so I can configure different components differently just by giving them different props.
Take for example, our ContactList. Let’s say, in the first ContactList I want to show three names and in the second contact list, I want to show a completely different set of contacts.
So what I would actually like to do is to be able to configure these ContactLists independently of one another. We can do this with the use of prop that we pass each ContactList component.
import React from 'react';
import ReactDOM from 'react-dom';

class ContactList extends React.Component {
  render() {
    const people = this.props.contacts;

    return (
      <ol>
        {people.map(person => (
          <li key={person.name}>{person.name}</li>
        ))}
      </ol>
    );
  }
}

function App() {
  return (
    <div className="App">
      <ContactList
        contacts={[{ name: 'James' }, { name: 'Mark' }, { name: 'Steven' }]}
      />
      <ContactList
        contacts={[{ name: 'Evi' }, { name: 'Sarah' }, { name: 'Susan' }]}
      />
      <ContactList
        contacts={[{ name: 'Spot' }, { name: 'Rover' }, { name: 'Fido' }]}
      />
    </div>
  );
}

const rootElement = document.getElementById('root');
ReactDOM.render(<App />, rootElement);
Live Demo: Simple Composition on CodeSandbox
You can see we were able to reuse the elements from ContactList but configure them completely separately. This makes it really easy to reuse these components by just passing in little bits of configuration via the props.
These two principles,
- the ability to encapsulate a bunch of elements in a component
- the ability to easily reuse each component by being able to configure each one differently and independently via props
are two really important and fundamental keys to understanding the composition model of React.
Favor Composition Over Inheritance
You might have heard before that it’s better to “favor composition over inheritance”. This is a principle that I believe is difficult to learn today. Many of the most popular programming languages make extensive use of inheritance, and it has carried over into popular UI frameworks like the Android and iOS SDKs.
In contrast, React uses composition to build user interfaces. Yes, we extend React.Component, but we never extend it more than once. Instead of extending base components to add more UI or behavior, we compose elements in different ways using nesting and props. You ultimately want your UI components to be independent, focused, and reusable.
So if you’ve never understood what it means to “favor composition over inheritance” you’ll definitely learn using React!
2.5 Component Recap
The principles we’ve discussed in this lesson are absolutely fundamental to getting the most out of a React.
Just to recap…
- We learned about how JSX just uses JavaScript to let us describe the UI by creating elements instead of writing these rigid string templates.
- We also learned how to encapsulate groups of elements in React components, and how to build larger portions of the UI by composing those components together.
-
Components let you split the UI into independent, reusable pieces, and think about each piece in isolation.
-
Conceptually, components are like JavaScript functions. They accept arbitrary inputs (called “props”) and return React elements describing what should appear on the screen.
-
- We also installed Create React App, and used it to get a quick start on using the latest technologies commonly used to create a modern React application.
But React’s code we use in encapsulation story gets really interesting in the next lesson where we talk about how each of these little components can hold, and manage it’s own state.
3. State Management
3.1 Project Setup

Three new concepts that we’ll be covering are:
- Props - Allows you to pass data into components
- Functional Components - An alternative, and probably more intuitive approach to creating components.
- Controlled Components - Allows you to hook up the forms in your application to your component state
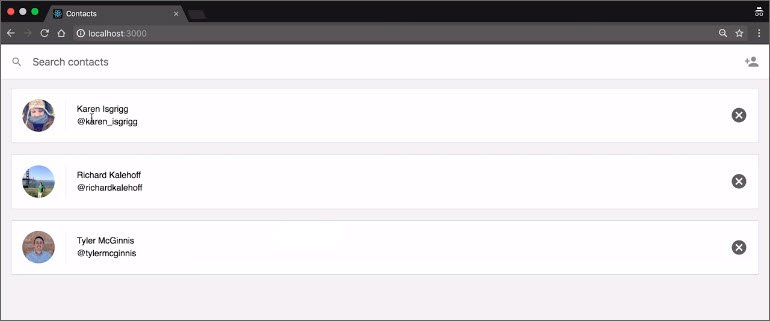
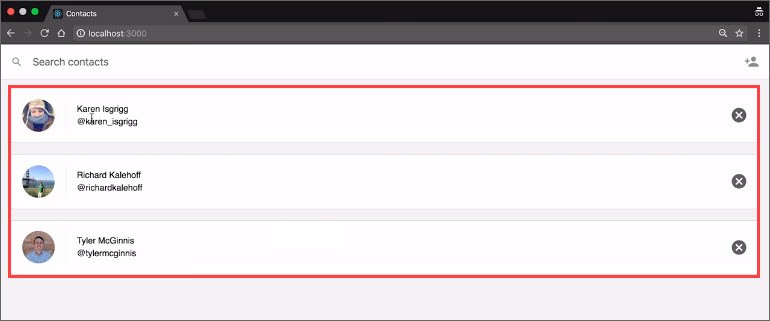
Contacts App
We will be building a Contacts app that shows a list of contacts. Each contact has an avatar, name, and twitter handle.
The app will also have a search bar that will allow you to filter the contacts or reset the the state to show all contacts.
It will also allow you to remove a contact and add a contact by entering a name, handle, and uploading an image.
What we should think about is how to build out this application. The way we build a large React application is by building out a bunch of small applications or components.
We need to consider how we’d structure this out if we were building this out of components.
Front End Project Files
Create React App will generate a number of default files and starter code that we need to get rid of. There will be two sets of changes you need to make, delete the starter content and add files that we’re providing you.
We’ve done this step this for you. Here’s the project repo
Follow these instructions.
- Clone the repo with
git clone https://github.com/udacity/reactnd-contacts-app.git
- checkout the ‘starter-files-added’ remote branch with this command
git checkout -b starter-files-added origin/starter-files-added
Back End Server
The Contacts app project that we’re building is a front-end project. However, we’ll eventually be storing the contacts on a backend server. Since we’re only really focusing on the front-end for this course, we’ve gone ahead and built this server for you so you can focus on just the React parts of this program.
The server is a simple Node/Express app. The repo for the project is at
All you need to do is:
- clone the project with
git clone https://github.com/udacity/reactnd-contacts-server2.git
- install the project dependencies with
npm install
- start the server with
node server.js
Once you’ve started the server, you can forget about it. The Contacts project we’re working on will interact with this server, but we won’t ever modify any of the server code.
💡 Running Two Servers💡
At this point, you should be running two different servers on your local machine:
- Front-end development server: Accessible on port 3000
- (
npm startoryarn start)- Back-end server: Accessible on port 5001
- (
node server.js)Please be sure that both are running before moving on in this Lesson.
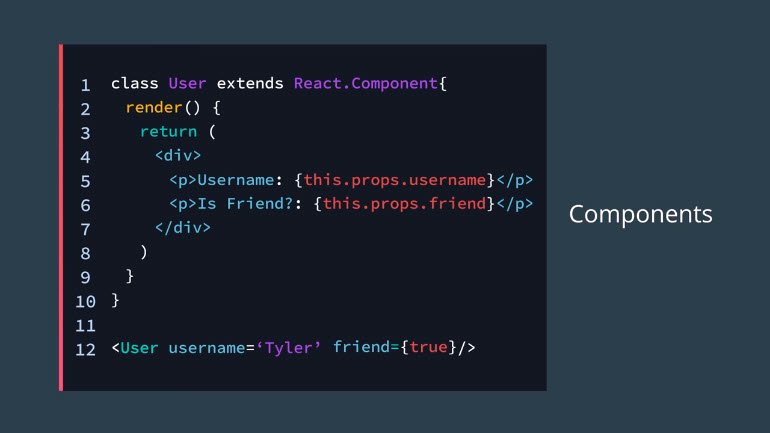
3.2 Pass Data with Props
Here we have a function whose whole purpose is to fetch a user. The problem is we need to tell the function which user to fetch. This is done by passing a parameter to our function.

The same thing holds true for React components. In the same way we pass data to a function, we can pass data to a component.
Here the whole purpose of this component is to display a user to the UI. In order to do this we add a custom attribute to our component and give it a value.
Now we can access that value from inside our component definition by using this.props.username.
In fact any attributes that are added to a component are accessible inside of that component.
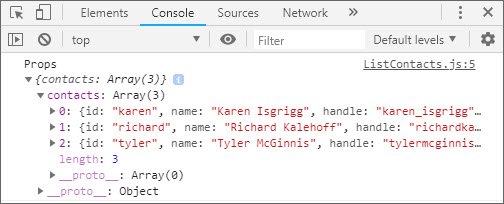
Here we’ll use this contacts array temporarily. Eventually, we’ll be grabbing this from our backend server.
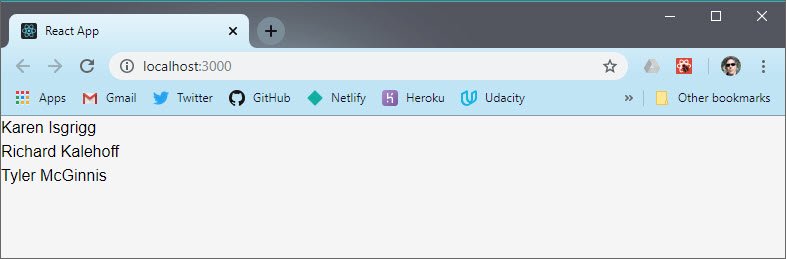
const contacts = [
 {
   "id": "karen",
   "name": "Karen Isgrigg",
   "handle": "karen_isgrigg",
   "avatarURL": "http://localhost:5001/karen.jpg"
 },
 {
   "id": "richard",
   "name": "Richard Kalehoff",
   "handle": "richardkalehoff",
   "avatarURL": "http://localhost:5001/richard.jpg"
 },
 {
   "id": "tyler",
   "name": "Tyler McGinnis",
   "handle": "tylermcginnis",
   "avatarURL": "http://localhost:5001/tyler.jpg"
 }
];
We want to create a new component that will take in this array as props and be responsible for looping over that array to show a contact record for each item in the array.
Whenever we want to build out a new component we create a new file for it. In this case we’ll want to name the file “ListContacts.js” because that’s what the component will be responsible for.
ListContacts - array as props
We start with our import statement. Then we create our class and extend Component. We’ll usually want to immediately jump down to the bottom and do our export statement as well.
// ListContacts.js
import React, { Component } from 'react';

class ListContacts extends Component {
  render() {
    return (
      <ol className="contact-list">

      </ol>
    )
  }
}

export default ListContacts;
We create the render method and inside our return statement and we start with an ordered list.
Next we need to figure out a way of passing the array from App to our child component.
We first start by importing our ListContacts component. We are then able to use it in our App’s render method. We then create a contacts prop and pass in the contacts array.
// App.js
import React, { Component } from 'react';
import ListContacts from './ListContacts';

const contacts = [
  {
    id: 'karen',
    name: 'Karen Isgrigg',
    handle: 'karen_isgrigg',
    avatarURL: 'http://localhost:5001/karen.jpg'
  }
  // additional elements...
];

class App extends Component {
  render() {
    return (
      <div>
        <ListContacts contacts={contacts} />
      </div>
    );
  }
}

export default App;
We can think of this as we would a function invocation. We can pass data to that function in the same way we’re passing data to our component as a prop.
Lastly if we want to test we can console.log the following in ListContacts.js and view this in our Console.
class ListContacts extends Component {
  render() {
    console.log('Props', this.props);
    return (
      <ol className="contact-list">

      </ol>
    );
  }
}
Argument is to function what props is to component.
3.2 Question 2 of 4
If there were a <Clock /> component in an app you’re building, how would you pass a currentTime prop into it?
<Clock {new Date().getTime()} /><Clock this.props={new Date().getTime()} /><Clock currentTime={new Date().getTime()} /><Clock this.currentTime={new Date().getTime()} />
ListContacts - map over array
Next we map over the contacts array and create a list item outputting the name for each. We create a key attribute and output the id.
class ListContacts extends Component {
  render() {
    return (
      <ol className="contact-list">
        {this.props.contacts.map(contact => (
          <li key={contact.id}>
            {contact.name}
          </li>
        ))}
      </ol>
    );
  }
}
Notice that we use a parens instead of curly braces after the ES6 arrow function in order to get the implicit return.
The reason we need to add a key is because eventually one of those list items may change, and by having a unique key attribute on each list item, React is able to performantly know which list item has changed and can update just that item rather than having to recreate the entire list every time.
3.2 QUESTION 3 OF 4
Using the <Clock /> component example:
<Clock currentTime='3:41pm' />
How would you access the value 3:41pm from inside the component?
- Clock.currentTime
- currentTime
- this.currentTime
- this.props.currentTime
ListContacts - display data & inline style
Now instead of just showing the names, we want to fill out the rest of the component.
We start by adding a className to the list item. We then create a div which will be used for the avatar. We’ll want to add an inline style to this div so we can pass in the specific image url for this avatar that is contained in our contacts array.
The style attribute has two curly braces. The first tells React that we’re using JavaScript and the second is the object that we’re passing in with the inline style rules.
Then we create another div to contain paragraph elements for the name and handle.
class ListContacts extends Component {
  render() {
    return (
      <ol className="contact-list">
        {this.props.contacts.map(contact => (
          <li key={contact.id} className="contact-list-item">
            <div
              className="contact-avatar"
              style={{
                backgroundImage: `url(${contact.avatarURL})`
              }}
            />
            <div className="contact-details">
              <p>{contact.name}</p>
              <p>{contact.handle}</p>
            </div>
            <button className="contact-remove">Remove</button>
          </li>
        ))}
      </ol>
    );
  }
}
Lastly, we create a button for the Remove action which is not hooked up yet.
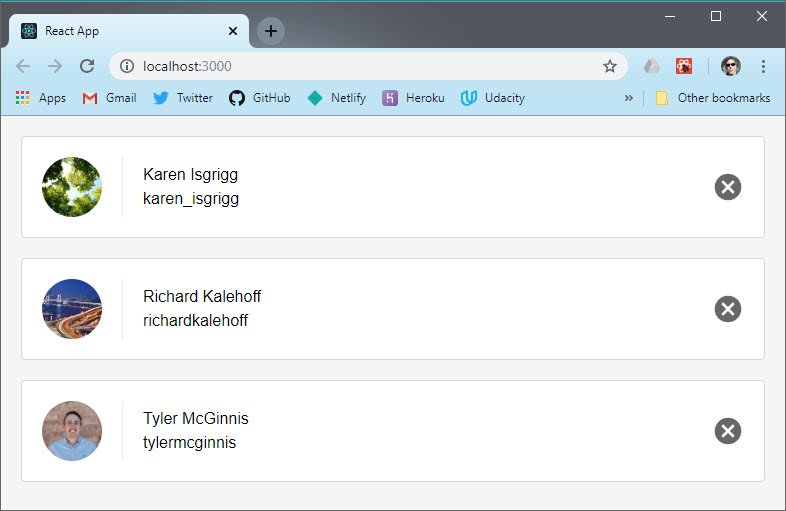
Live Demo: Contacts App on CodeSandbox
3.2 Question 4 of 4
How do you pass multiple props individually to a component?
<Clock time={Date.now()} zone='MST' /><Clock props={{time: Date.now(), zone: 'MST'}} /><Clock [time=Date.now(), zone='MST'] /><Clock props={[Date.now(), 'MST']} />
Passing Data With Props Recap
A prop is any input that you pass to a React component. Just like an HTML attribute, a prop name and value are added to the Component.
// passing a prop to a component
<LogoutButton text='Wanna log out?' />
In the code above, text is the prop and the string ‘Wanna log out?’ is the value.
All props are stored on the this.props object. So to access this text prop from inside the component, we’d use this.props.text:
// access the prop inside the component
...
render() {
 return <div>{this.props.text}</div>
}
...
3.2 Further Research
- Components and Props from the React Docs
3.3 Exercise Prep
Workspaces
In this program, you’ll be able to practice what you’ve learned right inside the classroom!
A Workspace is a development environment integrated into the Udacity Classroom. Your Workspace is backed by a Linux virtual machine (Ubuntu). You have access to a terminal, so you have complete control over installing packages and modifying content.
Exercises in Workspaces
Each Workspace contains an instructions.md file that contains the instructions for the exercise. Each Workspace also contain a Possible Solution folder located inside of the src folder. We recommend not looking inside the Possible Solution folder until you have finished the exercise on your own. That way, you can practice recalling and applying what you’ve learned, thereby solidifying your understanding of the material.
Preservation Information
The first time you open your Workspace, a new virtual machine is created just for you. Any files that you modify in /home/workspace or any new files you add in /home/workspace are automatically backed up and saved. The next time you come back to the Workspace, any previous changes will be preserved.
If you don’t interact with the Workspace for 30 minutes, the Workspace will be suspended. The Workspace becomes idle by any of the following:
- not interacting with the browser tab of the Workspace
- closing the browser tab with the Workspace
- if your laptop goes to sleep
- etc
Restoring Your Workspace
If your Workspace has been suspended after a period of inactivity, just click the “Wake Up Workspace” button to restore it. Remember that none of your data is lost.
Project Development
Think of your Workspace as a normal computer:
- Open up the files you need to edit (saving is done automatically).
- Open terminal windows as necessary.
- The terminal should start at /home/workspace, so make sure to cd to the correct directory as necessary.
- Start the project
- start a terminal (no need to cd anywhere)
- run
npm install0- runnpm start
- Open the src folder and start working on the exercise.
- To view your project, click the “Open Preview Tab” button located in the lower left of the screen.
- Running
npm startcauses Create React App to display a URL of http://localhost:3000/. Because your Workspace is running in a virtual machine, typing http://localhost:3000/ into your browser will not access the local host of the VM, so make sure to use the “Open Preview Tab” button.
- Running
Committing to Github
We strongly recommend committing your files to Github whenever you’re working on coding projects. Workspaces provide a convenient way to do that - just use the Workspace Terminal.
To commit files from your Workspace directly to Github:
- Set up a new Github repository.
- Use the Workspace terminal to commit files to Github as usually would. If you need a refresher, click here. Don’t forget to add your
node_modulesfolder to the.gitignorefile.
Unable to Access Your Workspace?
If you are unable to access your Workspace in the Classroom it could be because you have “3rd Party Cookies” disabled in your browser. Workspaces need to set a “3rd party cookie” to enable access.
Check out this Workspace troubleshooting FAQ for information on how to enable 3rd party cookies for your browser.
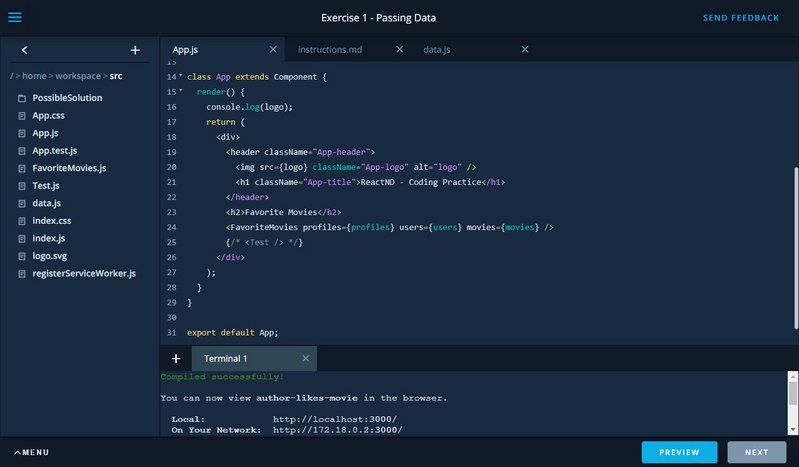
3.4 Ex 1 - Passing Data
This exercise consisted of the following instructions.
Instructions
Use React and the
profiles,users, andmoviesdata in App.js to display a list of users alongside their favorite movies.Example
Jane Cruz’s favorite movie is Planet Earth 1.
The data looks like this.
// data.js
const profiles = [
  {
    id: 1,
    userID: '1',
    favoriteMovieID: '1',
  },
  // more records...
];

const users = {
  1: {
    id: 1,
    name: 'Jane Cruz',
    userName: 'coder',
  },
  // more records...
};

const movies = {
  1: {
    id: 1,
    name: 'Planet Earth 1',
  },
  // more records...
};

export {profiles, users, movies};
3.4 Solution
The entry point is index.jsx. It imports our styles.css and App component and then renders that App component.
// index.js
import React from 'react';
import ReactDOM from 'react-dom';
import App from './App';

import './styles.css';

const rootElement = document.getElementById('root');
ReactDOM.render(<App />, rootElement);
App will act as the parent component. It imports data.js and passes that data as props to the FavoriteMovies component.
// App.js
import React, { Component } from 'react';
import './App.css';
import FavoriteMovies from './FavoriteMovies';
import { profiles, users, movies } from './data.js';

class App extends Component {
  render() {
    return (
      <div>
        <header className="App-header">
          <img src="logo.svg" className="App-logo" alt="logo" />
          <h1 className="App-title">ReactND - Coding Practice</h1>
        </header>
        <h2>Favorite Movies</h2>
        <FavoriteMovies profiles={profiles} users={users} movies={movies} />
      </div>
    );
  }
}

export default App;
The FavoriteMovies component maps over the props data and gets both user’s name and the movie name from the lookup object stores.
// FavoriteMovies.js
import React, { Component } from 'react';

class FavoriteMovies extends Component {
  render() {
    const { profiles, users, movies } = this.props;
    return (
      <ol>
        {profiles.map(profile => (
          <li key={profile.id}>
            {users[profile.userID].name}'s favorite movie is{' '}
            {movies[profile.favoriteMovieID].name}
          </li>
        ))}
      </ol>
    );
  }
}

export default FavoriteMovies;
Here’s the final result.
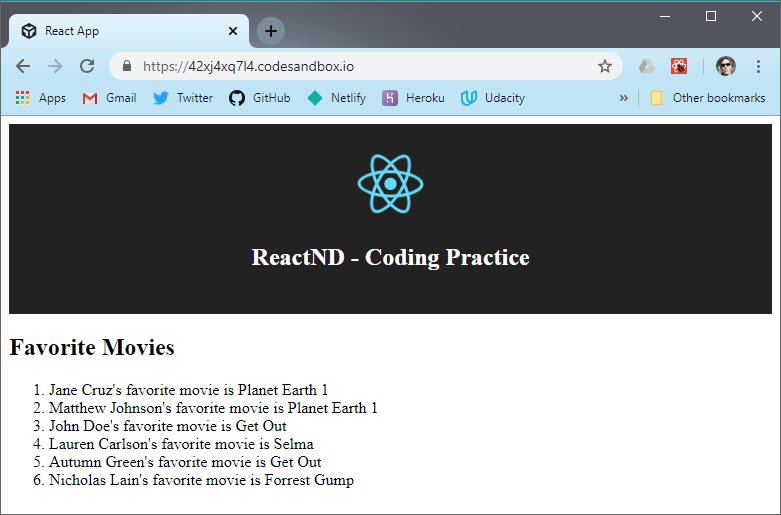
Live Demo: Ex 1 - Passing Data on CodeSandbox
3.5 Ex 2 - Passing Data
The instructions for this exercise are:
3.5 Instructions
Let’s do something a little bit more complicated. Instead of displaying a list of users and their movies, this time you need to display a list of movies.
For each movie in the list, there are two options:
- If the movie has been favorited, then display a list of all of the users who said that this movie was their favorite.
- If the movie has not been favorited, display some text stating that no one favorited the movie.
As you go about tackling this project, try to make the app modular by breaking it into reusable React components.
3.5 Example
<h2>Forrest Gump</h2>
<p>Liked By:</p>
<ul>
  <li>Nicholas Lain</li>
</ul>

<h2>Get Out</h2>
<p>Liked By:</p>
<ul>
  <li>John Doe</li>
  <li>Autumn Green</li>
</ul>

<h2>Autumn Green</h2>
<p>None of the current users liked this movie</p>
Same data as before.
// data.js
const profiles = [
  {
    id: 1,
    userID: '1',
    favoriteMovieID: '1',
  },
  // more records...
];

const users = {
  1: {
    id: 1,
    name: 'Jane Cruz',
    userName: 'coder',
  },
  // more records...
};

const movies = {
  1: {
    id: 1,
    name: 'Planet Earth 1',
  },
  // more records...
};

export {profiles, users, movies};
3.5 Solution
The data is the same as the previous exercise except this time it had some more complexity.
It required one component to loop through the movies (PopularMovies). Then it required a child component (UserList) to display the names of people that favorited that movie.
Within App I just passed the profiles, users, movies as props to my FavoriteMovies component.
// App.js
import React, { Component } from 'react';
import './App.css';
import { profiles, users, movies } from './data.js';
import PopularMovies from './PopularMovies';

class App extends Component {
  render() {
    return (
      <div className="App">
        <header className="App-header">
          <img src="logo.svg" className="App-logo" alt="logo" />
          <h1 className="App-title">ReactND - Coding Practice</h1>
          <p>Exercise 2 - Passing Data</p>
        </header>
        <main className="App-main">
          <h2>How Popular is Your Favorite Movie?</h2>
          <PopularMovies profiles={profiles} users={users} movies={movies} />
        </main>
      </div>
    );
  }
}

export default App;
Next I destructured props and created moviesArr from the movies object.
// PopularMovies.js
import React, { Component } from 'react';
import UserList from './UserList';

class PopularMovies extends Component {
  render() {
    const { profiles, users, movies } = this.props;
    const moviesArr = Object.values(movies);
    return (
      <div className="PopularMovies-container">
        {moviesArr.map(movie => (
          <div key={movie.id} className="PopularMovies-cell">
            <h3>{movie.name}</h3>
            <UserList movieID={movie.id} users={users} profiles={profiles} />
          </div>
        ))}
      </div>
    );
  }
}

export default PopularMovies;
moviesArr follows this format:
[{id: 1, name: 'movie 1'}, {id:2, name: 'movie 2'}, ...]
Now I can map over the movies to output my movie name and pass the following to my UserList component.
- movieID
- users
- profiles
In UserList I filter the profiles array by returning only those users that have favorited the specific movieID we’re on.
// UserList.js
import React, { Component } from 'react';

class UserList extends Component {
  render() {
    const { movieID, profiles, users } = this.props;
    const filteredProfiles = profiles.filter(
      profile => Number(profile.favoriteMovieID) === movieID
    );

    // console.log(filteredProfiles);
    if (!filteredProfiles || filteredProfiles.length === 0) {
      return <p>None of the current users liked this movie</p>;
    }

    return (
      <div>
        <p>Liked by:</p>
        <ul>
          {filteredProfiles.map(profile => (
            <li key={profile.userID}>{users[profile.userID].name}</li>
          ))}
        </ul>
      </div>
    );
  }
}

export default UserList;
Next, I check if no filteredProfiles array items exist then I output a message and return.
Otherwise I map over filteredProfiles and resolve the users.name based on the profile.userID.
Lastly I added some styling so it lays out nicely.

Live Demo: Ex 2 - Passing Data on CodeSandbox
Here’s a diagram of how the various components lay out within the UI.
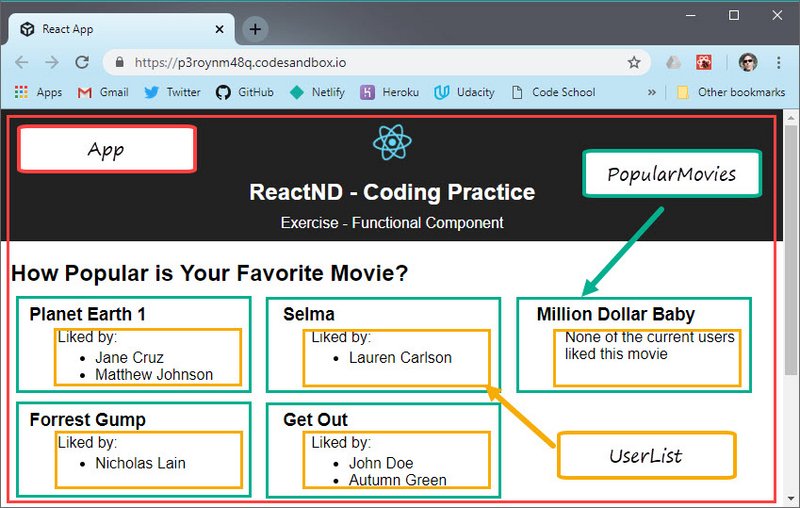
Live Demo: Ex 2 - Passing Data on CodeSandbox
3.6 Functional Components
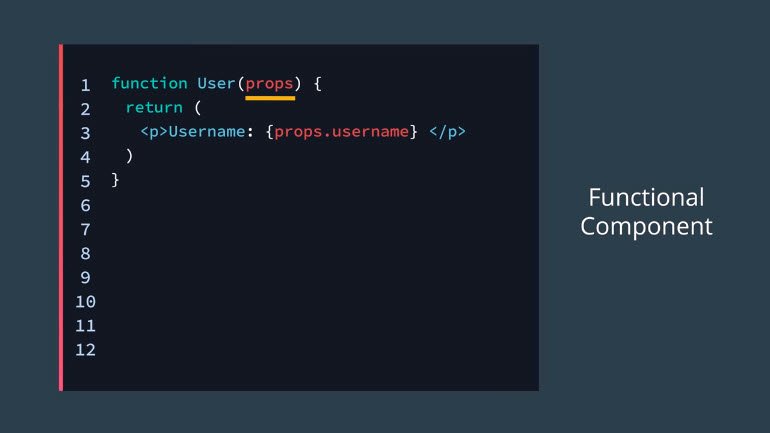
Up until this point we’ve used JavaScript’s class syntax with a render() method to build out our components.
// class component
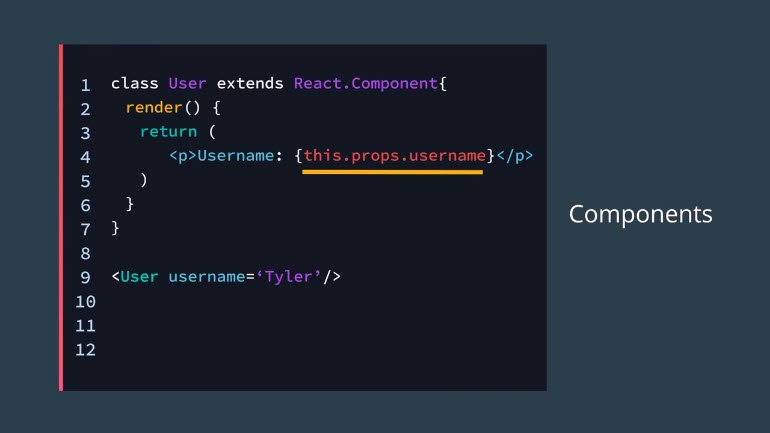
class User extends React.Component {
render() {
return (
<p>Username: {this.props.username}</p>
)
}
}
Eventually we’ll be adding more methods to these classes but if all our component has is a render() method then we can use a regular old function to render out our component.
// stateless functional component
function Username(props) {
  return (
    <p>Username: {props.username}</p>
  )
}
Notice, however, that we’re no longer accessing the components props by using the ‘this’ keyword. Instead, our functional component is being passed its props as the first argument to the function.
3.6 Question 1 of 2
When is it appropriate to use a Stateless Functional Component? Check all that apply.
- When the component needs to initialize some data
- When all the component needs is to just render something
- When the component doesn’t have any props passed in
- When the component does not use JSX
3.6 Question 2 of 2
If the
<IngredientList items={ingredient.items} />
- props.items
We do away with the ‘this’ keyword.
Refactor ListContacts
Next we are going to refactor our ListContacts component following the rules above.
Here’s the component defined as a class.
// ListContact.js
import React, { Component } from 'react';

class ListContacts extends Component {
  render() {
    return (
      <ol className="contact-list">
        {this.props.contacts.map(contact => (
          <li key={contact.id} className="contact-list-item">
            <div
              className="contact-avatar"
              style={{
                backgroundImage: `url(${contact.avatarURL})`
              }}
            />
            <div className="contact-details">
              <p>{contact.name}</p>
              <p>{contact.handle}</p>
            </div>
            <button className="contact-remove">Remove</button>
          </li>
        ))}
      </ol>
    );
  }
}

export default ListContacts;
After making our changes we have a slightly simpler component in the form of a stateless functional component.
// ListContact.js
import React from 'react';

function ListContacts(props) {
  return (
    <ol className="contact-list">
      {props.contacts.map(contact => (
        <li key={contact.id} className="contact-list-item">
          <div
            className="contact-avatar"
            style={{
              backgroundImage: `url(${contact.avatarURL})`
            }}
          />
          <div className="contact-details">
            <p>{contact.name}</p>
            <p>{contact.handle}</p>
          </div>
          <button className="contact-remove">Remove</button>
        </li>
      ))}
    </ol>
  );
}

export default ListContacts;
This required us to drop the ‘this’ keyword and simply return the UI code from the function that takes props as it’s first argument.
Stateless Functional Components Recap
If your component does not keep track of internal state (i.e., all it really has is just a render() method), you can declare the component as a Stateless Functional Component.
Remember that at the end of the day, React components are really just JavaScript functions that return HTML for rendering. As such, the following two examples of a simple Email component are equivalent:
// class component
class Email extends React.Component {
 render() {
   return (
     <div>
       {this.props.text}
     </div>
   );
 }
}
// stateless functional component
const Email = (props) => (
 <div>
   {props.text}
 </div>
);
In the latter example (written as an ES6 function with an implicit return), rather than accessing props from this.props, we can pass in props directly as an argument to the function itself. In turn, this regular JavaScript function can serve as the Email component’s render() method.
3.6 Further Research
3.7 Ex - Fn Components
The exercise instructions are.
3.7 Instructions
Modify this app to use Stateless Functional Components. Remember that for performance reasons, if a component doesn’t need to hold state, we’d want to make it a Stateless Functional Component.
This exercise will help you practice passing data into Stateless Functional Components.
App.js
// before
class App extends Component {
  render() {
    return (
      <div>
        <header className="App-header">
          <img src={logo} className="App-logo" alt="logo" />
          <h1 className="App-title">ReactND - Coding Practice</h1>
        </header>
        <h1>How Popular is Your Favorite Movie?</h1>
        <MovieCardsList profiles={profiles} movies={movies} users={users} />
      </div>
    );
  }
}
// after
function App (props) {
  return (
    <div>
      <header className="App-header">
        <img src={logo} className="App-logo" alt="logo" />
        <h1 className="App-title">ReactND - Coding Practice</h1>
      </header>
      <h1>How Popular is Your Favorite Movie?</h1>
      <MovieCardsList profiles={profiles} movies={movies} users={users} />
    </div>
  )
}
MovieCardsList
//before
class MovieCardsList1 extends Component {
  render() {
    const { profiles, users, movies } = this.props;
    const usersByMovie = {};

    profiles.forEach(profile => {
      const movieID = profile.favoriteMovieID;

      if (usersByMovie[movieID]) {
        usersByMovie[movieID].push(profile.userID);
      } else {
        usersByMovie[movieID] = [profile.userID];
      }
    });

    const movieCards = Object.keys(movies).map(id => (
      <MovieCard
        key={id}
        users={users}
        usersWhoLikedMovie={usersByMovie[id]}
        movieInfo={movies[id]}
      />
    ));

    return <ul>{movieCards}</ul>;
  }
}
// after
function MovieCardsList(props) {
  const { profiles, users, movies } = this.props;
  const usersByMovie = {}; // create empty object

  profiles.forEach(profile => {
    const movieID = profile.favoriteMovieID; // get movieID as key

    if (usersByMovie[movieID]) { // loop thru ea. profile item
      usersByMovie[movieID].push(profile.userID); // push user onto array
    } else { // else if movie key does not exit
      usersByMovie[movieID] = [profile.userID]; // assign user array to key
    }
  });

  const movieCards = Object.keys(movies).map(id => (
    <MovieCard
      key={id}
      users={users}
      usersWhoLikedMovie={usersByMovie[id]}
      movieInfo={movies[id]}
    />
  ));

  return <ul>{movieCards}</ul>;
}
MovieCard
// before
class MovieCard extends Component {
  render() {
    const { users, usersWhoLikedMovie, movieInfo } = this.props;

    return (
      <li key={movieInfo.id}>
        <h2>{movieInfo.name}</h2>
        <h3>Liked By:</h3>

        {!usersWhoLikedMovie || usersWhoLikedMovie.length === 0 ? (
          <p>None of the current users liked this movie.</p>
        ) : (
          <ul>
            {usersWhoLikedMovie &&
              usersWhoLikedMovie.map(userId => {
                return (
                  <li key={userId}>
                    <p>{users[userId].name}</p>
                  </li>
                );
              })}
          </ul>
        )}
      </li>
    );
  }
}
// after
function MovieCard(props) {
  const { users, usersWhoLikedMovie, movieInfo } = props;

  return (
    <li key={movieInfo.id}>
      <h2>{movieInfo.name}</h2>
      <h3>Liked By:</h3>

      {!usersWhoLikedMovie || usersWhoLikedMovie.length === 0 ? (
        <p>None of the current users liked this movie.</p>
      ) : (
        <ul>
          {usersWhoLikedMovie &&
            usersWhoLikedMovie.map(userId => {
              return (
                <li key={userId}>
                  <p>{users[userId].name}</p>
                </li>
              );
            })}
        </ul>
      )}
    </li>
  );
}
Here’s a diagram showing the layout of the various components within the UI.

Live Demo: Ex - Functional Component on CodeSandbox
3.8 Add Component State
Earlier in this Lesson, we learned that props refer to attributes from parent components. In the end, props represent “read-only” data that are immutable.
A component’s state, on the other hand, represents mutable data that ultimately affects what is rendered on the page. State is managed internally by the component itself and is meant to change over time, commonly due to user input (e.g., clicking on a button on the page).
In this section, we’ll see how we can encapsulate the complexity of state management to individual components.
State
At this point, you’ve learned about
- Creating components
- Composing components together
- Passing data to components
However, we still haven’t talked about what may be the best part of React, state management.
Because of React’s component model, we’re able to encapsulate the complexity of state management to individual components. This allows us to build a large application by building out a bunch of smaller applications, which are really just components.
To add state to our components, all we need to do is add a state property to our class whose value is an object. This object represents the state of our component.
Each key in the object, represents a distinct piece of state for this component.

Now, just as we did with props, we can access the username property on our state by doing this.state.username.
What I really love about React is how it allows my brain to separate two important, yet complex concepts.
- How the component looks
- The current state of my application
Because of the separation, the UI, or how the application looks, is simply a function of the application state.
With React your two concerns are:
- Which state is in my application
- How does my UI change based off of that state
💡 Class Fields 💡
In the code above, we put the state object directly inside the class…not in a constructor() method!
class User extends React.Component {
  state = {
    username: 'Tyler'
  }
}
…rather than:
class User extends React.Component {
  constructor(props) {
    super(props);
    this.state = {
      username: 'Tyler'
    };
  }
}
This is slightly different from Facebook’s Setting the Initial State docs.
Having state outside the
constructor()means it is a class field, which is a proposal for a new change to the language. It currently isn’t supported by JavaScript, but thanks to Babel’s fantastic powers of transpiling, we can use it!The benefit of declaring state using the class field syntax is that we have less code to type if we don’t need to create the
constructor()method.
Add State to Contacts App
Right now our contacts array is living independently, outside our App component.
// App.js
import React, { Component } from 'react';
import ListContacts from './ListContacts';

const contacts = [
  {
    id: 'karen',
    name: 'Karen Isgrigg',
    handle: 'karen_isgrigg',
    avatarURL: 'http://localhost:5001/karen.jpg'
  },
  {
    id: 'richard',
    name: 'Richard Kalehoff',
    handle: 'richardkalehoff',
    avatarURL: 'http://localhost:5001/richard.jpg'
  },
  {
    id: 'tyler',
    name: 'Tyler McGinnis',
    handle: 'tylermcginnis',
    avatarURL: 'http://localhost:5001/tyler.jpg'
  }
];

class App extends Component {
  render() {
    return (
      <div>
        <ListContacts contacts={contacts} />
      </div>
    );
  }
}

export default App;
Having this data live in the scope of the App component isn’t necessarily bad but the problem is that it’s outside of React’s visibility.
React will have no knowledge of any changes made to this data such as when we add, edit, or delete records.
One of React’s strengths is state management and by having this data outside of our component we are not utilizing that strength. For that reason we need to move our contacts array into the local state of our App component.
That way when we start modifying our contacts array, React will see those changes and update the UI based on those changes.
What we’ll do is add a state property to our local component. This takes in a state object and represents the state for the entire App component.
We’ll create a contacts property on that state object and then copy the value of the contacts array to that property.
// App.js
class App extends Component {
  state = {
    contacts: [
      {
        id: 'karen',
        name: 'Karen Isgrigg',
        handle: 'karen_isgrigg',
        avatarURL: 'http://localhost:5001/karen.jpg'
      },
      {
        id: 'richard',
        name: 'Richard Kalehoff',
        handle: 'richardkalehoff',
        avatarURL: 'http://localhost:5001/richard.jpg'
      },
      {
        id: 'tyler',
        name: 'Tyler McGinnis',
        handle: 'tylermcginnis',
        avatarURL: 'http://localhost:5001/tyler.jpg'
      }
    ]
  };
  render() {
    return (
      <div>
        <ListContacts contacts={this.state.contacts} />
      </div>
    );
  }
}
Now in order to get access to the local component state we need to access it with this.state.contacts.
So, the UI looks the same but what we’ve done is moved our contacts array from being in the scope of the module to actually being a property on the local component state.
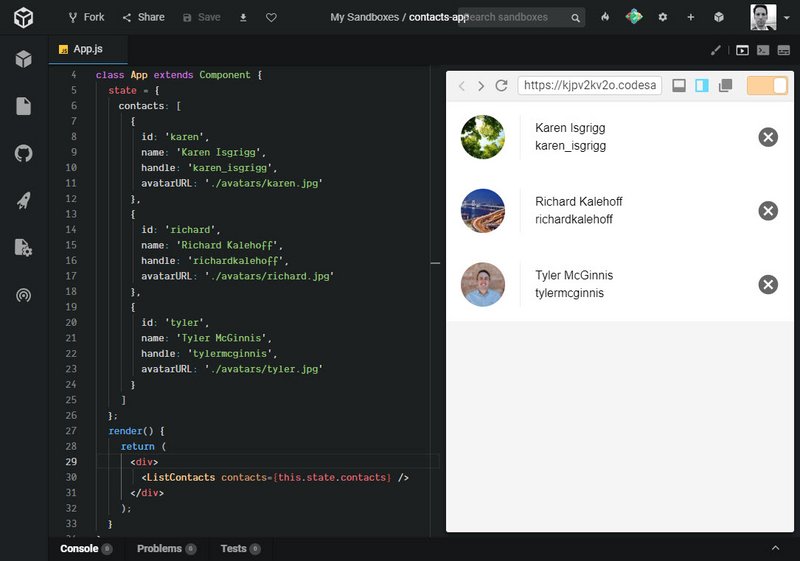
Live Demo: Contacts App on CodeSandbox
️⚠️ Props in Initial State ⚠️
When defining a component’s initial state, avoid initializing that state with
props. This is an error-prone anti-pattern, since state will only be initialized with props when the component is first created.this.state = { user: props.user }In the above example, if props are ever updated, the current state will not change unless the component is “refreshed.” Using props to produce a component’s initial state also leads to duplication of data, deviating from a dependable “source of truth.”
3.8 Quiz Question
What is true about state in React? Please select all that apply:
- A component’s state can be defined at initialization.
- State that is needed by multiple components needs to be lifted up to the closest common ancestor.
- State should be used when you want to store information that will never change.
- A component can alter it’s own internal state.
State Recap
By having a component manage its own state, any time there are changes made to that state, React will know and automatically make the necessary updates to the page.
This is one of the key benefits of using React to build UI components: when it comes to re-rendering the page, we just have to think about updating state.
- We don’t have to keep track of exactly which parts of the page change each time there are updates.
- We don’t need to decide how we will efficiently re-render the page.
React compares the previous output and new output, determines what has changed, and makes these decisions for us. This process of determining what has changed in the previous and new outputs is called Reconciliation.
3.8 Further Research
3.9 Updating State
Now that we have state inside of our application, the next step is to figure out how to update it. Your natural intuition might be to update the state directly.
// ⚠️ This is wrong ⚠️
this.state.username = 'James'
Unfortunately, that’s not going to work. The reason is because by mutating the state directly, React will have no idea that the state of your component actually changed.
setState()
To solve this problem, React gives you a helper method called setState(). There are two ways to use setState.
- setState function - used when new state is based on previous state
- setState object - used when new state doesn’t depend on previous state
The first way is by passing setState a function.
// setState passing a function
this.setState(prevState => ({ // <- implicit return of an object
  count: prevState.count + 1
}))
The function will be passed the previous state as its first argument. The object returned from this function will be merged with the current state to form the new state of the component.
The second pattern is to pass an object. This object will be merged with the current state to form the new state of the component.
// setState passing an object
this.setState({
  username: 'James'
})
Typically, you want to use the functional setState when the new state of your component depends on the previous state.

For everything else, you can use the object setState. However, I always prefer to use the functional setState.
Regardless of how you use setState, the end result will always be the same: Whenever you invoke setState, React by default is going to re-render your entire application and update the UI.
This is why we say that in React, your UI is just a function of your state. Once your state changes, your UI will automatically update accordingly.
Hooking the delete button up to Contact App
Now that our state is living inside of our component, the next step is to hook up the delete buttons so that the specific contact is deleted whenever the button is clicked.
The reason we’re able to do this is because our state is living inside of our App component.
removeContact() method
We’re going to add a method to our App component which is responsible for taking in a specific contact and then deleting that contact from our contacts array.
We do this by creating a removeContact method that takes in a contact object and calls setState() passing in the currentState.
We specify the property we’re updating (contacts) and set it to the new value. We use filter to remove the contact we want to delete.
// using an ES6 arrow function to define the method means we don't
// have to bind 'this' to it in the constructor!
  removeContact = contact => {
    this.setState(currentState => ({
      contacts: currentState.contacts.filter(c => {
        return c.id !== contact.id;
      })
    }));
  };
Then to allow our ListContacts component to use this method we must pass it as props so we can hook it up to the delete button. Just as we can pass data as props, we can also pass functions as props as well.
Once again, the reason the removeContact() method is living inside our App component is because that is where our data lives.
Here is the completed App component.
// App.js
class App extends Component {
  state = {
    contacts: [
      {
        id: 'karen',
        name: 'Karen Isgrigg',
        handle: 'karen_isgrigg',
        avatarURL: 'http://localhost:5001/karen.jpg'
      },
      // more records..
     ]
  };
  removeContact = contact => {
    this.setState(currentState => ({
      contacts: currentState.contacts.filter(c => {
        return c.id !== contact.id;
      })
    }));
  };
  render() {
    return (
      <div>
        <ListContacts
          contacts={this.state.contacts}
          onDeleteContact={this.removeContact}
        />
      </div>
    );
  }
}
onClick method
Next we need hook up our onDeleteContact method to the delete button’s onClick method inside our ListContacts component.
// Method 1
<button
  className="contact-remove"
  onClick={() => props.onDeleteContact(contact)}
>
  Remove
</button>
One thing to note is that since we need to pass in contact as an argument we need to wrap the onDeleteContact function call in an arrow function.
One other way of doing this would be to do the following.
// Method 2
<button
  className="contact-remove"
  onClick={props.onDeleteContact.bind(null, contact)}
>
  Remove
</button>
⚠️ Avoid arrow functions & .bind() in render() ⚠️
We generally want to avoid declaring arrow functions or binding in render() for optimal performance.
You can set up this ESLint rule (jsx-no-bind) to help alert you to this issue.
See Cory House articles on Medium:
This is the updated app with delete contact feature implemented.
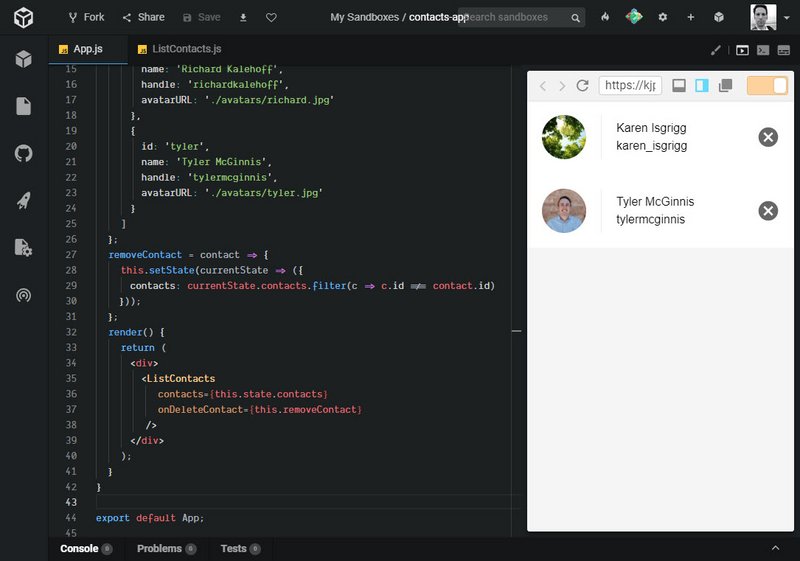
Live Demo: Contacts App on CodeSandbox
How State is Set
Earlier in this lesson, we saw how we can define a component’s state at the time of initialization. Since state reflects mutable information that ultimately affects rendered output, a component may also update its state throughout its lifecycle using this.setState(). As we’ve learned, when local state changes, React will trigger a re-render of the component.
There are two ways to use setState(). The first is to merge state updates. Consider a snippet of the following component:
class Email extends React.Component {
 state = {
   subject: '',
   message: ''
 }
 // ...
});
Though the initial state of this component contains two properties (subject and message), they can be updated independently. For example:
this.setState({
 subject: 'Hello! This is a new subject'
})
This way, we can leave this.state.message as-is, but replace this.state.subject with a new value.
The second way we can use setState() is by passing in a function rather than an object. For example:
this.setState(prevState => ({
 count: prevState.count + 1
}))
Here, the function passed in takes a single prevState argument. When a component’s new state depends on the previous state (i.e., we are incrementing count in the previous state by 1), we want to use the functional setState().
3.9 Quiz Question
What is true about setting state in our components? Please check all that apply:
- Whenever
setState()is called, the component also callsrender()with the new state - State updates can be merged by passing in an object to
setState() - Updating state directly is ideal when you want to re-render a component (i.e. preferring
'this.state.message = 'hi there';rather thanthis.setState({ message: 'hi there' });) - State updates can be asynchronous (i.e.
setState()can accept a function with the previous state as its first argument) setState()should be called within the component’srender()method
In the end, your UI is just a function of your state. Being able to leverage React’s automatic re-renders when resetting state can give your app’s users a truly dynamic experience.
setState() Recap
While a component can set its state when it initializes, we expect that state to change over time, usually due to user input. The component is able to change its own internal state using this.setState().
Each time state is changed, React knows and will call render() to re-render the component. This allows for fast, efficient updates to your app’s UI.
Further Research Using State Correctly from the React Docs
3.10 Ex - Managing State
This exercise started with a static page and a set of instructions.

3.10 Instructions
Create a game that shows an equation of the form
- X + Y + Z = P
Here, X, Y, and Z should be random numbers, and P should be the proposed answer. The user should be able to answer whether it is true that the sum of X, Y, and Z equals the proposed answer P.
The user gets a point for each question the user answers correctly. The score is displayed in this format
- [# of correct answers] / [# of questions answered]
Every time the user answers a question, a new question that uses randomly generated numbers is displayed.
Remember that a Component’s constructor is the first thing that runs when the object is created. The render method gets called automatically every time the state changes inside of the component and anytime the value of the component’s props changes.
This exercise will help you practice what you’ve learned in the course so far, including the trickiest part of React - managing state.
The starter app consisted of the following:
// App.js
import React, { Component } from 'react';
import logo from './logo.svg';
import './App.css';

const value1 = Math.floor(Math.random() * 100);
const value2 = Math.floor(Math.random() * 100);
const value3 = Math.floor(Math.random() * 100);
const proposedAnswer = Math.floor(Math.random() * 3) + value1 + value2 + value3;
const numQuestions = 0;
const numCorrect = 0;

class App extends Component {
  render() {
    return (
      <div className="App">
        <header className="App-header">
          <img src={logo} className="App-logo" alt="logo" />
          <h1 className="App-title">ReactND - Coding Practice</h1>
        </header>
        <div className="game">
          <h2>Mental Math</h2>
          <div className="equation">
            <p className="text">
              {`${value1} + ${value2} + ${value3} = ${proposedAnswer}`}
            </p>
          </div>
          <button>True</button>
          <button>False</button>
          <p className="text">
            Your Score: {numCorrect}/{numQuestions}
          </p>
        </div>
      </div>
    );
  }
}

export default App;
3.10 Solution
I the divided the game into three separate components.
- App.js
- Game.js
- Score.js
The numQuestions and numCorrect values are tracked in App’s state.
I defined state as a Class Field in order to reduce the amount of code I would have to type if I included it in the constructor.
I’ve included what the constructor would look like for illustrative purposes.
I’ve also shown the handlers defined as a Class Method using an arrow function which eliminates us having to bind the handler to ‘this’ in the constructor.
// App.js
import React, { Component } from 'react';
import './App.css';
import Game from './Game.js';
import Score from './Score.js';

class App extends Component {
  /*constructor(props) {
    super(props);
    this.state = {
      numQuestions: 0,
      numCorrect: 0
    }
    this.handleButtonClick = this.handleButtonClick.bind(this);
  }*/
  // state as a Class field means we can avoid defining it in the constructor
  state = {
    numQuestions: 0,
    numCorrect: 0
  };
  /*handleButtonClick(e) {
    // this form means we need to bind 'this' in constructor
    console.log('e.target', e.target.innerText);
    this.setState(currState => ({
      numQuestions: currState.numQuestions + 1
    }))
  }*/
  handleButtonClick = isCorrect => {
    // this form doesn't require us to bind 'this' in constructor
    this.setState(currState => ({
      numQuestions: currState.numQuestions + 1,
      numCorrect: isCorrect ? currState.numCorrect + 1 : currState.numCorrect
    }));
  };
  // this form allows us to avoid using arrow functions & .bind()
  //   in render() when creating lists with .map() (see below...)
  // It is unnecessary here since we are not mapping over multiple <Game />s
  renderGame = game => <Game onButtonClick={this.handleButtonClick} />;

  render() {
    return (
      <div className="App">
        <header className="App-header">
          <img src="logo.svg" className="App-logo" alt="logo" />
          <h1 className="App-title">ReactND - Coding Practice</h1>
          <p>Exercise - Managing State</p>
        </header>
        <main className="App-main">
          {/*
            // These cause unnecessary re-render of Game components
            <Game onButtonClick={(e) => this.handleButtonClick(e)} />
            <Game onButtonClick={this.handleButtonClick.bind(this)} />
            */}
          <Game onButtonClick={this.handleButtonClick} />
          {this.renderGame()}
          <Score
            numQuestions={this.state.numQuestions}
            numCorrect={this.state.numCorrect}
          />
        </main>
      </div>
    );
  }
}

export default App;
There are two articles that show how to avoid unnecessary renders when setting up handler functions.
⚠️ Avoid arrow functions & .bind() in render() ⚠️
We generally want to avoid declaring arrow functions or binding in render() for optimal performance.
You can set up this ESLint rule (jsx-no-bind) to help alert you to this issue.
See Cory House articles on Medium:
Here’s the Game component.
// Game.js
import React from 'react';

class Game extends React.PureComponent {
  constructor(props) {
    super(props);
    const gameNums = this.generateNums();
    this.state = {
      value1: gameNums[0],
      value2: gameNums[1],
      value3: gameNums[2],
      proposedAnswer: gameNums[3]
    };
  }

  generateNums = () => {
    const value1 = Math.floor(Math.random() * 100);
    const value2 = Math.floor(Math.random() * 100);
    const value3 = Math.floor(Math.random() * 100);
    const proposedAnswer =
      Math.floor(Math.random() * 3) + value1 + value2 + value3;
    return [value1, value2, value3, proposedAnswer];
  };

  updateState = () => {
    const gameNums = this.generateNums();
    this.setState(prevState => ({
      value1: gameNums[0],
      value2: gameNums[1],
      value3: gameNums[2],
      proposedAnswer: gameNums[3]
    }));
  };

  checkAnswer = answer => {
    const isEqual =
      this.state.value1 + this.state.value2 + this.state.value3 ===
      this.state.proposedAnswer;
    return answer === isEqual;
  };

  onButtonClick = e => {
    // console.log('e.target', e.target.innerText);
    this.updateState();
    const answer = Boolean(e.target.innerText === 'False' ? false : true);
    const isCorrect = this.checkAnswer(answer);
    // console.log('isCorrect', isCorrect);
    this.props.onButtonClick(isCorrect);
  };

  render() {
    // const { onButtonClick } = this.props;
    console.log(`Game component rendered`);
    console.log(
      `${this.state.value1 + this.state.value2 + this.state.value3} === ${
        this.state.proposedAnswer
      }`
    );
    return (
      <div className="game">
        <h2>Mental Math</h2>
        <div className="equation">
          <p className="text">{`${this.state.value1} + ${this.state.value2} + ${
            this.state.value3
          } = ${this.state.proposedAnswer}`}</p>
        </div>
        <button onClick={e => this.onButtonClick(e)}>True</button>
        <button onClick={this.onButtonClick}>False</button>
      </div>
    );
  }
}

export default Game;
Here’s the Score component.
// Score.js
import React from 'react';

const Score = props => {
  const { numCorrect, numQuestions } = props;
  return (
    <p className="text">
      Your Score: {numCorrect}/{numQuestions}
    </p>
  );
};

export default Score;
Here’s a screenshot of the working application.
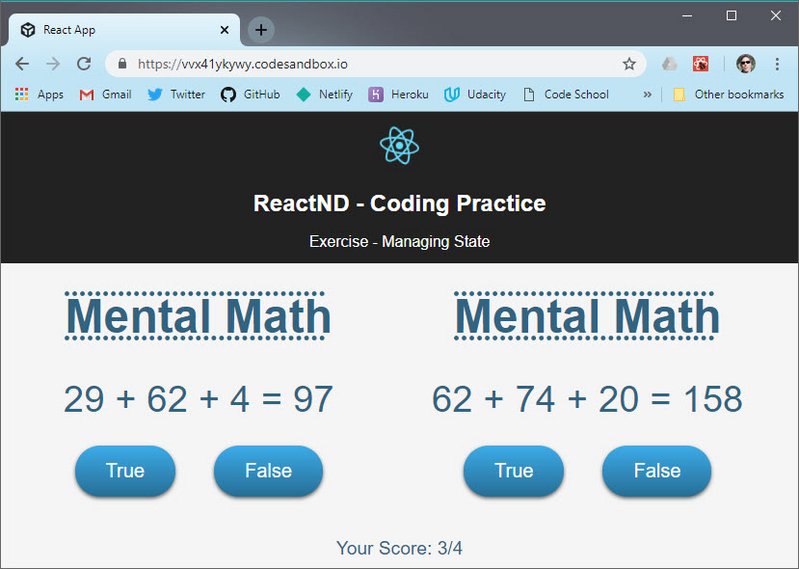
Live Demo: Mental Math App on CodeSandbox
3.11 PropTypes
Type checking a Component’s Props with PropTypes
As we implement additional features into our app, we may soon find ourselves debugging our components more frequently. For example, what if the props that we pass to our components end up being an unintended data type (e.g. an object instead of an array)?
PropTypes is a package that lets us define the data type we want to see right from the get-go and warn us during development if the prop that’s passed to the component doesn’t match what is expected.
To use PropTypes in our app, we need to install prop-types:
npm install --save prop-types
Alternatively, if you have been using yarn to manage packages, feel free to use it as well to install:
yarn add prop-types
Let’s jump right in and see how it’s used!
Add PropTypes to Contacts App
We first start by adding the import to the top of the file we’re using it in.
import PropTypes from 'prop-types';
What it allows us to do is add a property to our ListTypes component that will define the props that this component should receive.
// ListContacts.js
ListContacts.propTypes = {
  contacts: PropTypes.array.isRequired,
  onDeleteContact: PropTypes.func.isRequired
}
App.js is where we include our ListContacts component. It specifies both contacts and onDeleteContact props.
// App.js
  render() {
    return (
      <div>
        <ListContacts
          contacts={this.state.contacts}
          // onDeleteContact={this.removeContact}
        />
      </div>
    );
  }
}
If we comment out the second prop we will receive an error message in console telling us exactly what the problem is.
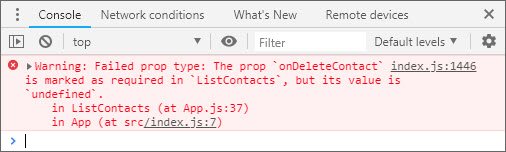
It will also notify us if we pass in the wrong datatype.
The best thing about PropTypes is related to 3rd party components.
When we use a component that wasn’t created by us we can look at the PropTypes to instantly know what datatype needs to be passed in as props.
PropTypes Question
Consider this component:
import PropTypes from 'prop-types';

class Email extends React.Component {
  render() {
    return (
      <h3>Message: {this.props.text}</h3>
    );
  }
}

Email.propTypes = {
  text: // ???
};
We want to validate that a text prop is indeed being passed in, and that its data type is a string. What should the value of the above object’s text key be?
Email.propTypes = {
  text: PropTypes.string.isRequired
};
PropTypes Recap
All in all, PropTypes is a great way to validate intended data types in our React app. Type checking our data with PropTypes helps us identify these bugs during development to ensure a smooth experience for our app’s users.
3.11 Further Research
- prop-types library from npm
- Typechecking With PropTypes from the React Docs
3.12 Controlled Components
Typically when you’re using forms in a web app, the form state lives inside of the DOM. But as we’ve talked about, the whole point of React is to more effectively manage state inside of your application.
So, how do we handle forms in React? We can solve this problem with what React calls controlled components.
Controlled components are components which render a form, but the “Source of Truth” for the form state lives inside of the component state rather than inside of the DOM.
The reason they’re called controlled components, is because React is controlling the state of the form. Here, we have a component which is rendering a form with a single input element.
The first thing to notice is that we’ve added a value attribute to our input of this.state.email.
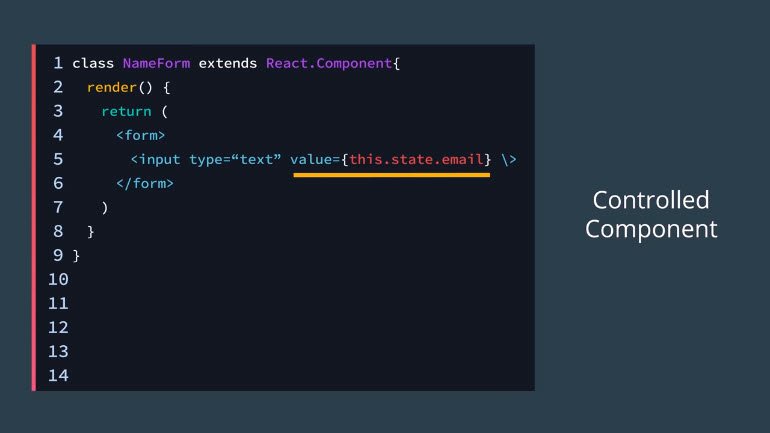
What this means is that the text in the input field is going to be whatever the email property of our component state is. Therefore, the only way to update the state in the input field, is to update the email property of the component state.
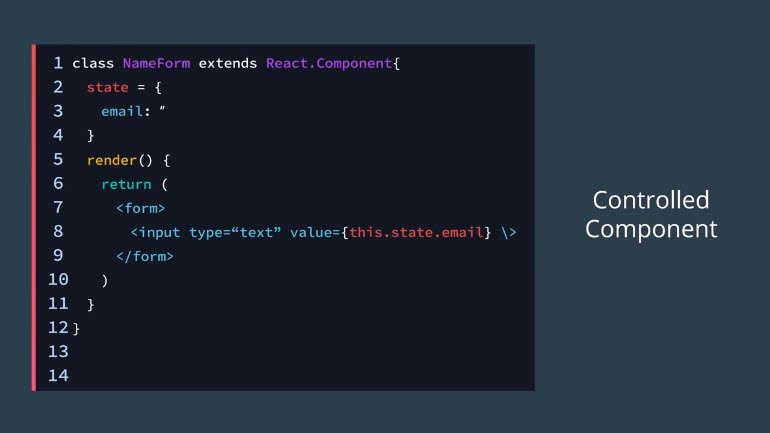
As you can tell, this is a true controlled component because React is in control of the email property of our state. If we want the input field to change, we can create a handleChange method that uses setState to update the email address.
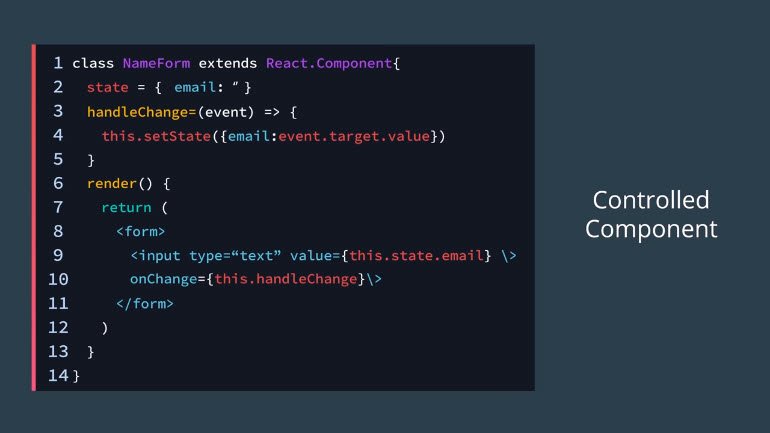
Whenever the input field is changed, we can call this method by passing it to the onchange attribute.
Although controlled components require a little bit more typing, they do have some benefits.
- First, they support instant input validation.
- Second, they allow you to conditionally disable or enable form buttons.
- Third, they enforce input formats.
Now, notice that all of these benefits have to do with updating the UI based on some user input. This is the heart of not only controlled components, but also React in general.
If the state of our application changes, then our UI updates based on that new state.
React Developer Tools
While building React apps, it may be tricky at times to see exactly is going on in your components. After all, with so many props being passed and accessed, numerous nested components, and all the JSX yet to be rendered as HTML, it can be tough to put things into perspective!
React Developer Tools allows you to inspect your component hierarchy along with their respective props and states. Once you install the Chrome extension, open the Chrome console and check out the React tab. For a detailed overview, feel free to check out the official documentation.
Let’s see it in action below!
Contacts App - Search form as a controlled component
What we’re going to do is build out the “search contact” section of our Contacts App. This will allow us to filter our list, which introduces the topic of forms in React.
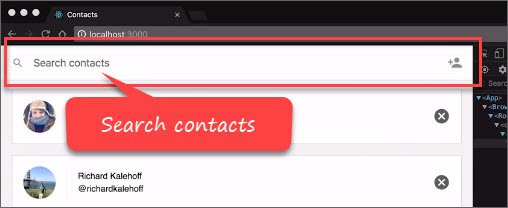
Now we could bypass React and manage our forms directly through the DOM but that doesn’t make a whole lot of sense.
React is really good at managing state. So, many times, it makes sense to also put your form state inside of your component state.
What we’re going to do is bind our input field to whatever the value of a certain property on our state is. That’s going to allow us to update the UI, based on this form data.
So, if I type a “t”, you’ll notice that we are filtering our list, but we’re also showing the search results section as well.
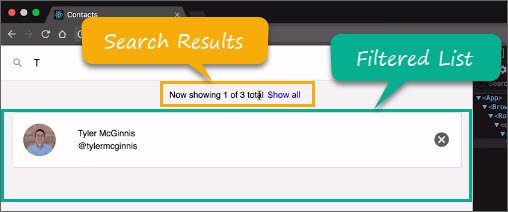
A good rule of thumb is, if you want your form data to update the UI in any other way besides just the input field itself, then make your form a controlled component where React is controlling the state of the input field.
If you’re not worried about having your UI update based off the form data, then you can go ahead and stick the form somewhere in the DOM and grab it when you need it.
Contacts App - Refactoring ListContacts
We’re going to be adding state to our ListContacts component because we’re going to bind our new search input field to our component state.
This means we refactor from using a stateless functional component to a class component.
In doing this we can move our PropTypes definition into our class by creating a ‘static propTypes’ property. We’ll also need to add ‘this’ keyword to all instances of ‘props’.
// ListContacts.js
import React, { Component } from 'react';
import PropTypes from 'prop-types';

class ListContacts extends Component {
  static propTypes = {
    contacts: PropTypes.arrayOf(
      PropTypes.shape({
        id: PropTypes.string.isRequired,
        name: PropTypes.string.isRequired,
        handle: PropTypes.string.isRequired,
        avatarURL: PropTypes.string.isRequired
      })
    ),
    onDeleteContact: PropTypes.func.isRequired
  };
  render() {
    return (
      <ol className="contact-list">
        {this.props.contacts.map(contact => (
          <li key={contact.id} className="contact-list-item">
            <div
              className="contact-avatar"
              style={{
                backgroundImage: `url(${contact.avatarURL})`
              }}
            />
            <div className="contact-details">
              <p>{contact.name}</p>
              <p>{contact.handle}</p>
            </div>
            <button
              className="contact-remove"
              onClick={() => this.props.onDeleteContact(contact)}
            >
              Remove
            </button>
          </li>
        ))}
      </ol>
    );
  }
}

export default ListContacts;
Now our app is back to normal. Next, here’s what we are going to do.
- Create a ‘state’ class field
- Add a ‘query’ property to our component’s state object & set it equal to an empty string
- Wrap our ordered list with a div and set the className to “list-contacts”
- Inside that div we’ll create another div and add an input field with the following attributes
- className of ‘search-contacts’
- a type of ‘text’
- placeholder will be “Search Contacts”
- value={this.state.query} - this sets the value of the control to our state
- onChange={this.updateQuery} - this allows us to update state on every keystroke
- Add an ‘updateQuery’ method which will set state based on the input field value
Whenever the input field changes, we want to update the query property on our state. Doing this updates the value inside of the input field.
Lastly, we add a call to ‘JSON.stringify’ passing it the state in order to see what our state is.
// ListContacts.js
import React, { Component } from 'react';
import PropTypes from 'prop-types';

class ListContacts extends Component {
  static propTypes = {
    contacts: PropTypes.arrayOf(
      PropTypes.shape({
        id: PropTypes.string.isRequired,
        name: PropTypes.string.isRequired,
        handle: PropTypes.string.isRequired,
        avatarURL: PropTypes.string.isRequired
      })
    ),
    onDeleteContact: PropTypes.func.isRequired
  };
  state = {
    query: ''
  };
  updateQuery = e => {
    const query = e.target.value;
    this.setState(() => ({
      query: query.trim()
    }));
  };
  render() {
    return (
      <div className="list-contacts">
        {JSON.stringify(this.state)}
        <div className="list-contacts-top">
          <input
            className="search-contacts"
            type="text"
            placeholder="Search Contacts"
            value={this.state.query}
            onChange={this.updateQuery}
          />
        </div>
        <ol className="contact-list">
          {this.props.contacts.map(contact => (
            <li key={contact.id} className="contact-list-item">
              <div
                className="contact-avatar"
                style={{
                  backgroundImage: `url(${contact.avatarURL})`
                }}
              />
              <div className="contact-details">
                <p>{contact.name}</p>
                <p>{contact.handle}</p>
              </div>
              <button
                className="contact-remove"
                onClick={() => this.props.onDeleteContact(contact)}
              >
                Remove
              </button>
            </li>
          ))}
        </ol>
      </div>
    );
  }
}

export default ListContacts;
Here’s what the final outcome looks like.

Live Demo: Contacts App on CodeSandbox
Contacts App - Recap
Note that the value attribute is set on the <input> element. Since the displayed value will always be the value in the component’s state, we can treat state as the “single source of truth” for the form’s state.
To recap how user input affects the ListContacts component’s own state:
- The user enters text into the input field.
- The
onChangeevent listener invokes theupdateQuery()function. updateQuery()then callssetState(), merging in the new state to update the component’s internal state.- Because its state has changed, the ListContacts component re-renders.
Let’s see how we can leverage this updated state to filter our contacts. To help us with our filtering we’ll need the following packages:
npm install --save escape-string-regexp sort-by
3.12 Question 1 of 3
What is a Controlled Component?
- A component which controls the state of its children
- A component which renders a form, but the source of truth for that form state lives inside of the component state rather than inside the DOM
- A component which controls the UI for its children components
- A component which renders a form, but the source of truth for that form state lives inside of DOM rather than inside the component
Contacts App - Filter and Sort Contacts
Next we want to filter our list based on whatever we type in the input field.
We start by destructuring both state and props.
  render() {
    const { query } = this.state;
    const { contacts, onDeleteContact } = this.props;
We then go through and update each reference to remove ‘this.state’ and ‘this.props’
Next we want to filter our contacts based on whatever is in the input field.
We convert to lowercase and assign the result to a new variable call showingContacts. We then use this new variable in our .map() method.
    const showingContacts = contacts.filter(contact =>
      contact.name.toLowerCase().includes(query.toLowerCase())
    );
Here is the entire code.
// ListContacts.js
import React, { Component } from 'react';
import PropTypes from 'prop-types';

class ListContacts extends Component {
  static propTypes = {
    contacts: PropTypes.arrayOf(
      PropTypes.shape({
        id: PropTypes.string.isRequired,
        name: PropTypes.string.isRequired,
        handle: PropTypes.string.isRequired,
        avatarURL: PropTypes.string.isRequired
      })
    ),
    onDeleteContact: PropTypes.func.isRequired
  };
  state = {
    query: ''
  };
  updateQuery = e => {
    const query = e.target.value;
    this.setState(() => ({
      query: query.trim()
    }));
  };
  render() {
    const { query } = this.state;
    const { contacts, onDeleteContact } = this.props;

    const showingContacts = contacts.filter(contact =>
      contact.name.toLowerCase().includes(query.toLowerCase())
    );

    return (
      <div className="list-contacts">
        <div className="list-contacts-top">
          <input
            className="search-contacts"
            type="text"
            placeholder="Search Contacts"
            value={query}
            onChange={this.updateQuery}
          />
        </div>
        <ol className="contact-list">
          {showingContacts.map(contact => (
            <li key={contact.id} className="contact-list-item">
              <div
                className="contact-avatar"
                style={{
                  backgroundImage: `url(${contact.avatarURL})`
                }}
              />
              <div className="contact-details">
                <p>{contact.name}</p>
                <p>{contact.handle}</p>
              </div>
              <button
                className="contact-remove"
                onClick={() => onDeleteContact(contact)}
              >
                Remove
              </button>
            </li>
          ))}
        </ol>
      </div>
    );
  }
}

export default ListContacts;
So again, because we want to update the UI, we stick the input field on the component state. Whenever the component state changes that causes a re-render which then filters our contacts based on whatever the query is.
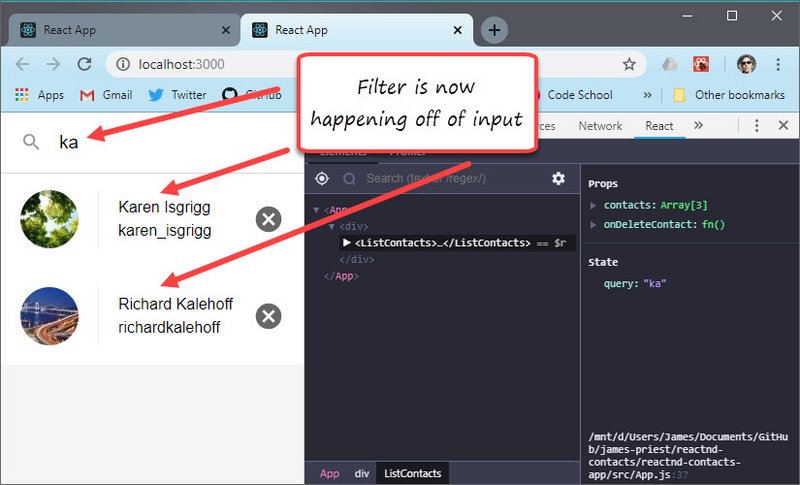
Live Demo: Contacts App on CodeSandbox
3.12 Question 2 of 3
Which benefit applies to Controlled Components that doesn’t apply to “uncontrolled” components?
- Controlled Components are more the “React way” of doing things
- Controlled Components are less typing
- Controlled Components are more performant
- Controlled Components allow you to update your UI based on the form itself
Contacts App - Showing The Displayed Contacts Count
We’re almost done working with the controlled component! Our last step is to make our app display the count of how many contacts are being displayed out of the overall total.
We add the following after our search input.
        {showingContacts.length !== contacts.length && (
          <div className="showing-contacts">
            <span>
              Now showing {showingContacts.length} of {contacts.length}
            </span>
            <button onClick={this.clearQuery}>Show all</button>
          </div>
        )}
We also add the clearQuery method above render.
  clearQuery = () => {
    this.setState(() => ({
      query: ''
    }));
  };
Here’s the completed code.
import React, { Component } from 'react';
import PropTypes from 'prop-types';

class ListContacts extends Component {
  static propTypes = {
    contacts: PropTypes.arrayOf(
      PropTypes.shape({
        id: PropTypes.string.isRequired,
        name: PropTypes.string.isRequired,
        handle: PropTypes.string.isRequired,
        avatarURL: PropTypes.string.isRequired
      })
    ),
    onDeleteContact: PropTypes.func.isRequired
  };
  state = {
    query: ''
  };
  updateQuery = e => {
    const query = e.target.value;
    this.setState(() => ({
      query: query.trim()
    }));
  };
  clearQuery = () => {
    this.setState(() => ({
      query: ''
    }));
  };
  render() {
    const { query } = this.state;
    const { contacts, onDeleteContact } = this.props;

    const showingContacts = contacts.filter(contact =>
      contact.name.toLowerCase().includes(query.toLowerCase())
    );

    return (
      <div className="list-contacts">
        <div className="list-contacts-top">
          <input
            className="search-contacts"
            type="text"
            placeholder="Search Contacts"
            value={query}
            onChange={this.updateQuery}
          />
        </div>
        {showingContacts.length !== contacts.length && (
          <div className="showing-contacts">
            <span>
              Now showing {showingContacts.length} of {contacts.length}
            </span>
            <button onClick={this.clearQuery}>Show all</button>
          </div>
        )}
        <ol className="contact-list">
          {showingContacts.map(contact => (
            <li key={contact.id} className="contact-list-item">
              <div
                className="contact-avatar"
                style={{
                  backgroundImage: `url(${contact.avatarURL})`
                }}
              />
              <div className="contact-details">
                <p>{contact.name}</p>
                <p>{contact.handle}</p>
              </div>
              <button
                className="contact-remove"
                onClick={() => onDeleteContact(contact)}
              >
                Remove
              </button>
            </li>
          ))}
        </ol>
      </div>
    );
  }
}

export default ListContacts;
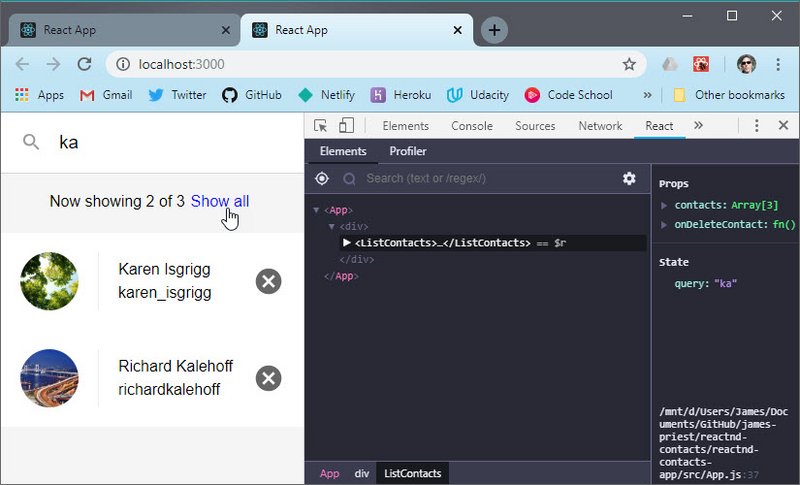
Live Demo: Contacts App on CodeSandbox
Here’s the documentation on Controlled Components which shows additional examples.
3.12 Question 3 of 3
Which of the following is true about Controlled Components? Please check all that apply:
- Each update to the state has an associated handler function
- Form elements receive their current value via an attribute
- Form input values are generally stored in the component’s state
<textarea>and<select>cannot be controlled elements- Event handlers for a controlled element update the component’s state
Controlled Components Recap
Controlled components refer to components that render a form, but the “source of truth” for that form state lives inside of the component state rather than inside of the DOM. The benefits of Controlled Components are:
- instant input validation
- conditionally disable/enable buttons
- enforce input formats
In our ListContacts component, not only does the component render a form, but it also controls what happens in that form based on user input.
In this case, event handlers update the component’s state with the user’s search query. And as we’ve learned: any changes to React state will cause a re-render on the page, effectively displaying our live search results.
3.13 Ex 1 - Controlled Components
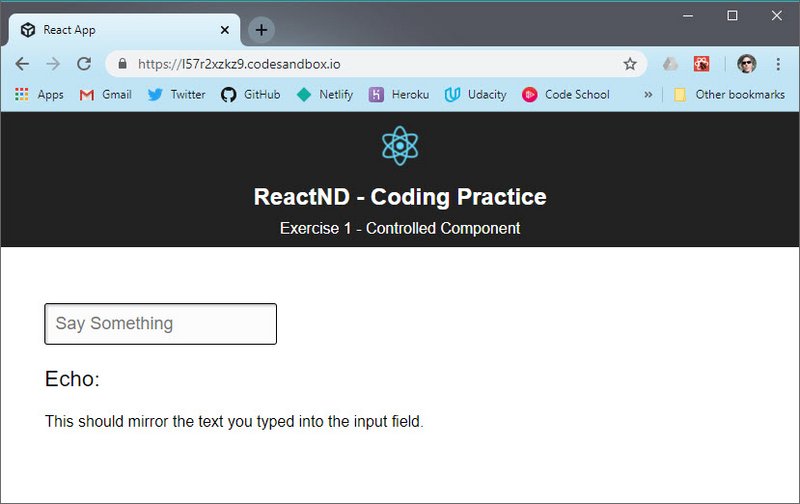
This exercise consisted of the following instructions.
3.13 Instructions
Edit the code to make the printed text mirror what we type into the input field. When we erase all of the text, nothing should be printed to the screen.
Remember that the React component that renders the form also controls what happens in that form on user input.
This exercise will help you solidify what you’ve learned about Controlled Components.
3.13 Solution
import React, { Component } from "react";
import "./App.css";

class App extends Component {
  state = {
    echo: ""
  };
  handleChange = e => {
    const echo = e.target.value;
    this.setState(prevState => ({
      echo: echo
    }));
  };
  render() {
    const { echo } = this.state;
    return (
      <div className="App">
        <header className="App-header">
          <img src="logo.svg" className="App-logo" alt="logo" />
          <h1 className="App-title">ReactND - Coding Practice</h1>
          <p>Exercise 1 - Controlled Component</p>
        </header>
        <main className="App-main">
          <div className="container">
            <input
              type="text"
              placeholder="Say Something"
              value={echo}
              onChange={this.handleChange}
            />
            <p className="echo">Echo:</p>
            {echo === "" ? (
              <p>This should mirror the text you typed into the input field.</p>
            ) : (
              <p>{echo}</p>
            )}
          </div>
        </main>
      </div>
    );
  }
}

export default App;

Live Demo: Exercise 1 - Controlled Component on CodeSandbox
3.14 Ex 2 - Controlled Components

Here the instructions.
3.14 Instructions
This file gives you a functioning app. But, as you can tell, the App isn’t modular at all - there is only 1 component!
Task: Break down this app into components and make them work together to achieve exactly the same result.
Remember that React components should be modular, composable (can be assembled in various ways to achieve the desired result on the page), and reusable.
This exercise will help you to practice passing data into components, creating Stateless Functional Components, adding state to components, updating state, and creating Controlled Components.
Here’s the initial file
// App.js
import React, { Component } from "react";
import "./App.css";

class App extends Component {
  state = {
    value: "",
    items: []
  };

  handleChange = event => {
    this.setState({ value: event.target.value });
  };

  addItem = event => {
    event.preventDefault();
    this.setState(oldState => ({
      items: [...oldState.items, this.state.value]
    }));
  };

  deleteLastItem = event => {
    this.setState(prevState => ({ items: this.state.items.slice(0, -1) }));
  };

  inputIsEmpty = () => {
    return this.state.value === "";
  };

  noItemsFound = () => {
    return this.state.items.length === 0;
  };

  render() {
    return (
      <div className="App">
        <header className="App-header">
          <img src="logo.svg" className="App-logo" alt="logo" />
          <h1 className="App-title">ReactND - Coding Practice</h1>
          <p>Exercise 2 - Controlled Components</p>
        </header>
        <main className="App-main">
          <h2>Shopping List</h2>
          <form onSubmit={this.addItem}>
            <input
              type="text"
              placeholder="Enter New Item"
              value={this.state.value}
              onChange={this.handleChange}
            />
            <button disabled={this.inputIsEmpty()}>Add</button>
          </form>

          <button onClick={this.deleteLastItem} disabled={this.noItemsFound()}>
            Delete Last Item
          </button>

          <p className="items">Items</p>
          <ol className="item-list">
            {this.state.items.map((item, index) => (
              <li key={index}>{item}</li>
            ))}
          </ol>
        </main>
      </div>
    );
  }
}

export default App;
3.14 Solution
I started by separating the UI into logical sections. The React docs call it Breaking the UI Into A Component Hierarchy
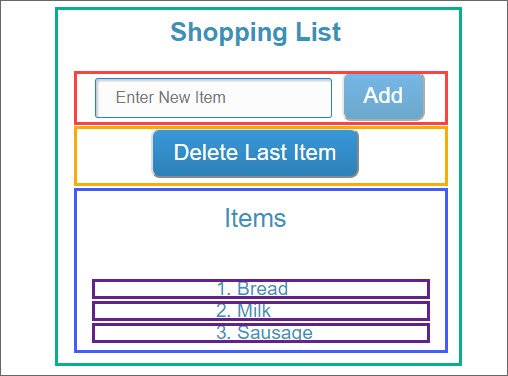
This used the following hierarchy:
- App.js (green)
- AddItem.js (red)
- DeleteItem.js (yellow)
- ItemList.js (blue)
- Item.js (purple)
I started with App.js.
// App.js
import React, { Component } from "react";
import "./App.css";
import AddItem from "./AddItem";
import DeleteItem from "./DeleteItem";
import ItemList from "./ItemList";

class App extends Component {
  state = {
    items: []
  };

  addItem = item => {
    this.setState(prevState => ({
      items: [...prevState.items, item]
    }));
  };

  deleteLastItem = event => {
    this.setState(prevState => ({ items: this.state.items.slice(0, -1) }));
  };

  noItemsFound = () => {
    return this.state.items.length === 0;
  };

  render() {
    return (
      <div className="App">
        <header className="App-header">
          <img src="logo.svg" className="App-logo" alt="logo" />
          <h1 className="App-title">ReactND - Coding Practice</h1>
          <p>Exercise 2 - Controlled Components</p>
        </header>
        <main className="App-main">
          <h2>Shopping List</h2>
          <AddItem onAddItem={this.addItem} />
          <DeleteItem
            onDeleteLastItem={this.deleteLastItem}
            onNoItemsFound={this.noItemsFound()}
          />
          <ItemList items={this.state.items} />
        </main>
      </div>
    );
  }
}

export default App;
Next was AddItem.js
// AddItem.js
import React, { Component } from "react";

class AddItem extends Component {
  state = {
    value: ""
  };
  inputIsEmpty = () => {
    return this.state.value === "";
  };
  handleChange = event => {
    this.setState({ value: event.target.value });
  };
  addItem = e => {
    e.preventDefault();
    // this.props.onAddItem(e.target.value); // Nope! target is button
    this.props.onAddItem(this.state.value);
  };
  render() {
    return (
      <form onSubmit={this.addItem}>
        <input
          type="text"
          placeholder="Enter New Item"
          value={this.state.value}
          onChange={this.handleChange}
        />
        <button disabled={this.inputIsEmpty()}>Add</button>
      </form>
    );
  }
}

export default AddItem;
The next was DeleteItem.js
import React from "react";

function DeleteItem(props) {
  const { onDeleteLastItem, onNoItemsFound } = props;
  return (
    <button onClick={onDeleteLastItem} disabled={onNoItemsFound}>
      Delete Last Item
    </button>
  );
}

export default DeleteItem;
Then ItemList.js
// ItemList.jsx
import React from "react";
import Item from "./Item.js";

function ItemList(props) {
  const { items } = props;
  return (
    <div>
      <p className="items">Items</p>
      <ol className="item-list">
        {items.map((item, index) => (
          <Item key={index} item={item} />
        ))}
      </ol>
    </div>
  );
}

export default ItemList;
Last was Item.js
// Item.js
import React from "react";

function Item(props) {
  return <li>{props.item}</li>;
}

export default Item;
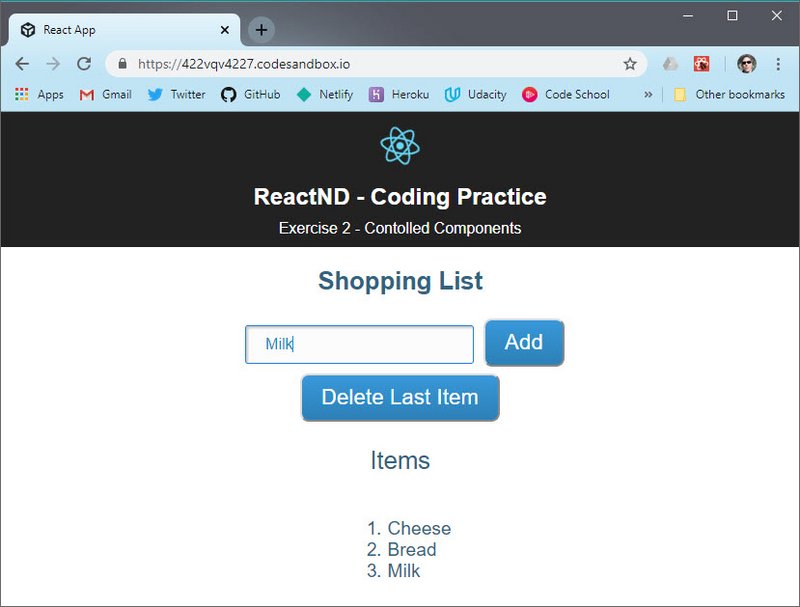
Live Demo: Exercise 2 - Controlled Component on CodeSandbox
3.15 Lesson Summary
Putting it All Into Perspective
When it comes to keeping track of data in your app, think about what will be done with that data, and what that data will look like as your user interfaces with your app.
If you want your component to store mutable local data, consider using state to hold this information. Many times, it is state that will be used to manage controlled form elements in your components.
On the other hand, if some information isn’t expected to change over time, and is generally designed to be “read-only” throughout your app, consider using props instead.
Both state and props will generally be in the form of an object, and changes in either will trigger a re-render of the component, but they each play very different roles in your app.
We covered a lot in this lesson, and you’ve made great progress - great work!
3.15 Lesson Challenge
Read these articles:
- Thinking in React
- Functional Components vs. Stateless Functional Components vs. Stateless Components
- Forms (Controlled Components)
- Avoiding React SetState() Pitfalls
- How to NOT React: Common Anti-Patterns and Gotchas in React
Answer the following questions and share your answers with your Study Group.
- What is the difference between Stateless Functional Components and class components?
- Describe the reasoning behind Controlled Components.
- What is the correct way to modify state? Make sure to explain what role a child component like “Add User” can have in the app.
3.16 Ex 1 - All Together
Here are the requirements
3.16 Instructions
For this exercise, imagine that you’re building a section of a simple video game website where we should be able to add users and display users, along with the number of games he/she has played.
Requirements
Create a React app that lets us add a user’s first name, last name, and username. When the user is added, the number of games that he/she has played is defaulted to 0. Each username has to be unique, so we cannot add multiple users with the same username. When someone clicks “Add” but the username already exists, the app should not allow for a duplicate user to be added and should show an error message instead.
The app should also display a list of users, specifically their usernames and the number of games they’ve played (which is defaulted to 0). If someone tries to add a user when one of the fields is empty, the “Add” button should be disabled.
We should also have a button that lets us toggle between showing and hiding the number of games the users have played. For example, the button can start out as “Hide the Number of Games Played” and the app can display “username1 played 0 games.” Clicking that button should change the button text to “Show the Number of Games Played” and the displayed username and score can be changed to “username1 played * games.”
Guidelines
State management is at the heart of React. It allows us to have a single source of truth for our entire application. That means that we don’t need to make sure that our data is synched across multiple components; React does it for us. It happens via unidirectional data flow: parent components pass properties to child components as props.
Remember that state cannot be modified outside of the component in which it is declared. If a child component needs to pass some data back up to the parent (e.g. a form that conveys the new user information to the component that holds that the users piece of state), we’ll need to pass callbacks from the component that holds state all the way down to the required component. By calling those callbacks, child components are able to pass data to back up to their parents, which are able to modify their state. Props can go through multiple components to get to the component they ultimately need to reach.
Approach
This practice exercise will help you cement your understanding of where to put state, how to update and access state, when to use stateless functional components, and how to use controlled components.
We recommend following the Thinking in React Guide when you’re building your React applications.
Step 1. Break down the app into a hierarchy of components
Draw a box around each React component. Create a bullet list hierarchy.
Step 2. Build a static version in React
This static version will take the data model and render the UI. You’ll want to build components that reuse other components and pass data using props. Don’t use state at all to build this static version. State is reserved only for interactivity (data that changes over time). Since this is a static version of the app, you don’t need it.
Step 3. Figure out the data that should be a part of our state:
- Is it passed in from a parent via props? If so, it probably isn’t state.
- Does it remain unchanged over time? If so, it probably isn’t state.
- Can you compute it based on any other state or props in your component? If so, it isn’t state.
Step 4. Identify where each piece of state lives.
- Identify every component that renders something based on that state.
- If multiple components need the same piece of state, put that piece of state into those components’ parent-most component.
If you can’t find a component where it makes sense to own the state, create a new component simply for holding the state and add it somewhere in the hierarchy above the common owner component.
Step 5. Add Inverse Data Flow.
State should be updated inside of the component where that state lives. If we pass state down from component A to component B and then need to update the state based on something that happened in component B, we can do so via callbacks:
Component A will not only pass state to Component B, but it will also pass a callback function that will fire whenever the state should be updated.
3.16 Solution
The first thing I did was break the UI up into different functional areas.
I first did this with a pen and paper in this order.
- Draw out UI
- Draw boxes around functional components
- Create bullet hierarchy

This is how I divided up the hierarchy:
- App (blue)
- UserInput (red)
- UserList (yellow)
- User (green)
- Game Toggle (purple)
I started with App.js
// App.js
import React, { Component } from "react";
import "./App.css";
import UserInput from "./UserInput";
import UserList from "./UserList";

class App extends Component {
  state = {
    // users: []
    users: [
      { fname: "james", lname: "priest", username: "jpriest", games: 0 },
      { fname: "mary", lname: "jane", username: "mj4ever", games: 0 }
    ]
  };
  saveUser = user => {
    console.log(user);
    this.setState(prevState => ({
      users: [...prevState.users, user]
    }));
  };
  render() {
    const { users } = this.state;
    return (
      <div className="App">
        <header className="App-header">
          <img src="logo.svg" className="App-logo" alt="logo" />
          <h1 className="App-title">ReactND - Coding Practice</h1>
          <p>Exercise 1 - All Together</p>
        </header>
        <main className="App-main">
          <h2>User Game List</h2>
          <div className="container">
            <UserInput users={users} saveUser={this.saveUser} />
            <UserList users={users} />
          </div>
        </main>
      </div>
    );
  }
}

export default App;
Next I built out UserInput.js
// UserInput.js
import React, { Component } from "react";

class UserInput extends Component {
  state = {
    fname: "",
    lname: "",
    username: "",
    games: 0,
    unique: true
  };
  handleChange = e => {
    const name = e.target.name;
    const value = e.target.value;
    // console.log(e.target.name);
    this.setState({
      [name]: value,
      unique: true
    });
  };
  fieldsAreValid = e => {
    const { fname, lname, username } = this.state;
    const valid = fname.length > 0 && lname.length > 0 && username.length > 0;
    return valid;
  };
  addUser = e => {
    e.preventDefault();
    console.log(this.props.users);
    console.log(this.state.username);
    // const { fname, lname, username } = this.state;
    // this.props.saveUser({ fname, lname, username });
    if (
      this.props.users.filter(user => user.username === this.state.username)
        .length > 0
    ) {
      console.log("already taken");
      this.setState({ unique: false });
    } else {
      this.setState({ unique: true });
      this.props.saveUser({ ...this.state });
    }
  };
  render() {
    const { fname, lname, username } = this.state;
    return (
      <div>
        <h3>Add User</h3>

        <form onSubmit={this.addUser}>
          <label>
            First Name:
            <input
              name="fname"
              type="text"
              value={fname}
              onChange={this.handleChange}
              className="form-element"
            />
          </label>
          <br />
          <label>
            Last Name:
            <input
              name="lname"
              type="text"
              value={lname}
              onChange={this.handleChange}
              className="form-element"
            />
          </label>
          <br />
          <label>
            Username:
            <input
              name="username"
              type="text"
              value={username}
              onChange={this.handleChange}
              required
              className={
                !this.state.unique ? "form-element error" : "form-element"
              }
            />
            {!this.state.unique && (
              <span className="red">Username must be unique!</span>
            )}
          </label>
          <br />
          <button disabled={!this.fieldsAreValid()}>Add</button>
        </form>
      </div>
    );
  }
}

export default UserInput;
Next was UserList.js
// UserList.js
import React, { Component } from "react";
import User from "./User";
import GameToggle from "./GameToggle";

class UserList extends Component {
  state = {
    hide: false
  };
  toggleGames = () => {
    console.log(this.state.hide);
    this.setState(prevState => ({
      hide: !prevState.hide
    }));
  };
  render() {
    const { users } = this.props;
    const { hide } = this.state;
    return (
      <div>
        <h3>Users</h3>
        {users.length > 0 && (
          <table>
            <thead>
              <tr>
                <td>First Name</td>
                <td>Last Name</td>
                <td>Username</td>
                <td>Games</td>
              </tr>
            </thead>
            <tbody>
              {users.map(user => (
                <User key={user.username} user={user} hide={hide} />
              ))}
            </tbody>
          </table>
        )}
        <GameToggle toggleGames={this.toggleGames} hide={hide} />
      </div>
    );
  }
}

export default UserList;
Then I added User.js
// User.js
import React from "react";

function User(props) {
  const { fname, lname, username, games } = props.user;

  return (
    <tr>
      <td>{fname}</td>
      <td>{lname}</td>
      <td>{username}</td>
      <td>
        {username} played {props.hide ? "*" : games} games
      </td>
    </tr>
  );
}

export default User;
Lastly, I add GameToggle.js
// GameToggle.js
import React from "react";

function GameToggle(props) {
  const { hide } = props;
  return (
    <button onClick={props.toggleGames}>
      {hide
        ? "Show the Number of Games Played"
        : "Hide the Number of Games Played"}
    </button>
  );
}

export default GameToggle;
Here’s the working app.

Live Demo: Exercise 1 - All Together on CodeSandbox
3.17 Ex 2 - All Together
Here are the requirements.
3.17 Instructions
You’re given a starter template with dummy data.
Task: Add interactivity to the app by refactoring the static code in this template. The goal is to build a React app that shows 2 chat windows for the two existing users - Amy and John.
The messages they send to each other should appear in both chat windows.
- On Amy’s screen, her messages should appear in green and John’s messages should appear in blue.
- On John’s screen, his messages should appear in green and Amy’s messages should appear in blue.
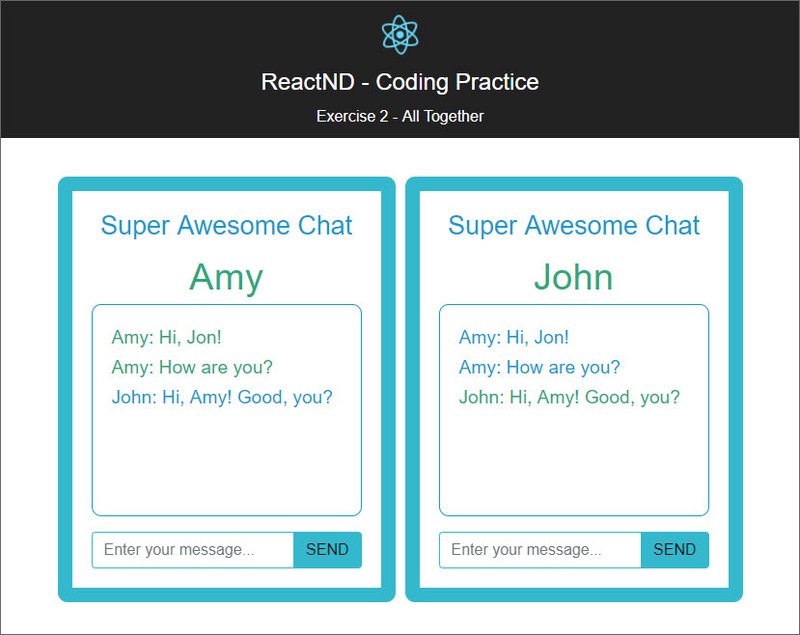
3.17 Solution
The first thing I did was divide the app up into a component hierarchy.

This is how I divided up the hierarchy:
- App (green)
- ChatWindow (blue)
- MessageHistory (yellow)
- MessageInput (red)
- ChatWindow (blue)
Here’s App.js
// App.js
import React, { Component } from "react";
import "./App.css";
import ChatWindow from "./ChatWindow";

class App extends Component {
  users = [{ username: "Amy" }, { username: "John" }];
  state = {
    messages: [
      { username: "Amy", text: "hi, John!" },
      { username: "Amy", text: "how are you?" },
      { username: "John", text: "hi, Amy! good, you?" },
      { username: "Amy", text: "do u like me for real?" },
      { username: "John", text: "I love u for real😘" },
      { username: "Amy", text: "oh John 😍😍😍" },
      { username: "John", text: "oh Amy 🤗🤗🤗" }
    ]
  };
  postMessage = msg => {
    console.log(msg);
    this.setState(prevState => ({
      messages: [...prevState.messages, msg]
    }));
  };
  render() {
    const { messages } = this.state;
    return (
      <div className="App">
        <header className="App-header">
          <img src="logo.svg" className="App-logo" alt="logo" />
          <h1 className="App-title">ReactND - Coding Practice</h1>
          <p>Exercise 2 - All Together</p>
        </header>
        <main className="App-main">
          <div className="container">
            {this.users.map(user => (
              <ChatWindow
                key={user.username}
                username={user.username}
                messages={messages}
                onPostMessage={this.postMessage}
              />
            ))}
          </div>
        </main>
      </div>
    );
  }
}

export default App;
Next is ChatWindow.js
// ChatWindow.js
import React, { Component } from "react";
import MessageHistory from "./MessageHistory";
import MessageInput from "./MessageInput";
import PropTypes from "prop-types";

class ChatWindow extends Component {
  composeMessage = msg => {
    const { username } = this.props;
    const text = msg;
    const msgObject = {
      username,
      text
    };
    this.props.onPostMessage(msgObject);
  };
  render() {
    const { username, messages } = this.props;
    return (
      <div className="chat-window">
        <h2>Super Awesome Chat</h2>
        <div className="name sender">{username}</div>
        <MessageHistory messages={messages} username={username} />
        <MessageInput onPostMessage={this.composeMessage} />
      </div>
    );
  }
}

ChatWindow.propTypes = {
  username: PropTypes.string.isRequired,
  messages: PropTypes.arrayOf(
    PropTypes.shape({
      username: PropTypes.string.isRequired,
      text: PropTypes.string.isRequired
    })
  ),
  onPostMessage: PropTypes.func.isRequired
};

export default ChatWindow;
Followed by MessageHistory.js
// MessageHistory.js
import React from "react";
import PropTypes from "prop-types";

const MessageHistory = props => {
  const { messages, username } = props;
  return (
    <ul className="message-list">
      {messages.map((message, index) => (
        <li
          key={index}
          className={
            message.username === username
              ? "message sender"
              : "message recipient"
          }
        >
          <p>{`${message.username}: ${message.text}`}</p>
        </li>
      ))}
    </ul>
  );
};

MessageHistory.propTypes = {
  username: PropTypes.string.isRequired,
  messages: PropTypes.arrayOf(
    PropTypes.shape({
      username: PropTypes.string.isRequired,
      text: PropTypes.string.isRequired
    })
  )
};

export default MessageHistory;
Lastly is MessageInput.js
// MessageInput.js
import React, { Component } from "react";
import PropTypes from "prop-types";

class MessageInput extends Component {
  state = {
    msg: ""
  };
  isDisabled = () => {
    if (this.state.value === "") {
      return true;
    }
    return false;
  };
  handleChange = e => {
    this.setState({
      msg: e.target.value
    });
  };
  handleSubmit = e => {
    e.preventDefault();
    this.props.onPostMessage(this.state.msg);
  };
  render() {
    const { msg } = this.state;
    return (
      <div>
        <form className="input-group" onSubmit={this.handleSubmit}>
          <input
            type="text"
            className="form-control"
            placeholder="Enter your message..."
            value={msg}
            onChange={this.handleChange}
          />
          <div className="input-group-append">
            <button className="btn submit-button" disabled={this.isDisabled()}>
              SEND
            </button>
          </div>
        </form>
      </div>
    );
  }
}

MessageInput.propTypes = {
  onPostMessage: PropTypes.func.isRequired
};

export default MessageInput;
The final output looks like this.
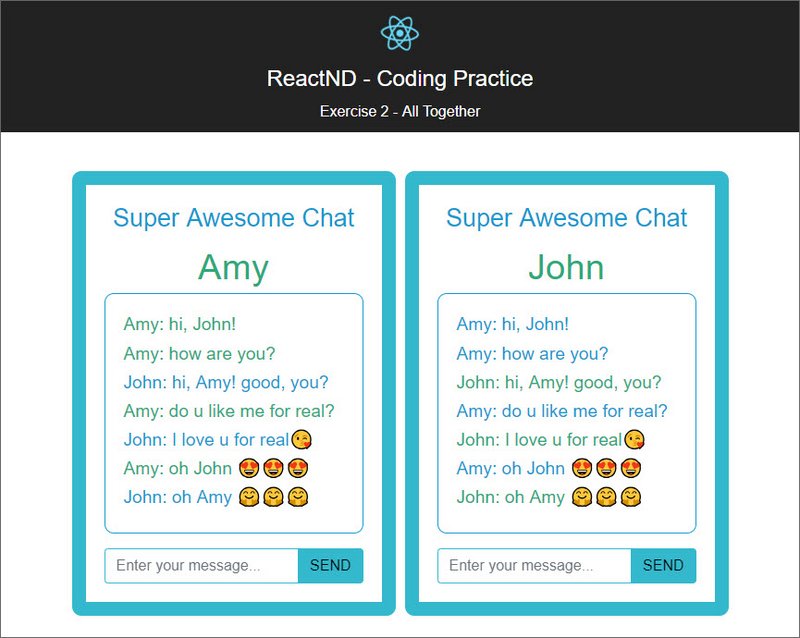
Live Demo: Exercise 2 - All Together on CodeSandbox
4. Lifecycle Events
4.1 Introduction
At this point, you should be fairly comfortable dealing with local state inside of your components. However, one thing we haven’t talked about yet, is how to fetch and manage data that is living in a database somewhere.
Your first intuition might be to make an Ajax request inside of the render method. Unfortunately, that’s a bad idea because the render method needs to be free of side effects.
render() shouldn’t make Ajax request, or do anything that is asynchronous in nature. It should only receive props and return a description of the UI.
So, if we can’t make Ajax requests in the render method, where should we make them?
This introduces the concept of life cycle events in React. Lifecycle events are special methods each component has, that allow us to run custom behavior during certain times of the component’s life.

Times like when a component is being created and inserted into the DOM, when a component receives new props, and a few others.
React has a bunch of different lifecycle events that you can hook into, but for now, we’re only going to talk about the most common ones.
componentDidMount()is immediately invoked after the component is inserted into the DOM.componentWillUnmount()is invoked immediately before component is removed from the DOM.getDerivedStateFromProps()which will be invoked whenever the component is about to receive brand new props.
Now, we still have to answer the initial question, if we wanted to fetch external data from an API, how would we do this?
This is the perfect use case for the componentDidMount() lifecycle events.
render() Is For Rendering, Only!
I just mentioned this in the video, but I want to stress it again - data should not be fetched in the render method! A component’s render() method should only be used to render that component; it should not make any HTTP requests, fetch data that’s used to display the content, or alter the DOM. The render() method also shouldn’t call any other functions that do any of these things, either.
So if render() is only used for displaying content, then we put code that should handle things like Ajax requests in React’s lifecycle events.
Lifecycle Events
Lifecycle events are specially named methods in a component. These methods are automatically bound to the component instance, and React will call these methods naturally at certain times during the life of a component. There are a number of different lifecycle events, but here are the most commonly used ones.
- componentDidMount() - invoked immediately after the component is inserted into the DOM
- componentWillUnmount() - invoked immediately before a component is removed from the DOM
- getDerivedStateFromProps() - invoked after a component is instantiated as well as when it receives brand new props
To use one of these, you’d just create a method in your component with the name and React will call it. It’s an easy way to hook into different parts of the lifecycle of React components.
The lifecycle event that we’ll be looking at (and will be using a lot in our app!) is the componentDidMount() lifecycle event.
You’ll sometimes see shouldComponentUpdate() in React apps as well. It returns true by default. This means that whenever a component’s state (or its parent’s state) is updated, the component re-renders.
The React documentation provides the following guidance for using this lifecycle event:
- The default behavior is to re-render on every state change, and in the vast majority of cases you should rely on the default behavior.
- Do not rely on it to “prevent” a rendering, as this can lead to bugs.
- Consider using the built-in
PureComponentinstead of writingshouldComponentUpdate()by hand. - We do not recommend doing deep equality checks or using JSON.stringify() in shouldComponentUpdate(). It is very inefficient and will harm performance.
4.2 componentDidMount()
If you want to make an Ajax request in React, use the componentDidMount lifecycle event. Let’s walk through how this works.
Once our component is added to the view, componentDidMount will be invoked, componentDidMount will initiate our Ajax request. Once the request has finished and we have the response, setState is called which updates the state of our component with our newly requested data.
This will tick off a re-render and update the UI.

How componentDidMount() Works
If you remember from the previous section, componentDidMount() is the lifecycle hook that is run right after the component is added to the DOM and should be used if you’re fetching remote data or doing an Ajax request. Here’s what the React docs have to say about it:
componentDidMount() is invoked immediately after a component is mounted. Initialization that requires DOM nodes should go here. If you need to load data from a remote endpoint, this is a good place to instantiate the network request. Setting state in this method will trigger a re-rendering.
Let’s take a look at an example User component:
import React, { Component } from 'react';
import fetchUser from '../utils/UserAPI';

class User extends Component {
 constructor(props) {
   super(props);

   this.state = {
     name: '',
     age: ''
   };
 }

 componentDidMount() {
   fetchUser().then((user) => this.setState({
     name: user.name,
     age: user.age
   }));
 }

 render() {
   return (
     <div>
       <p>Name: {this.state.name}</p>
       <p>Age: {this.state.age}</p>
     </div>
   );
   }
}

export default User;
You’ll notice that this component has a componentDidMount() lifecycle event. This component seems pretty straightforward, but let’s walk through the order of how it works:
- The
render()method is called which updates the page with a<div>that has one paragraph for the name and one paragraph for the age. What’s important to realize is thatthis.state.nameandthis.state.ageare empty strings (at first), so the name and age don’t actually display - Once the component has been mounted, the
componentDidMount()lifecycle event occurs- The
fetchUserrequest from theUserAPIis run which sends a request to the user database - When the data is returned,
setState()is called and updates thenameandageproperties
- The
- Since the state has changed,
render()gets called again. This re-renders the page, but nowthis.state.nameandthis.state.agehave values
Let’s use componentDidMount() to fetch real users from a server in our Contacts app!
⚠️ Required API File ⚠️
If you used create-react-app to build your project, then you’ll need the ContactsAPI file for the following video.
Update Components App with componentDidMount
As of right now the contacts array lives within the state field of our App component.
In reality we’d get this data by making an API request from a public API service using something like fetch().
Here’s our ContactsAPI.js file which is responsible for making fetch requests to our database
// ./utils/ContactsAPI.js
const api = process.env.REACT_APP_CONTACTS_API_URL || 'http://localhost:5001';

let token = localStorage.token;

if (!token)
  token = localStorage.token = Math.random()
    .toString(36)
    .substr(-8);

const headers = {
  Accept: 'application/json',
  Authorization: token
};

export const getAll = () =>
  fetch(`${api}/contacts`, { headers })
    .then(res => res.json())
    .then(data => data.contacts);

export const remove = contact =>
  fetch(`${api}/contacts/${contact.id}`, { method: 'DELETE', headers })
    .then(res => res.json())
    .then(data => data.contact);

export const create = body =>
  fetch(`${api}/contacts`, {
    method: 'POST',
    headers: {
      ...headers,
      'Content-Type': 'application/json'
    },
    body: JSON.stringify(body)
  }).then(res => res.json());
We then need to import this into App.js with the following.
import * as ContactsAPI from './utils/ContactsAPI';
Next we remove the hard-coded contacts array out of state and create this componentDidMount method.
// App.js
class App extends Component {
  state = {
    contacts: []
  };
  componentDidMount = () => {
    ContactsAPI.getAll().then(contacts => {
      this.setState(() => ({ contacts }));
    });
  };
  render() {...}
}
This calls the getAll method which returns a Promise. When that Promise resolves we will have our contacts which we use to setState with.
4.2 Question 1 of 2
In which lifecycle method should you make Ajax/API requests?
- componentDidMount
- componentWillUnmount
- render
- shouldComponentUpdate
4.2 Question 2 of 2
Why shouldn’t you make Ajax requests in the render method?
- render() method shouldn’t be concerned with much more than just returning UI
- render() doesn’t support normal JavaScript
- You don’t have complete control over when the render() method will be invoked
- You can’t invoke functions inside of the render() method.
Remove Contacts
With what we have so far, we’re fetching all users from the Contacts API and adding them to this.state.contacts. Pretty good so far. What’s missing, though, is the removing feature. Currently, when we remove a contact, it gets removed from this.state.contacts, but it still exists in the backend database.
Let’s use the Contacts API’s remove() method to update the backend.
Components App - removeContact
This next step is to invoke the remove method when removeContact method is called.
// App.js
  removeContact = contact => {
    this.setState(currentState => ({
      contacts: currentState.contacts.filter(c => c.id !== contact.id)
    }));
    ContactsAPI.remove(contact);
  }
The method above actually splits the operation into two. It first calls setState to remove the contact from the UI and then it calls ContactsAPI.remove to remove the contact from the DB.
Here we remove the item from state ONLY IF the DB item is removed successfully. Otherwise , we handle the error with a catch statement.
  removeContact = contact => {
    ContactsAPI.remove(contact)
      .then(contact => {
        this.setState(prevState => ({
          contacts: prevState.contacts.filter(c => c.id !== contact.id)
        }));
      })
      .catch(error => console.log("DB error"));
  };
componentDidMount() Recap
componentDidMount() is one of a number of lifecycle events that React offers. componentDidMount() gets called after the component is “mounted” (which means after it is rendered).
If you need to dynamically fetch data or run an Ajax request, you should do it in componentDidMount().
4.2 Further Research
componentDidMount() from the React Docs
4.3 Lesson Summary
To recap, lifecycle events are special methods that React provides that allow us to hook into different points in a component’s life to run some code. Now, there are a number of different lifecycle events. They will run at different points, but we can break them down into three distinct categories:
Adding to the DOM
The following lifecycle events will be called in order when a component is being added to the DOM:
- constructor()
- getDerivedStateFromProps()
- render()
- componentDidMount()
⚠️componentWillMount() has been deprecated. ⚠️
As of React 16.3, componentWillMount() has been replaced with UNSAFE_componentWillMount(). Only UNSAFE_componentWillMount() will work starting with React 17.0. UNSAFE_componentWillMount() is now considered to be a legacy method and should not be used in new code.
Re-rendering
The following lifecycle events will be called in order when a component is re-rendered to the DOM:
- getDerivedStateFromProps()
- shouldComponentUpdate()
- render()
- getSnapshotBeforeUpdate()(specific use cases)
- componentDidUpdate()
⚠️componentWillReceiveProps() and componentWillUpdate() have been deprecated. ⚠️
As of React 16.3, they have been replaced with UNSAFE_componentWillUpdate() and UNSAFE_componentWillReceiveProps(). Only UNSAFE_componentWillUpdate() and UNSAFE_componentWillReceiveProps() will work starting with React 17.0. UNSAFE_componentWillUpdate() and UNSAFE_componentWillReceiveProps() are now considered to be legacy methods and should not be used in new code.
Removing from the DOM
This lifecycle event is called when a component is being removed from the DOM:
- componentWillUnmount()
4.3 Further Research
- componentDidMount() from the React Docs
- componentWillUnmount() from the React Docs
- The Component Lifecycles from the React Docs
Here is what the final code looks like.
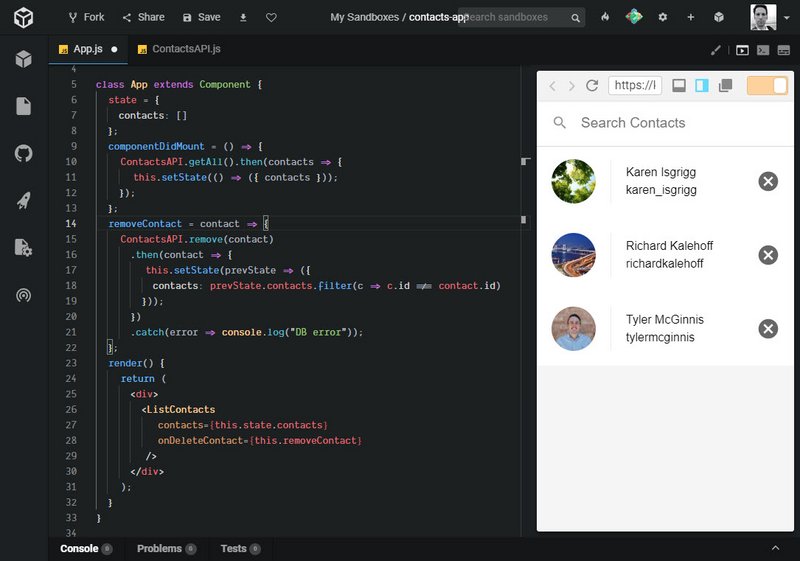
Live Demo: Contacts App on CodeSandbox
Deeper Dive into Lifecycle
These 4 articles touch on different aspect of the component lifecycle. Some detail methods that are now deprecated but these are noted in the articles.
- Understanding the React Component Lifecycle
- React component’s lifecycle
- Understanding React — Component life-cycle
- React JS: what is a PureComponent?
4.4 Lifecycle Event Stages
At it’s most basic, a React component describes what to render through it’s render() method.
But what if we want to do something before or after the component has rendered or mounted? What if we want to avoid a re-render?
React provides several methods that notify us when certain stages of the lifecycle process occurs. These are called the component’s lifecycle methods and they are invoked in a predictable order.
They can be split into three groups or stages with a fourth one being Error Handling.
- Mounting
- Updating
-
Unmounting
- Error Handling
Common Lifecycle Methods
Below is a diagram showing the most common lifecycle methods divided by stage.
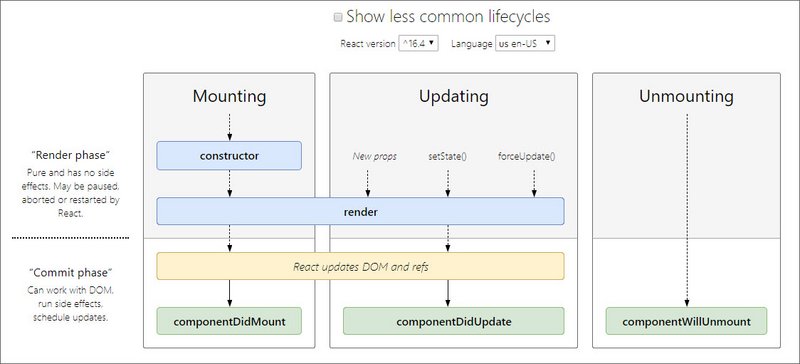
Here’s the same list in a hierarchy.
- Mounting
- Updating
- Unmounting
Rarely Used Lifecycle Methods
Here’s a list of methods broken down by stage with the common ones marked in bold.

Mounting
These methods are called in the following order when an instance of a component is being created and inserted into the DOM.
- constructor()
- static getDerivedStateFromProps()
- render()
- componentDidMount()
Updating
An update can be caused by changes to props or state. These methods are called in the following order when a component is being re-rendered:
- static getDerivedStateFromProps()
- shouldComponentUpdate()
- render()
- getSnapshotBeforeUpdate()
- componentDidUpdate()
Unmounting
This method is called when a component is being removed from the DOM:
- componentWillUnmount()
Error Handling
These methods are called when there is an error during rendering, in a lifecycle method, or in the constructor of any child component.
5. React Router
React Router is a tool that lets us use React to build Single Page Applications.
5.1 Intro
Single-Page Apps
Single-page applications can work in different ways. One way a single-page app loads is by downloading the entire site’s contents all at once. This way, when you’re navigating around on the site, everything is already available to the browser, and it doesn’t need to refresh the page.
Another way single-page apps work is by downloading everything that’s needed to render the page the user requested. Then when the user navigates to a new page, asynchronous JavaScript requests are made for just the content that was requested.
Another key factor in a good single-page app is that the URL controls the page content. Single-page applications are highly interactive, and users want to be able to get back to a certain state using just the URL. Why is this important? Bookmarkability! (pretty sure that’s not a word…yet) When you bookmark a site, that bookmark is only a URL, it doesn’t record the state of that page.
Have you noticed that any of the actions you perform in the app do not update the page’s URL? We need to create React applications that offer bookmarkable pages!
React Router
React Router turns React projects into single-page applications. It does this by providing a number of specialized components that manage the creation of links, manage the app’s URL, provide transitions when navigating between different URL locations, and so much more.
According to the React Router website:
React Router is a collection of navigational components that compose declaratively with your application.
You can check out the website at https://reacttraining.com/.
In the next section, we’ll dynamically render content to the page based on a value in the project’s this.state object. We’ll use this basic example as an idea of how React Router works by controlling what’s being seen via state.
Then we’ll switch over to using React Router. We’ll walk you through installing React Router, adding it to the project, and hooking everything together so it can manage your links and URLs.
5.2 Dynamically Render Pages
As the app currently functions, there’s no way to add new contacts! That’s a shame because I really need to add Richard to my list of contacts. So let’s create a form that’ll let us create new contacts and save them to the server.
5.2 Quiz Question
We’re about to create a form that will create new contacts. Where should the code for the form UI go?
- in App.js
- in ListComponents.js
- in index.js
- in a new component
We don’t want the form to display all of the time, so we’ll start out by having the form show up only if a setting is enabled. We’ll store this setting in this.state. Doing it this way will give us an idea of how React Router functions.
Contacts App - Manual Routing with State
Before we use React Router we are going to implement a manual way of conditionally showing the CreateContact page.
We start by adding CreateContact.js
// CreateContact.js
import React, { Component } from 'react';

class CreateContact extends Component {
  render() {
    return <div>Create Contact</div>;
  }
}

export default CreateContact;
Next we do the following to App.js.
- Import CreateContact.js
- Add a state field called ‘screen’ to track which component to show
- Create conditional rendering based on
state.screenvalue
// App.js
import React, { Component } from 'react';
import ListContacts from './ListContacts';
import * as ContactsAPI from './utils/ContactsAPI';
import CreateContact from './CreateContact';

class App extends Component {
  state = {
    contacts: [],
    screen: 'create'
  };
  componentDidMount() {
    ContactsAPI.getAll().then(contacts => {
      this.setState(() => ({
        contacts
      }));
    });
  }
  removeContact = contact => {
    this.setState(currentState => ({
      contacts: currentState.contacts.filter(c => {
        return c.id !== contact.id;
      })
    }));

    ContactsAPI.remove(contact).then(contact => {
      console.log(contact); // <- removed contact
    });
  };
  render() {
    return (
      <div>
        {this.state.screen === 'list' && (
          <ListContacts
            contacts={this.state.contacts}
            onDeleteContact={this.removeContact}
          />
        )}
        {this.state.screen === 'create' && <CreateContact />}
      </div>
    );
  }
}

export default App;
We did a couple things so far.
- We created the CreateContact component that’ll be in charge of the form to create new contacts.
- We favored composition by creating CreateContact as a standalone component that we added to the render() method.
In an attempt to do an extremely simple recreation of how React Router works, we added a screen property to this.state, and used this property to control what content should display on the screen.
Short-circuit Evaluation Syntax
In the conditional rendering, we used a somewhat odd looking syntax:
{this.state.screen === 'list' && (
  <ListContacts
  contacts={this.state.contacts}
  onDeleteContact={this.removeContact}
  />
)};
and
{this.state.screen === 'create' && (
  <CreateContact />
)}
This can be a little confusing with both the JSX code for a component and the code to run an expression. But this is really just the logical expression &&:
expression && expression
What we’re using here is a JavaScript technique called short-circuit evaluation. If the first expression evaluates to true, then the second expression is run. However, if the first expression evaluates to false, then the second expression is skipped. We’re using this as a guard to first verify the value of this.state.screen before displaying the correct component.
For a deeper dive into this, check out the short-circuit evaluation info on MDN.
Add A Button
Right now we have to manually change the state to get the app to display the different screens. We want the user to be able to control that in the app itself, so let’s add a button!
We do this in ListContacts.js right after the search input. We destructure a new prop called onNavigate and set Add Contact button’s onClick to it.
// ListContacts.js
  render() {
    const { query } = this.state;
    const { contacts, onDeleteContact, onNavigate } = this.props;
    return (
      <div className="list-contacts">
        <div className="list-contacts-top">
          <input
            className="search-contacts"
            type="text"
            placeholder="Search Contacts"
            value={query}
            onChange={this.updateQuery}
          />
          <a
            href="#create"
            onClick={() => onNavigate()}
            className="add-contact"
          >
            Add Contact
          </a>
        </div>
Next we update App.js with the onNavigate method that will be passed as props to ListContacts.js.
We inline an arrow function that will set state for the ‘screen’ property to ‘create’. This will trigger the CreateContact component to display.
We also include an AddContact method that we’ll pass as props to CreateContact component. This method will trigger ListContacts to display.
// App.js
  addContact = contact => {
    console.log("Contact added", contact);
    this.setState(() => ({
      screen: "list"
    }));
  };
  render() {
    return (
      <div>
        {this.state.screen === 'list' && (
          <ListContacts
            contacts={this.state.contacts}
            onDeleteContact={this.removeContact}
            onNavigate={() => {
              this.setState({ screen: 'create' });
            }}
          />
        )}
        {this.state.screen === 'create' && (
          <CreateContact onCreateContact={this.addContact} />
        )}
      </div>
    );
  }
Lastly we update the CreateContact component by adding a button that we’ll hook up to the onCreateContact method that is being passed in.
// CreateContact.js
import React, { Component } from "react";
import PropTypes from "prop-types";

class CreateContact extends Component {
  static propTypes = {
    onAddContact: PropTypes.func.isRequired
  };
  render() {
    const { onAddContact } = this.props;
    return (
      <div>
        Create Contact
        <button
          onClick={() => {
            onAddContact({
              id: "james",
              name: "James Priest",
              handle: "@james",
              avatarURL: "/james.jpg"
            });
          }}
        >
          Add Contact
        </button>
      </div>
    );
  }
}

export default CreateContact;
Here’s the UI.
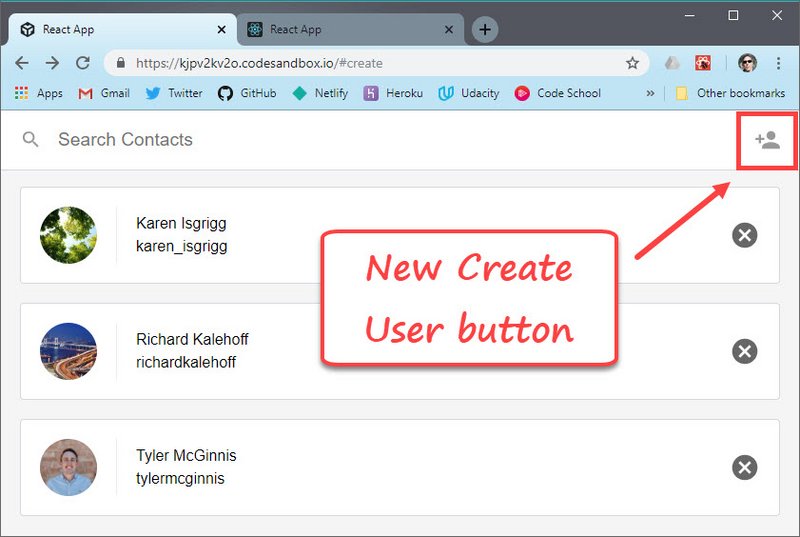
Live Demo: Contacts App on CodeSandbox
The problem is that when we use the BACK button, the app breaks and is not able to navigate or replicate the state of our SPA from before.
This is no good because this is an essential feature fo the web. When a user clicks the BACK button they expect to see the previous screen but this is really tricky to do with component state all on our own.
React Router exists to alleviate this issue so we can keep our UI and URL in sync
Dynamic Routing Recap
In the code we added in this section, we tried our attempt at using state to control what content displays to the user. We saw things break down, though, when we used the back button.
Now, let’s switch over to using React Router to manage our app’s screens.
5.3 The BrowserRouter Component
As we’ve just seen, when the user presses the ‘back’ button in the browser, they will probably have to refresh the page to see the proper content at that location. This isn’t the best experience for our user! When we update location, we can update the app as well using JavaScript. This is where React Router comes in.
Install React Router
To use React Router in our app, we need to install react-router-dom.
npm install --save react-router-dom
BrowserRouter
The first component we’re going to look at from React Router is called Browser Router.
It’s going to listen for changes in the URL, and then make sure the correct screen shows up whenever the URL changes.

Contacts App - BrowserRouter
This component is going to listen for changes in the URL and then make sure the correct screen shows up whenever the URL changes.
In order to use this we need to update index.js.
import React from "react";
import ReactDOM from "react-dom";
import { BrowserRouter } from "react-router-dom";
import "./index.css";
import App from "./App";

ReactDOM.render(
  <BrowserRouter>
    <App />
  </BrowserRouter>,
  document.getElementById("root")
);
After importing react-router-dom we wrap the App component with the BrowserRouter component.
BrowserRouter Explained
What’s nice about React Router is that everything is just a component. This makes using it nice, but it also makes diving into the code more convenient as well. Let’s take a look at what exactly BrowserRouter is doing under the hood.
Here is the code straight from the React Router repository.
// BrowserRouter package source...
class BrowserRouter extends React.Component {
  static propTypes = {
    basename: PropTypes.string,
    forceRefresh: PropTypes.bool,
    getUserConfirmation: PropTypes.func,
    keyLength: PropTypes.number,
    children: PropTypes.node
  }

  history = createHistory(this.props)

  render() {
    return <Router history={this.history} children={this.props.children} />
  }
}
When you use BrowserRouter, what you’re really doing is rendering a Router component and passing it a history prop. Wait, what is history? history comes from the history library (also built by React Training).
The whole purpose of this library is it abstracts away the differences in various environments and provides a minimal API that lets you manage the history stack, navigate, confirm navigation, and persist state between sessions.
So in a nutshell, when you use BrowserRouter, you’re creating a history object which will listen to changes in the URL and make sure your app is made aware of those changes.
BrowserRouter Component Recap
In summary, for React Router to work properly, you need to wrap your whole app in a BrowserRouter component. Also, BrowserRouter wraps the history library which makes it possible for your app to be made aware of changes in the URL.
5.3 Further Research
5.4 The Link Component
The link component from React Router is critical. It’s the way that the user navigates through your app.
When the user clicks a link, it talks to the BrowserRouter and tells it to update the URL.
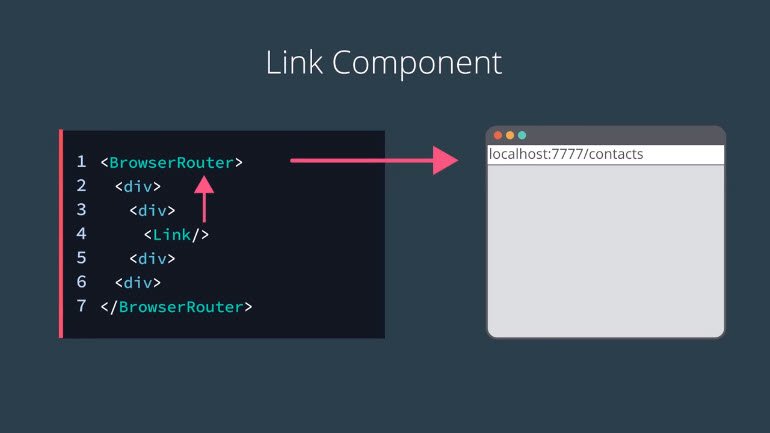
It’s also accessible. Meaning, if you use the keyboard to navigate an app, it’ll still work. Or maybe you want to right-click and open a new window? That’s going to still work, too.
These components do what users expect a link on the web to do.
Contacts App - Link Component
What we need to do is replace our create contact link with a Link component in ListContacts.js
We will also update href to to and we will remove the onClick handler since Link will handle the navigation for us.
// ListContacts.js
  render() {
    // code...
    return (
      <div className="list-contacts">
        <div className="list-contacts-top">
          <input
            className="search-contacts"
            type="text"
            placeholder="Search Contacts"
            value={query}
            onChange={this.updateQuery}
          />
          <Link to="create" className="add-contact">
            Add Contact
          </Link>
          {/* more code... */}
We can also remove the onNavigate prop from this component.

Live Demo: Contacts App on CodeSandbox
Link Component Explained
As you’ve seen, Link is a straightforward way to provide declarative, accessible navigation around your application. By passing a to property to the Link component, you tell your app which path to route to.
<Link to="/about">About</Link>
If you’re experienced with routing on the web, you’ll know that sometimes our links need to be a little more complex than just a string. For example, you can pass along query parameters or link to specific parts of a page. What if you wanted to pass state to the new route? To account for these scenarios, instead of passing a string to Link’s to prop, you can pass it an object like this,
<Link
  to={{
    pathname: "/courses",
    search: "?sort=name",
    hash: "#the-hash",
    state: { fromDashboard: true }
  }}
>
  Courses
</Link>
You won’t need to use this feature all of the time, but it’s good to know it exists. You can read more about Link in the React Router official docs.
5.4 Quiz Question
When creating anchors for our app’s routes, let’s say we want <a href="/members" class="members">Members</a> in the DOM. How should we write this using React Router’s <Link> component?
<Link to="/members" class="members">Members</Link><a to="/members" class="members">Members</a><Link to="/members" className="members">Members</Link><ink to="/members" class="members" linkText="Members" />
Link Recap
React Router provides a Link component which allows you to add declarative, accessible navigation around your application. You’ll use it in place of anchor tags (a) as you’re typically used to.
React Router’s <Link> component is a great way to make navigation through your app accessible for users. Passing a to prop to your link, for example, helps guide your users to an absolute path (e.g., /about):
<Link to="/about">About</Link>
Since the <Link> component fully renders a proper anchor tag (<a>) with the appropriate href, you can expect it to behave how a normal link on the web behaves.
5.4 Further Research
5.5 The Route Component
The final component we need is called the route. Route takes a path that will match the URL, or not.
If the path matches the URL, then the route will render some UI. But it won’t render anything if it doesn’t match.
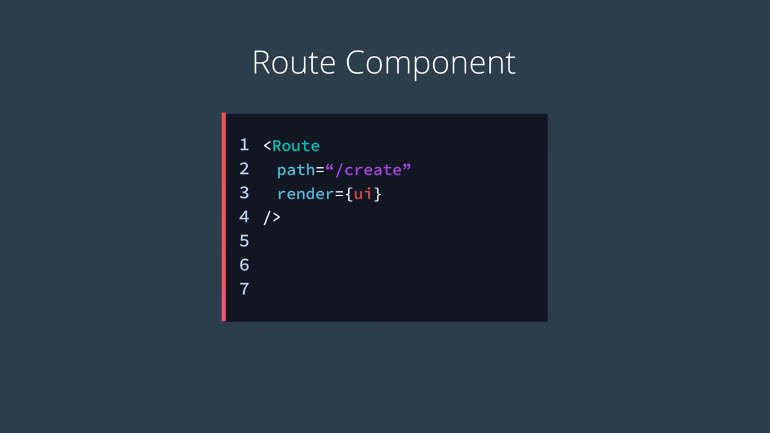
Much like the code that we had that was checking our component’s state to decide which screen we wanted to render, Route will do that same sort of thing. But instead of checking component’s state, it will check the URL.
What does that mean? It means that the back button’s still going to work.
Contacts App - Route Component
This is the third and final thing we need to do in order to get React Router to start managing the URL and the UI for us.
We start back in App.js and import Route from ‘react-router-dom’.
Then instead of conditionally rendering based on state we are now going to render a Route based on path.
// App.js
import * as ContactsAPI from './utils/ContactsAPI';
import CreateContact from './CreateContact';
import { Route } from 'react-router-dom';

class App extends Component {
  state = {
    contacts: []
  };
  // more code... (handlers and methods)
  render() {
    return (
      <div>
        <Route
          path="/"
          exact
          render={() => (
            <ListContacts
              contacts={this.state.contacts}
              onDeleteContact={this.removeContact}
            />
          )}
        />
        <Route
          path="/create"
          component={CreateContact}
        />
      </div>
    );
  }
}
We can use render prop to render the component and pass in additional props like handler functions.
Otherwise, we can use component prop of Route when we are just passing in the component name without additional props.
One thing to note is the use of exact prop so that both components aren’t rendered when we are at ‘/create’.
We’ve also gotten rid of our onNavigate props and the screen state since React Router is now managing this for us.
5.5 Quiz Question
If the browser loads the URL /houses/green, which of the following Routes will match?
<Route path="/houses" component={Houses} /><Route exact path="/houses" component={Houses} /><Route path="/houses/green" component={Houses} /><Route exact path="/houses/green" component={Houses} /><Route path="/" component={Houses} />
Route Component Recap
The main takeaway from this section is that with a Route component if you want to be able to pass props to a specific component that the router is going to render, you’ll need to use Route’s render prop. As you saw, render puts you in charge of rendering the component which in turn allows you to pass any props to the rendered component as you’d like.
In summary, the Route component is a critical piece of building an application with React Router because it’s the component which is going to decide which components are rendered based on the current URL path.
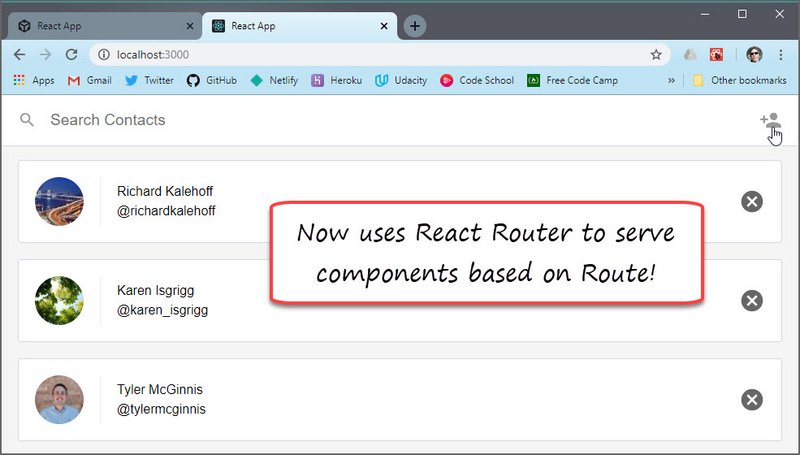
Live Demo: Contacts App on CodeSandbox
Clicking the Add Contact button now serves the CreateContact component.
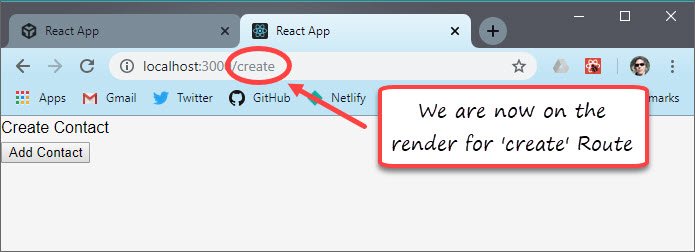
Live Demo: Contacts App on CodeSandbox
5.6 Finish Contact Form
Right now, the page to create contacts is empty! Let’s build out a form on that page so we start adding our own custom contacts.
⚠️ Required File ⚠️
At the beginning of the program, we gave you the option to clone our starter project or to start from scratch using create-react-app. If you haven’t added it yet, you’ll need the ImageInput.js file for the following video.
The ImageInput component is a custom <input> that dynamically reads and resizes image files before submitting them to the server as data URLs. It also shows a preview of the image. This file is given to you because it contains features related to files and images on the web that aren’t crucial to your education in this context.
Contacts App - Create Contact Form
At this point we need to add the following code to our CreateContact.js component.
// CreateContact.js
import { Link } from 'react-router-dom';
import ImageInput from './ImageInput';

class CreateContact extends Component {
  render() {
    if (this.state.toList === true) {
      return <Redirect to="/" />;
    }
    return (
      <div>
        <Link className="close-create-contact" to="/">
          Close
        </Link>
        <form className="create-contact-form">
          <ImageInput
            className="create-contact-avatar-input"
            name="avatarURL"
            maxHeight={64}
          />
          <div className="create-contact-details">
            <input type="text" name="name" placeholder="Name" required />
            <input type="text" name="handle" placeholder="Handle" required />
            <button>Add Contact</button>
          </div>
        </form>
      </div>
    );
  }
}

export default CreateContact;
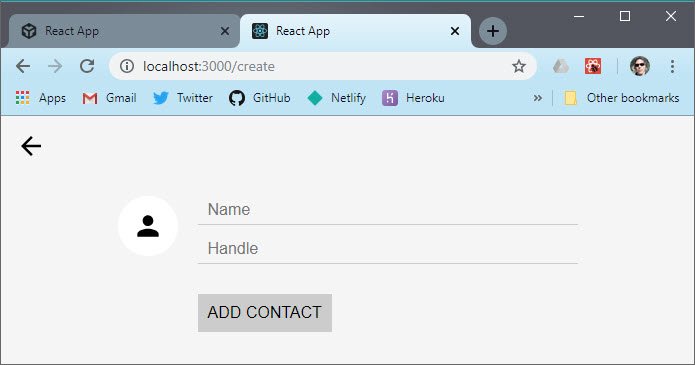
Live Demo: Contacts App on CodeSandbox
Serialize The Form Data
At this point, our form will serialize the values from user input (i.e., the name and email), adding them as a query string to the URL. We can add some additional functionality by having our app serialize these form fields on its own. After all, we want the app to ultimately handle creating the contact and saving it to the state.
To accomplish this, we’ll use the form-serialize package to output this information as a regular JavaScript object for the app to use.
npm install --save form-serialize
Next we make the following additions to CreateContact.js
// CreateContact.js
import serializeForm from 'form-serialize';

class CreateContact extends Component {
  // more code...
  handleSubmit = e => {
    e.preventDefault();
    const values = serializeForm(e.target, { hash: true });

    if (this.props.onCreateContact) {
      this.props.onCreateContact(values);
    }
  };
  // more code...
  render() {
    return (
      <div>
        <Link className="close-create-contact" to="/">
          Close
        </Link>
        <form onSubmit={this.handleSubmit} className="create-contact-form">
        {/* more code... */}
      </div>
    );
  }
}
Update Server With New Contact
We have our contact form. We’re serializing our data and passing it up to the parent component. All we need to do to have a fully functional app is to save the contact to the server.
Next we make the following changes to App.js
// App.js
class App extends Component {
  // more code...
  createContact = contact => {
    ContactsAPI.create(contact).then(contact => {
      this.setState(prevContacts => ({
        contacts: prevContacts.contacts.concat(contact)
      }));
    });
  };
  render() {
    return (
      <div>
        <Route
          exact
          path="/"
          render={() => (
            <ListContacts
              contacts={this.state.contacts}
              onDeleteContact={this.removeContact}
            />
          )}
        />
        <Route
          path="/create"
          render={({ history }) => (
            <CreateContact
              onCreateContact={contact => {
                this.createContact(contact);
                history.push('/');
              }}
            />
          )}
        />
      </div>
    );
  }
}
Here’s the Create Contact form.
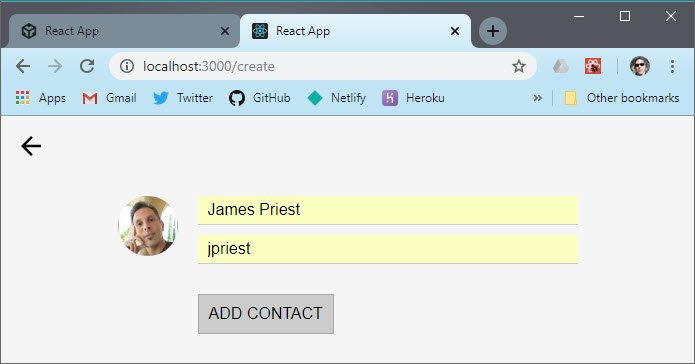
Here is the final list.

Live Demo: Contacts App on CodeSandbox
5.7 React Router Recap

Our app has a new screen and since we’re using React Router, all of our user’s expectations are met.
- When they click on our new link, the router transitions the new screen and the URL updates.
- They can then click the back button to go back, and the forward button to go forward.
- They can refresh the page, right-click a link to open in a new tab, or share this URL with a friend.
This is how the web works, and we don’t want to break it.
Further Learning
If you’re interested in learning more about React Router, we recommend these three resources.
- Build your own React Router v4 will walk through how to implement your own mini version of React Router to better understand its implementation details
- React Training’s official documentation for React Router blog post
- Tyler McGinnis React Router full course
5.7 Lesson Challenge
Read Tyler’s Nested routes with React Router v4 blog post and answer the following questions. Share your answers with your classmates.
- What is the difference between
LinkandRoute? - What is the difference between
match.pathandmatch.url? Give a use case for each. - Create a code example where you (1) pass props to a component that’s rendered by React Router and (2) use nested routes.
5.8 Course Resources
Keep Learning
Great work! You’ve learned how to build applications in React, but there’s always more to learn! Check out the following resources to up your skills:
- [The React Docs](https://facebook.github.io/react/docs/hello-world.html
- Tyler’s Blog
People to Follow
Whether it be popular blog posts or developers to follow on Twitter, a large part of getting everything out of a new technology is utilizing existing community resources. So we want to share with you with our favorite resources from the React community that we’ve found helpful over the last few years. Hopefully you’ll find them helpful as well.
- Dan Abramov
- Sebastian Markbåge
- Henry Zhu
- Peggy Rayzis
- Merrick Christensen
- Christopher Chedeau
- React
- Tyler McGinnis
Blog posts to read
- You’re missing the point of React
- React “Aha” Moments
- 9 Things every React.js Beginner should know
- React Elements vs React Components
If you want to learn more advanced topics in React, you can check out tylermcginnis.com.
Thanks for joining us on this journey! Now it’s time to move on to learning Redux!