React Fundamentals
<– back to React Fundamentals Code Notes homepage

1. Why React
- Composition
- Declarative
- Unidirectional Dataflow
- Explicit Mutations
- Just JavaScript
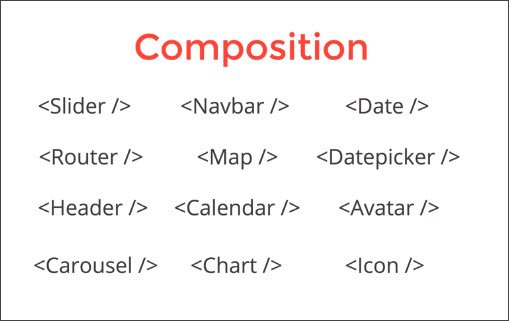
1.1 Composition
This is really means the composition of components.
It allows you to take a certain functionality of a small piece of your application and wrap or encapsulate it into it’s own isolated container.
For example, a <Map /> component will have a lot going on. It may have some state as to the specific location of the map. It may need to make Ajax requests as we scroll in order to update the map images.
What we’ve done is really taken all the complexity of what is going on for the map and abstracted it behind our <Map /> component.
What’s nice about the component model is the same intuition we use to think about related functions can be applied to components.
How do we build large applications in React? By building a bunch of small apps.
Instagram Composition
Here is a view of the Instagram interface. It is composed of many smaller components, each of which may have their own state.

Functional Composition
Here is an example of functional composition.
var getProfilePic = function (username) {
  return 'https://photo.fb.com/' + username
}

var getProfileLink = function (username) {
  return 'https://www.fb.com/' + username
}

var getAvatarInfo = function (username) {
  return {
    pic: getProfilePic(username),
    link: getProfileLink(username)
  }
}

getAvatarInfo('tylermcginnis')
What we are doing inside of getAvatarInfo is we are calling getProfilePic and getProfileLink.
By doing this we are composing functions together in order to get an object with a pic property as well as a link property.
What’s nice about React is we can use the same intuition we have about functions in order to compose our UI out of components.
Component Composition
Here’s an example of the same functionality built with components.
var ProfilePic = function() {
  return (
    <img src={'https://photo.fb.com/' + this.props.username}>
  )
}

var ProfileLink = function() {
  return (
    <a href={'https://www.fb.comn/' + this.props.username}>
      {this.props.username}
    </a>
  )
}

var Avatar = function() {
  return (
    <div>
      <ProfilePic username={this.props.username} />
      <ProfileLink username={this.props.username} />
    </div>
  )
}

<Avatar username="tylermcginnis" />
So instead of composing two functions into another function, we are composing two components into another component.
The important take-away here is not to get hung up on the implementation, but rather, grasp the idea of separating your interface into components, and then composing those components together.
That’s what makes React so powerful is the idea of encapsulating all this complexity into specific components, then composing those components together in order to build the interface.
1.2 Declarative

Imperative
When write imperative code you are telling the computer How to do something.
// Imperative (How)

var numbers = [4,2,3,6]
var total = 0
for (var i = 0; i < number.length; i++) {
  total += numbers[i]
}
It the example we are explicitly telling the computer how to add up the numbers by looping through the array and adding to total on each iteration.
Declarative
When we write declarative code we tell the computer What to do.
// Declarative (What)

var numbers = [4,2,3,6]
numbers.reduce(function (previous, current) {
  return previous + current
})
Here we are just telling the computer what we want to happen. We want to add the previous item to the current item.
We don’t need to concern ourselves with How .reduce does this. There is some level of abstraction here and we are trusting the abstraction of .reduce.
Benefits of Declarative Programming
- Reduce side-effects
- Minimize mutability
- More readable code
- Less bugs
Side-effects
In functional programming whenever you are modifying state, or mutating something, or making API requests… those are referred to as side-effects.
By having declarative code, you are reducing the amount of side-effects in your code.
Mutability
In our iterative example we have the total variable which we are changing on every iteration of the loop. Since we are modifying it on on every iteration, we can’t reliably trust it’s going to be a certain value at any given time.
In the declarative example we are actually not modifying state, because all of that state modification is happening under the hood of .reduce.
Not only are we minimizing side-effects, but we are also minimizing the amount of mutating we are doing to state which is going to make our programs more stable and consistent.
More readable
Many times declarative code is going to be more readable because we are not having to mentally iterate through the loop in order to understand what is happening.
Less bugs
Because there’s less mutability, we introduce less bugs into our code.
Imperative vs Declarative Example
Eating at a restaurant.
Imperative
You walk in and tell the host, I’d like to:
- walk over to that table
- be given a menu
- decide what I want
- give the waiter my order
- be served my food
- eat
This is very focused on How.
Declarative
You walk into a restaurant and tell the host, “I am here with my significant other, Do you have a table for two?”
This is focused on the What. We are trusting that the host will be able to accommodate the request without us providing explicit instructions on how this is to be accomplished.
Is React Declarative

Here is jQuery code that is very imperative because we are telling the computer How to handle the state.
Imperative
$("#btn").click(function() {
  $(this).toggleClass("highlight")
  $(this).text() === 'Add Highlight'
    ? $(this).text('Remove Highlight')
    : $(this).text('Add Highlight')
})
Declarative
<TylersBtn
  onClick={this.handleToggleHighlight}
  highlight={this.state.highlight} />
Here we have a React component called TylersBtn. It runs handleToggleHighlight whenever a user clicks the button. We pass in a highlight property which comes from this.state.highlight.
State is now being managed from inside the component rather than being managed in the DOM.
Additionally, we can just look at the component to know what is going on rather than have to step through the jQuery in order to know what’s happening.
Why “for the most part”
Because we need to call setState in order to set the highlight property and this is very imperative.
this.setState({
  highlight: !this.state.highlight
})
1.3 Unidirectional Data Flow

The only difference between a static website and a complex web app is state.
A static website is probably never going to break because it doesn’t have to manage state. FaceBook manages a bunch of state inside the app and therefore, manages lots of data.
The main purpose of React is for managing state inside your application.
The UI in React is really just a function of your state.

As the state updates, the UI is going to update as well. All we really need to do is worry about managing state in our app for the UI to update according to that state.
1.4 Explicit Mutations

Whenever we want to update the state in our application, we have to call setState.
this.setState({
  highlight: !this.state.highlight
})
What setStat is going to do is update the state in the application but it’s also going to kick off a re-render.
Whenever state is updated or whenever we call
setState, it kicks off a re-render & updates the UI.In order to update state in a React application, we have to call
setState
Explicit Mutations means we are not setting event listeners or doing dirty checking. We are specifically calling setState so we know exactly when our UI will update. It updates when we explicitly call setState.
1.5 Just JavaScript

The better you get at using React, the better you’ll get at JavaScript.
The React API is pretty small because it relies heavily on the JS API.
<ul>
  {friends.map(function (name) {
    return (
      <li>
        {name}
      </li>
    )
  })}
</ul>
Instead of using ng-repeat or some other API specific to a framework, we are using JavaScript’s built-in methods.
2. The React Ecosystem
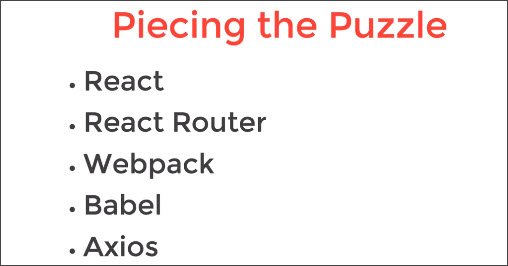
The React ecosystem is made up of these five basic areas.
- React
- React Router
- Webpack
- Babel
- Axios
2.1 React
This is the core React framework.
2.2 React Router
This will allow us to map a specific URL with a specific component.
| URL | Active Component |
|---|---|
| foo.com | Home |
| foo.com/about | About |
| foo.com/topics | Topics |
<Router>
  <div>
    <ul>
      <li><Link to="/">Home</Link></li>
      <li><Link to="/about">About</Link></li>
      <li><Link to="/topics">Topics</Link></li>
    </ul>

    <Router exact path="/" component={Home} />
    <Router path="/about" component={About} />
    <Router path="/topics" component={Topics} />
  </div>
</Router>
We have html that renders three <Link/> components and below that we render three <Router /> components.
The <Router /> components say:
- If someone goes to “/” then render the
<Home />component. - If someone goes to “/about” then render the
<About />component. - If someone goes to “/topics” then render the
<Topics />component.
The nice thing about React Router is that it’s just components. <Link /> is component and <Router />is a component that we are composing together.
2.3 Webpack
This is an extremely powerful tool that sometimes gets a bad wrap for being more complex than it actually is.
var path = require('path');
var HtmlWebpackPlugin = require('html-webpack-plugin');

module.exports = {
  entry: './app/index.js',
  output: {
    path: path.resolve(__dirname, 'dist'),
    filename: 'index_bundle.js'
  },
  module: {
    rules: [
      { test: /\.(js)$/, use: 'babel-loader' },
      { test: /\.css$/, use: { 'style-loader', 'css-loader' }}
    ]
  },
  plugins: [
    new HtmlWebpackPlugin({
      template: 'app/index.html'
    })
  ],
  mode: 'development'
};
What’s happening is index.js is the entry point and it is going to become the root component in our application.
Webpack will take all the js files along with each require statement and run them through the transformations defined under rules.
It’ll then bundle all the files into one file, output it to the dist folder, and name it index_bundle.js
Webpack is really just a code bundler.
It takes our code in our modules, transforms them, and bundles them.
2.4 Babel
Babel is a code transformer
We need to add an entry to package.json which includes instructions on what babel should transform.
"babel": {
  "presets": [
    "env",
    "react"
  ]
}
These transformations happen through Webpack and we run two types of transformations.
env- ES6 transformationsreact- jsx transformations
2.5 Axios
Provides a uniform way of making Ajax requests
function getRepos (username) {
  return axios.get('https://api.gitgub.com/users/' + username + '/repos' +
    param + '&per_page=100' );
}
3. Imperative vs Declarative
Imperative says How and declarative says What.
3.1 Declarative Languages
Here are some programming languages and where they fall on the spectrum.
| Imperative | Declarative | Mix (Can be) |
|---|---|---|
| C, C++, Java | SQL, HTML | JavaScript, C#, Python |
Here are a couple examples of declarative syntax.
SQL
SELECT * FROM Users WHERE Country='Mexico';
HTML
<article>
  <header>
    <h1>Declarative Programming</h1>
    <p>Some text about declarative programming</p>
  </header>
</article>
3.2 Imperative JavaScript
Next we’re going to create some imperative code.
- Write a function called double which takes in an array of numbers and returns a new array after doubling every item in that array. double([1,2,3]) -> [2,4,6]
function double (arr) { let results = [] for (let i = 0; i < arr.length; i++){ results.push(arr[i] * 2) } return results } - Write a function called add which takes in an array and returns the result of adding up every item in the array. add([1,2,3]) -> 6
function add (arr) { let result = 0 for (let i = 0; i < arr.length; i++){ result += arr[i] } return result } - Using jQuery, add a click event handler to the element which has an id of btn. When clicked, toggle (add or remove) the highlight class as well as change the text to Add Highlight or Remove Highlight depending on the current state of the element.
$("#btn").click(function() {
  $(this).toggleClass("highlight")
  $(this).text() === 'Add Highlight'
    ? $(this).text('Remove Highlight')
    : $(this).text('Add Highlight')
})
After examining these three here’s what we can say about them.
- They each describe How to do something. We are explicitly iterative over an array or explicitly laying out steps for how to implement the functionality we want.
- Each example is mutating some piece of state. In the first two we create a variable called
resultand then constantly modify it. The last example tracks state in the DOM rather than in a component. - The code isn’t very readable. We can’t just glance at the code to see what’s going on. We actually have to step through it like an interpreter would while also taking into account the context in which the code lives.
3.3 Declarative JavaScript
Here we are going to re-write the code to say What we want.
- Create a function to double the numbers in an array.
function double (arr) { return arr.map(item => item * 2) } - Create a function to add the numbers in an array and return the sum.
function add (arr) { return arr.reduce((prev, current) => prev + current); } - Create a highlight toggle component.
<Btn
  onToggleHighlight={this.handleToggleHighlight}
  highlight={this.state.highlight}>
  {this.state.buttonText}
</Btn>
In the first two examples we’re using JavaScript’s build-in .map and .reduce methods which provides an abstraction over some imperative implementation.
We are also not mutating any state. The mutations are abstracted inside of map and reduce.
The third example uses React. By looking at the component we can easily understand what the UI is going to look like. Another benefit is the state is living in the component itself rather than the DOM.
Another benefit of declarative code is that it is not context-dependant. This means the same code can be used in different programs because it is concerned with What is supposed to happen rather than the steps it takes to accomplish that goal.
If we look at our three examples above, we can consume those in any program we want. They’re program agnostic. That is hard to do with imperative code because often times imperative code relies on the context of the current state.
Functional programming is a subset of declarative programming. We can start getting familiar with functional programming techniques by starting with .map, .reduce, and .filter.
Definitions
Declarative programming is “the act of programming in languages that conform to the mental model of the developer rather than the operational model of the machine”.
3 types of programming languages
- Procedural languages specify an explicit sequence of steps to follow
- Imperative languages specify explicit manipulation fo the computer’s internal state
- Declarative languages express the logic of the computation without describing its control flow
4. React Setup
4.1 Npm
Some takeaways for npm are:
- Npm manages modules through
package.jsonso we don’t have to manage these manually with script tags in the html<script src="http://cdnjs.cloudflare.com/ajax/libs/jquery/2.1.4/jquery.min.js"></script> <script src="libs/jquery.js"></script> package.jsonshould be created in the project root with the following.npm --init -y- Packages should be installed as a dependency or dev-dependency
npm install -save react react-dom npm install --save-dev @babel/core @babel/preset-env @babel/preset-react - Npm scripts should be created to simplify tasks
"scripts": {
  "test": "ava 'app/**/*.test.js' --verbose --require ./setup-tests.js",
  "start": "webpack-dev-server --open"
}
npm installation
Here’s the full installation command for all packages used. This can be run at the terminal in one go.
npm install --save-dev @babel/core @babel/preset-env @babel/preset-react webpack webpack-cli webpack-dev-server babel-loader css-loader style-loader html-webpack-plugin’
4.2 Webpack 4
Why does Webpack exist?
Webpack, at its core, is a code bundler
It takes your code, transforms and bundles it, then returns a brand new version of your code.
There are really 3 main steps and 3 main things webpack needs to know…
- The starting point of your application, or your root JavaScript file.
- Which transformations to make on your code.
- To which location it should save the new transformed code.
Webpack configuration file should be named webpack.config.js and it should live in the root directory of our project.
Next this file needs to export an object which is going to represent the configurations for webpack.
// In webpack.config.js
module.exports = {}
1. Entry point
This tells webpack where the entry point of our application is located.
// In webpack.config.js
module.exports = {
  entry: './app/index.js',
}
2. Transformations
This tells webpack what transformations to make. This is where loaders come in handy. We install these using npm install --save-dev <package-name>.
The loaders we’ll be using are babel-loader, style-loader, and css-loader.
// In webpack.config.js
module.exports = {
  entry: './app/index.js',
  module: {
    rules: [
      { test: /\.(js)$/, use: 'babel-loader' },
      { test: /\.css$/, use: { 'style-loader', 'css-loader' }}
    ]
  }
}
The rules array contains all transformations. Each object contains a regex test, and if it matches, it tell webpack which loader to use.
3. Output
This tells webpack where to place the output of the transformed code.
// In webpack.config.js
module.exports = {
  entry: './app/index.js',
  module: {
    rules: [
      { test: /\.(js)$/, use: 'babel-loader' },
      { test: /\.css$/, use: { 'style-loader', 'css-loader' }}
    ]
  },
  output: {
    path: path.resolve(__dirname, 'dist'),
    filename: 'index_bundle.js'
  }
}
path is the directory where the new filename (index_bundle.js) should be placed.
HTML Template
Here’s the directory structure that our app has. Notice that there’s no index.html in the /dist folder.
/app
  - components
  - utils
  index.js
  index.html
/dist
  index_bundle.js
package.json
webpack.config.js
.gitignore
We need to implement a plugin that will take our app/index.html file and create a copy in dist/ with a reference to our new index_bundle.js.
There’s a plugin that does this called html-webpack-plugin. We install it with npm install --save-dev html-webpack-plugin.
We update our config file with a plugins section and set template to our original index.html.
// In webpack.config.js
module.exports = {
  entry: './app/index.js',
  module: {
    rules: [
      { test: /\.(js)$/, use: 'babel-loader' },
      { test: /\.css$/, use: { 'style-loader', 'css-loader' }}
    ]
  },
  output: {
    path: path.resolve(__dirname, 'dist'),
    filename: 'index_bundle.js'
  },
  plugins: [
    new HtmlWebpackPlugin({
      template: 'app/index.html'
    })
  ]
}
Running webpack now will give us two file in our dist/ folder.
- index_bundle.js is the result of taking our entry code and running it through our loaders.
- index.html was created on the fly with HTMLWebpackPluginConfig and is a copy of our original index.html file located in our app folder with a script tag referencing the newly created index_bundle.js file
app/index.html
<!DOCTYPE html>
<html lang="en">
<head>
  <meta charset="UTF-8">
  <title>My App</title>
  <link rel="stylesheet" href="styles.css">
</head>
<body>
  <div id="app"></div>
</body>
</html>
dist/index.html
<!DOCTYPE html>
<html lang="en">
<head>
  <meta charset="UTF-8">
  <title>My App</title>
  <link rel="stylesheet" href="styles.css">
</head>
<body>
  <div id="app"></div>
  <script src="index_bundle.js"></script>
</body>
</html>
The only difference between the two files is that the one in dist (which was created with HTMLWebpackPlugin) now has a script tag pointing to index_bundle.js.
mode
Finally, we need to specify whether we want webpack to run in “production” or “development” mode. Development mode will enable tooling for debugging and faster builds.
// In webpack.config.js
module.exports = {
  entry: './app/index.js',
  module: {
    rules: [
      { test: /\.(js)$/, use: 'babel-loader' },
      { test: /\.css$/, use: { 'style-loader', 'css-loader' }}
    ]
  },
  output: {
    path: path.resolve(__dirname, 'dist'),
    filename: 'index_bundle.js'
  },
  plugins: [
    new HtmlWebpackPlugin({
      template: 'app/index.html'
    })
  ],
  mode: "development"
}
Run Webpack
In order to run webpack we’ll need to install webpack and webpack-cli. These can be installed as dev-dependencies.
Then we’ll need to add a script to our package.json
package.json
"scripts": {
  "build": "webpack"
},
In terminal we can run “npm run build” to do a one time run through of your settings then compile your code and output into a dist folder.
To add a watch change webpack in your NPM script to run webpack -w and that will watch your files and re-execute webpack whenever any of the files Webpack is concerned about changes.
If we want to run a dev server we’ll need in install webpack-dev-server and add a new script.
package.json
"scripts": {
  "build": "webpack",
  "start": "webpack-dev-server --open"
},
In terminal we can run “npm run start” to start the dev server. It will autoreload when we make changes to our code.
The running instance is in memory so changes won’t be reflected in the dist folder.
4.3 Babel
Babel will actually do the transformations for us. It will transform JSX to JS and will allow us to opt into future version on JavaScript (ES2015, ES 2016, etc.)
The packages we need to install are @babel/core, @babel/preset-env, and @babel/preset-react
5. First React Component
5.1 Component explained
React components use ES6. Here’s an introduction to ES6 classes that’s pretty good.
var React = require('react');
var ReactDOM = require('react-dom');
class HelloWorld extends React.Component {
  render() {
    return (
      <div>Hello World!</div>
    )
  }
}
ReactDOM.render(<HelloWorld />, document.getElementById('app'));
Notice that the only method on our class is the render. Every component is required to have a render method. The reason for that is render is describing the UI (user interface) for our component.
ReactDOM.render takes in two arguments. The first argument is the component you want to render, the second argument is the DOM node where you want to render the component.
In the example above we’re telling React to take our HelloWorld component and render it to the element with an ID of app. Because of the parent/child child relations of React, you usually only have to use ReactDOM.render once in your application because by rendering the most parent component, all child components will be rendered as well.
This React presentation talks about why we don’t need to worry about HTML, JS, & CSS violation separation of concerns.
The “HTML” that you’re writing in the render method isn’t actually HTML but it’s what React is calling “JSX”. JSX simply allows us to write HTML like syntax which (eventually) gets transformed to lightweight JavaScript objects.
React is then able to take these JavaScript objects and from them form a “virtual DOM” or a JavaScript representation of the actual DOM. This creates a win/win situation where you get the accessibility of templates with the power of JavaScript.
Looking at the example below, this is what your JSX is transformed to once webpack runs its transformation process.
class HelloWorld extends React.Component {
  render() {
    return React.createElement("div", null, "Hello World");
  }
}
Up until this point we haven’t really emphasized the importance of this new “virtual DOM” paradigm we’re jumping into. The reason the React team went with this approach is because, since the virtual DOM is a JavaScript representation of the actual DOM, React can keep track of the difference between the current virtual DOM (computed after some data changes), with the previous virtual DOM (computed before some data changes). React then isolates the changes between the old and new virtual DOM and then only updates the real DOM with the necessary changes. Read more about it in React Elements vs React Components
In more layman’s terms, because manipulating the actual DOM can be complex, React is able to minimize manipulations to the actual DOM by keeping track of a virtual DOM and only updating the real DOM when necessary and with only the necessary changes. Typically UI’s have lots of state which makes managing state difficult. By re-rendering the virtual DOM every time any state change occurs, React makes it easier to think about what state your application is in.
The process looks something like this,
Signal to notify our app some data has changed→ Re-render virtual DOM -> Diff previous virtual DOM with new virtual DOM -> Only update real DOM with necessary changes.
5.2 Element vs Component
See full article React Elements vs React Components.
What is React?
React is a library for building user interfaces. No matter how complex React or the React ecosystem seem to be, this is React at its core — building UIs.
What is an Element?
Simply put, a React element describes what you want to see on the screen. Not so simply put, a React element is an object representation of a DOM node.
It’s important to note that a React element isn’t actually the thing you’ll see on your screen, instead, it’s just an object representation of it. There’s a few reasons for this.
The first is that JavaScript objects are lightweight — React can create and destroy these elements without too much overhead.
The second reason is React is able to analyze the object, diff it with the previous object representation to see what changed, and then update the actual DOM only where those changes occurred. This has some performance upsides to it.
React element
const element = React.createElement(
  'div',
  {id: 'login-btn'},
  'Login'
)
What is a Component?
A component is a function or a Class which optionally accepts input and returns a React element.
What happens with JSX?
JSX is always going to get transpiled to React.createElement invocations (typically) via Babel.
6. ESLint, Airbnb, & Prettier
6.1 What this solves
I wanted to set up linting and code formatting in VS Code so I could follow good coding practices from the beginning.
In my research I found that most people seem to be using a combination of ESLint, Airbnb, and Prettier to achieve this. Here’s what each does.
- ESLint highlights errors and formats code according to a set of rules
- Airbnb provides an opinionated set of rules for code quality and style
- Prettier formats code according to it’s own simple set of rules
The difficult part was trying to determine which packages, plugins, & configurations to use. I spent a week trying different recipes and configurations until I found a working solution.
I’m documenting this here so I can reference it later if need be.
Note: I wanted to install these packages globally to avoid having to do a separate local installation each time I started a new project.
This global approach wasn’t the best one for a couple reasons.
- A global install caused some libraries to not work well with one another. Some package combinations worked while others did not.
- It’s usually best to include the libraries as part of the project so anyone else who clones and works on it will have the benefit of this configuration.
6.2 Tools explained
Here are a quick explanation of these tools.
Prettier & ESLint explained
- Prettier (https://prettier.io) formats your code and nothing more. It’s opinionated and therefore only has a few configurable formatting rules (single or double quotes, semi colon or not, line-endings, etc.). It will reformat your code but does not help with code quality.
- ESLint (https://eslint.org) handles both code quality AND code formatting (depending on which rules or Style Guide you use). If you use Prettier then you should turn off ESLint’s formatting rules and just rely on code quality rules. Some of the config packages we use will do this automatically.
- Airbnb (https://github.com/airbnb/javascript) Provides a set of code style rules from which to work. This covers possible errors, best practices, and stylistic choices.
VSCode Extensions
- ESLint - This integrates ESLint syntax highlighting into VSCode. The eslint npm package needs to be installed and configured separate from the VSCode extension.
- Prettier - This extension isn’t used in our VSCode setup since we’ll configure Prettier to run from within ESLint with the help of an eslint plugin package. Also, relying on this extension to integrate with ESLint introduced a host of other issues such as formatting conflicts with VSCode’s built in formatter.
Npm Packages
To begin with, both ESLint and Prettier npm package libraries must be installed.
- eslint - core package which the VSCode extension relies on. It highlights errors and can be used to fix/format code from the CLI with
eslint --fix. - prettier - code formatting package that eslint uses. It can also format code on the CLI with
prettier --write.
Here are the npm packages I used for ESLint & Prettier:
- babel-eslint - a wrapper for Babel’s parser required by eslint-plugin-react.
- eslint-config-airbnb - This provides Airbnb’s rules for ESLint.
- eslint-config-prettier - Turns off ESLint formatting rules that conflict with Prettier.
- eslint-plugin-import - provides linting and rules around ES2015 import/export syntax.
- eslint-plugin-react - react specific linting rules for ESLint.
- eslint-plugin-jsx-a11y - accessibility rules checker on JSX elements for ESLint.
- eslint-plugin-react-native - React Native specific linting rules for ESLint.
- eslint-plugin-prettier - ESLint plugin to add Prettier formatting. This runs ESLint followed by Prettier. Use this to integrate Prettier with ESLint workflow and end up with Prettier formatted code. Requires eslint & prettier.
The following packages also provide formatting but done in a different way. If you want ESLint to apply its rules AFTER Prettier has formatted the code then you can use the packages below.
These format your JavaScript using Prettier FIRST, followed by ESLint SECOND. (Code -> prettier -> eslint -> formatted code). These two package libraries work best for CLI formatting.
- prettier-eslint - Use this if you want to apply ESLint’s code formatting to the output of Prettier formatted code.
- prettier-eslint-cli - The CLI version of prettier-eslint. This works on files. prettier-eslint operates on strings.
6.3 Articles & Reference
These are the videos, articles, and walk-throughs I used for reference.
- YouTube - How to Setup VS Code + Prettier + ESLint - Wes Bos
- Referenced Wes Bos Dot files on GitHub (.eslintrc & .vscode)
- Medium - Integrating Prettier + ESLint + Airbnb Style Guide in VSCode - Jeffrey Zhen.
Wes Bos config. Works with global or local packages. Must set these VSCode settings.- “beautify.language”: { “js”: [] }
- “eslint.autoFixOnSave”: true
- freeCodeCamp - How to integrate Prettier with ESLint and stylelint - Abhishek Jain.
Uses prettier-eslint & prettier-stylelint to create npm scripts for linting all existing code at once. - Blog post - A Prettier JavaScript Formatter - James Long
Describes how Prettier works with AST formatting. - Medium - Javascript Linting and Formatting with ESLint, Prettier, and Airbnb - Joshua Crass
Great article on setting up React rules, webpack aliases, ignore files, and pre-commit hooks using Husky. - Blog Post - How to Setup ESLint and Prettier in VSCode For React Project
This shows a good example of VSCode editor config so you can turn off conflicting auto formating.
6.4 JavaScript Style Guides
Here are a few style guides for reference.
- ESLint Recommended - default rule set used with
eslint:recommended. - Airbnb - A more opinionated style guide for writing Javascript.
- Standard Style - The style guide that eliminates semis.
Here’s a link to the Awesome ESLint GitHub repo. It is a good jump off point for configs, parsers, plugins, and style guides.
6.5 React Starter App
I put this up on a repo so I can easily clone and go.
Installation scripts
I also created a set of scripts to get everything installed properly.
These are:
- install-airbnb - Installs eslint & airbnb style guide rules
- install-prettier - Installs prettier code formatting
- install-react - Installs react and react-dom
- install-dev-env - Install babel, webpack, & loaders
- eslint-check - Checks for custom rule conflicts with Prettier’s formatting
- build - Builds the React app
- start - Starts the webpack dev server
// packages.json
{
  "name": "React App",
  "version": "1.0.0",
  "description": "",
  "main": "index.js",
  "babel": {
    "presets": [
      "@babel/preset-env",
      "@babel/preset-react"
    ]
  },
  "scripts": {
    "install-airbnb": "npx install-peerdeps --dev eslint-config-airbnb",
    "install-prettier": "npm i -D prettier eslint-config-prettier eslint-plugin-prettier",
    "install-react": "npm i --save react react-dom",
    "install-dev-env": "npm i -D @babel/core @babel/preset-env @babel/preset-react webpack webpack-cli webpack-dev-server babel-loader css-loader style-loader html-webpack-plugin",
    "eslint-check": "eslint --print-config . | eslint-config-prettier-check",
    "build": "webpack",
    "start": "webpack-dev-server"
  },
  "keywords": [],
  "author": "",
  "license": "ISC"
}
Depending on which branch is being used you may not need to run these.
ESLint config
These is the ESLint configuration file along with a set of custom rules.
// eslintrc.js
module.exports = {
  "env": {
    "browser": true,
    "es6": true,
    "node": true
  },
  "parserOptions": {
    "ecmaFeatures": {
      "jsx": true
    },
    "ecmaVersion": 2018,
    "sourceType": "module"
  },
  "extends": [
    "airbnb",
    "plugin:react/recommended",
    "plugin:jsx-a11y/recommended",
    "prettier",
    "prettier/react"
  ],
  "plugins": [
    "react",
    "jsx-a11y",
    "prettier"
  ],
  "rules": {
    "func-names": "off",
    "linebreak-style": "off",
    "no-console": "off",
    "prefer-const": [
      "error",
      {
        "destructuring": "all",
      }
    ],
    "prettier/prettier": ["error"],
    "react/jsx-filename-extension": [
      1,
      {
        "extensions": [
          ".js",
          ".jsx"
        ]
      }
    ],
    "react/prefer-stateless-function": 0
  }
};
VSCode config
Here are the changes I made to User config
Open Command Palette…(Ctrl/Cmd+Shift+P), then type: Preferences: Open Settings (JSON).
This will open your JSON config file. From there add in the following for automatic code format on save.
{
    "eslint.alwaysShowStatus": true,
    "eslint.autoFixOnSave": true,
}
Before & After

7. Dataflow with Props
7.1 Props explained
In this section we discuss how to pass information to our components, just as we’d pass information to a function via arguments.
- React is very good at managing state
- The system for passing data from one component to another child component is through props
- Props are to component what arguments are to functions
class HelloUser extends React.Component {
  render() {
    return (
      <div> Hello, {this.props.name}</div>
    )
  }
}
ReactDOM.render(<HelloUser name="James"/>, document.getElementById('app'));
When we use the component, we’re passing in a name attribute. This attribute can then be accessed inside the component as this.props.name.
7.2 Practicing Props
The following three exercises create the same badge app. Each exercise incorporates a more advanced and modular design.
The exercises ask you to pass down the correct props and render the components.
The final result will look like this.

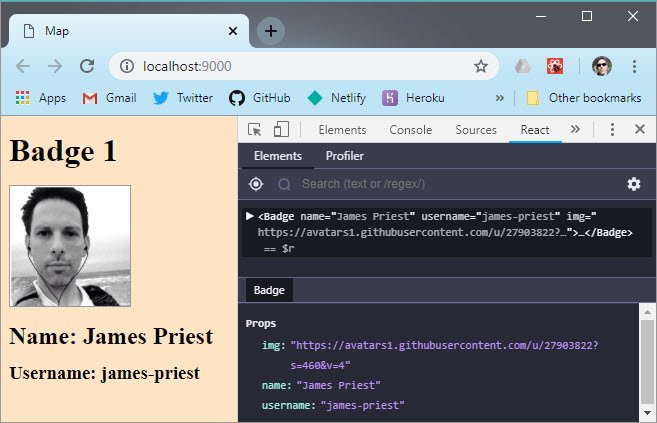
Solution 1
class Badge extends React.Component {
  render() {
    return (
      <div>
        <h1>Badge 1</h1>
        <img src={this.props.img} alt="" />
        <h2>Name: {this.props.name}</h2>
        <h3>Username: {this.props.username}</h3>
      </div>
    );
  }
}

ReactDOM.render(
  <Badge
    name="James Priest"
    username="james-priest"
    img="https://avatars1.githubusercontent.com/u/27903822?s=460&v=4"
  />,
  document.getElementById('app')
);
Here’s the Badge component using destructuring assignment for props.
class Badge extends React.Component {
  render() {
    const { name, username, img } = this.props;
    return (
      <div>
        <h1>Badge 1</h1>
        <img src={img} alt="" />
        <h2>Name: {name}</h2>
        <h3>Username: {username}</h3>
      </div>
    );
  }
}
Solution 2
const USER_DATA = {
  name: 'James Priest',
  img: 'https://avatars1.githubusercontent.com/u/27903822?s=460&v=4',
  username: 'james-priest'
};

class Badge extends React.Component {
  render() {
    return (
      <div>
        <h1>Badge 2</h1>
        <img src={this.props.user.img} alt="" />
        <h2>Name: {this.props.user.name}</h2>
        <h3>Username: {this.props.user.username}</h3>
      </div>
    );
  }
}

ReactDOM.render(<Badge user={USER_DATA} />, document.getElementById('app'));
Solution 2 with destructuring assignment…
class Badge extends React.Component {
  render() {
    const { user } = this.props;
    return (
      <div>
        <h1>Badge 2</h1>
        <img src={user.img} alt="" />
        <h2>Name: {user.name}</h2>
        <h3>Username: {user.username}</h3>
      </div>
    );
  }
}
Solution 3
class Avatar extends React.Component {
  render() {
    return <img src={this.props.img} alt="profile" />;
  }
}

class Label extends React.Component {
  render() {
    return <h2>{this.props.name}</h2>;
  }
}

class ScreenName extends React.Component {
  render() {
    return <h3>Username: {this.props.user}</h3>;
  }
}

class Badge extends React.Component {
  render() {
    return (
      <div>
        <h1>Badge 3</h1>
        <Avatar img={this.props.user.img} />
        <Label name={this.props.user.name} />
        <ScreenName user={this.props.user.username} />
      </div>
    );
  }
}

ReactDOM.render(
  <Badge
    user={{
      img: 'https://avatars1.githubusercontent.com/u/27903822?s=460&v=4',
      name: 'James Priest',
      username: 'james-priest'
    }}
  />,
  document.getElementById('app')
);
Solution 3 with destructuring
class Avatar extends React.Component {
  render() {
    const { img } = this.props;
    return <img src={img} alt="profile" />;
  }
}

class Label extends React.Component {
  render() {
    const { name } = this.props;
    return <h2>{name}</h2>;
  }
}

class ScreenName extends React.Component {
  render() {
    const { user } = this.props;
    return <h3>Username: {user}</h3>;
  }
}

class Badge extends React.Component {
  render() {
    const { user } = this.props;
    return (
      <div>
        <h1>Badge 3</h1>
        <Avatar img={user.img} />
        <Label name={user.name} />
        <ScreenName user={user.username} />
      </div>
    );
  }
}
7.3 Lists with map & filter
If you’re coming from an Angular background, you’re familiar with the idea of ‘ng-repeat’. With React, you can just use JavaScript’s native .map property.
.map allows you to “map” over an array, modify each item in that array, and returns a new array after each item in the array has been modified.
Here’s an example of “mapping over” numbers in an array and adding 10 to each item before returning a new array.
var numbers = [1,2,3];
var numbersPlusTen = numbers.map(function(num) {
  return num = 10;
});
console.log(numbersPlusTen) // [11, 12, 13]
The following is how to use map to build a list for our UI in React.
We are going to have a parent and a child component. The parent will pass down data to the child as props.
// parent
class FriendsContainer extends React.Component {
  render() {
    var name = 'Tyler McGinnis';
    var friends = ['Ean Platter', 'Murphy Randall', 'Merrick Christensen'];
    return (
      <div>
        <h3> Name: {name} </h3>
        <ShowList names={friends} />
      </div>
    )
  }
}
Here’s the child component.
class ShowList extends React.Component {
  render() {
    return (
      <div>
        <h3> Friends </h3>
        <ul>
          {this.props.names.map(function(friend){
            return <li> {friend} </li>;
          })}
        </ul>
      </div>
    )
  }
}
Remember that the code that gets returned from our render method is a representation of what the real DOM should look like.
All map does is it creates a new array, calls our callback function on each item in the array, and fills the new array with the result of calling the callback function on each item. For example,
var friends = ['Ean', 'John', 'Jane'];
var listItems = friends.map(function(friend){
  return "<li>" + friend + "</li>";
});
console.log(listItems); // ["<li>Ean</li>", "<li>John</li>", "<li>Jane</li>"];
So in our child component above, we’re mapping over names, wrapping each name in a pair of <li> tags, and saving that to our listItems variable. Then, our render method returns an unordered list with all of our friends.
.filter is similar to .map but instead of returning a new array after you’ve modified each item in the array, .filter allows you to filter out certain items in an array.
For example, let’s say one day we decided that we only wanted to have friends whose name started with ‘J’. With filter, that would look like this,
var friends = var friends = ['Ean', 'John', 'Jane'];
var newFriends = friends.filter(function(friend) {
  return friend[0] = 'J';
});
console.log(newFriends); // ['John', 'Jane']
7.4 Practicing map & filter
Here are two practice exercises.
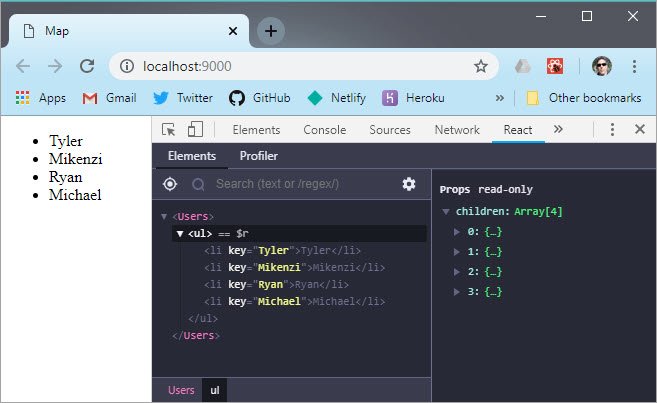
Solution 4 - map
This code simply maps over an array of names and outputs the name value.
class Users extends React.Component {
  render() {
    const { list } = this.props;
    return (
      <ul>
        {list.map(name => (
          <li key={name}>{name}</li>
        ))}
      </ul>
    );
  }
}

ReactDOM.render(
  <Users list={['Tyler', 'Mikenzi', 'Ryan', 'Michael']} />,
  document.getElementById('app')
);
Solution 5 - filter & map
This exercise uses chaining to take the results of .filter and chain to .map for the iteration.
class Users extends React.Component {
  render() {
    const { list } = this.props;
    return (
      <div>
        <h1>Friends</h1>
        <ul>
          {list
            .filter(person => person.friend === true)
            .map(person => (
              <li key={person.name}>{person.name}</li>
            ))}
        </ul>
        <hr />
        <h1>Non Friends</h1>
        <ul>
          {list
            .filter(person => person.friend === false)
            .map(person => (
              <li key={person.name}>{person.name}</li>
            ))}
        </ul>
      </div>
    );
  }
}

ReactDOM.render(
  <Users
    list={[
      { name: 'Tyler', friend: true },
      { name: 'Ryan', friend: true },
      { name: 'Michael', friend: false },
      { name: 'Mikenzi', friend: false },
      { name: 'Jessica', friend: true },
      { name: 'Dan', friend: false }
    ]}
  />,
  document.getElementById('app')
);
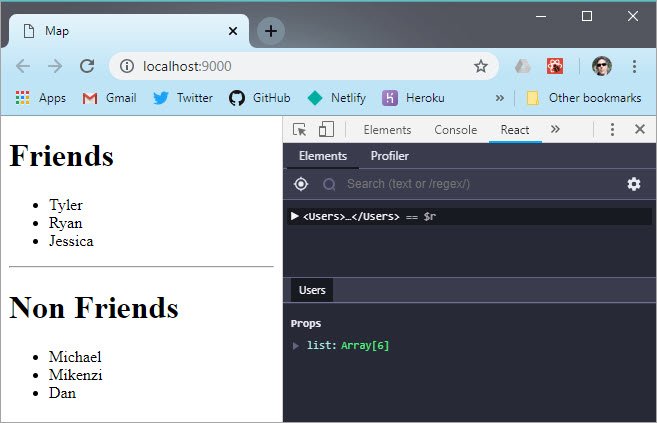
An alternate way to code this without inlining all the filtering and mapping is to filter the results into friends and nonFriends variables and then just map through each.
class Users extends React.Component {
  render() {
    const { list } = this.props;
    const friends = list.filter(user => user.friend === true);
    const nonFriends = list.filter(user => user.friend === false);
    return (
      <div>
        <h1>Friends</h1>
        <ul>
          {friends.map(person => (
            <li key={person.name}>{person.name}</li>
          ))}
        </ul>

        <hr />

        <h1>Non Friends</h1>
        <ul>
          {nonFriends.map(person => (
            <li key={person.name}>{person.name}</li>
          ))}
        </ul>
      </div>
    );
  }
}
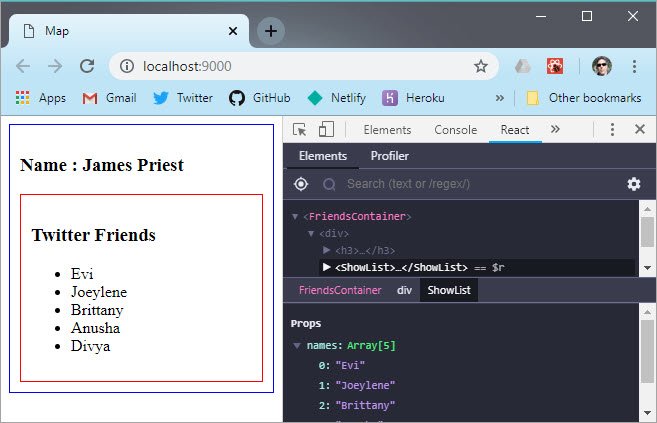
Twitter Friends - map
This uses both a parent and child component. The child component maps through a props array passed from the parent.
class FriendsContainer extends React.Component {
  render() {
    const name = 'James Priest';
    const friends = ['Evi', 'Joeylene', 'Brittany', 'Anusha', 'Divya'];
    const containerStyle = {
      border: '1px solid blue',
      padding: '10px'
    };
    return (
      <div style={containerStyle}>
        <h3>Name : {name}</h3>
        <ShowList names={friends} />
      </div>
    );
  }
}

class ShowList extends React.Component {
  render() {
    const { names } = this.props;
    const listStyle = {
      border: '1px solid red',
      padding: '10px'
    };
    return (
      <div style={listStyle}>
        <h3>Twitter Friends</h3>
        <ul>
          {names.map(friend => (
            <li key={friend}>{friend}</li>
          ))}
        </ul>
      </div>
    );
  }
}

ReactDOM.render(<FriendsContainer />, document.getElementById('app'));
The parent component is outlined in blue and the child component is outlined in red.
Using a key
In each of the solutions above we added a key to the array item. This key serves as a unique identifier.
What that does is it helps React identify which items have changed, added, or removed from a specific array.
It’s required for React to properly be able to handle updating of the data.
8. Composition
8.1 Functional Composition
You’re probably familiar with functions; when to use and when not to use them.
We’re going to take that same intuition about functions and use it for when to create new React components. Instead of taking in some arguments and returning a value, your function is going to take in some arguments and return some UI.
The idea can be summed up with the following:
A Function takes in some Data and returns a View
- f(d)=V
This is a beautiful way to think about developing user interfaces. Now your UI is just composed of different function invocations, which is how you’re already used to building applications.
Here’s some sample code:
var getProfilePic = function (username) {
  return 'https://github.com/' + username + '.png?size=200'
}
var getProfileLink = function (username) {
  return 'https://github.com/' + username
}
var getProfileData = function (username) {
  return {
    pic: getProfilePic(username),
    link: getProfileLink(username)
  }
}
getProfileData('james-priest')
We have three functions and one function invocation. The code is clean and organized because we’ve separated everything out into different functions.
Each function has a specific purpose and we’re composing our functions by having one function getProfileData which leverages the other two functions getProfilePic and getProfileLink.
Now when we invoke getProfileData we’ll get an object back which represents our user.
8.2 UI Composition
Now what I want to do is instead of having those functions return some value, let’s modify them a bit to return some UI (in the form of JSX).
Here you’ll really see the beauty of React’s render method.
class ProfilePic extends React.Component {
  render() {
    const { username } = this.props;
    return <img src={`https://github.com/${username}.png?size=200`} alt="" />;
  }
}

class ProfileLink extends React.Component {
  render() {
    const { username } = this.props;
    return <a href={`https://github.com/${username}`}>{username}</a>;
  }
}

class Avatar extends React.Component {
  render() {
    const { username } = this.props;
    return (
      <div>
        <ProfilePic username={username} />
        <ProfileLink username={username} />
      </div>
    );
  }
}
<Avatar username="james-priest" />
Now, instead of composing functions to get some value, we’re composing functions to get some UI.
This idea is so important in React that React 0.14 introduced Stateless Functional Components which allows the code above to be written as normal functions.
const ProfilePic = function(props) {
  const { username } = props;
  return <img src={`#${username}`} alt="" />;
};

const ProfileLink = function(props) {
  const { username } = props;
  return <a href={`https://www.fb.com/${username}`}>{username}</a>;
};

const Avatar = function(props) {
  const { username } = props;
  return (
    <div>
      <h3>Stateless Functional Components</h3>
      <ProfilePic username={username} />
      <ProfileLink username={username} />
    </div>
  );
};
<Avatar username="james-priest" />
8.3 Pure Functions
One thing each of the functions and components above has in common is they’re all “pure functions”.
Perhaps one of my favorite things about React is it’s given me a light introduction to functional programming (FP) and a fundamental piece of FP are pure functions.
The whole concept of a pure function is consistency and predictability (which IMO are keys to writing great software).
The reason for the consistency and predictability is because pure functions have the following characteristics.
- Pure functions always return the same result given the same arguments.
- Pure function’s execution doesn’t depend on the state of the application.
- Pure functions don’t modify the variables outside of their scope.
When you call a function that is “pure”, you can predict exactly what’s going to happen based on its input. This makes functions that are pure easy to reason about and testable.
Let’s look at some examples.
function add (x,y) {
  return x + y
}
Though simple, add is a pure function. There are no side effects. It will always give us the same result given the same arguments.
Let’s now look at two native JavaScript methods. .slice and .splice
var friends = ['Ryan', 'Michael', 'Dan']
friends.slice(0, 1) // 'Ryan'
friends.slice(0, 1) // 'Ryan'
friends.slice(0, 1) // 'Ryan'
Notice .slice is also a pure function. Given the same arguments, it will always return the same value. It’s predictable.
Let’s compare this to .slice’s friend, .splice
var friends = ['Ryan', 'Michael', 'Dan']
friends.splice(0, 1) // ["Ryan"]
friends.splice(0, 1) // ["Michael"]
friends.splice(0, 1) // ["Dan"]
.splice is not a pure function since each time we invoke it passing in the same arguments, we get a different result. It’s also modifying state.
Why is this important for React?
Well the main reason is React’s render method needs to be a pure function and because it’s a pure function, all of the benefits of pure functions now apply to your UI as well.
Another reason is that it’s a good idea to get used to making your functions pure and pushing “side effects” to the boundaries of your program.
I’ll say this throughout the course, React will make you a better developer if you learn React the right way. Learning to write pure functions is the first step on that journey.
8.4 PropTypes
If you’re coming from a strictly typed language, you know the importance of types.
class Users extends React.Component {
  render() {
    const { list } = this.props;
    return (
      <ul>
        {list.map(name => (
          <li key={name}>{name}</li>
        ))}
      </ul>
    );
  }
}

ReactDOM.render(
  <Users list={['Tyler', 'Mikenzi', 'Ryan', 'Michael']} />,
  document.getElementById('app')
);
Looking at the component above, what would happen if when we rendered the component, instead of passing in list as an array, what if we accidentally passed in a string?
<Users list="Tyler, Jake, Mikenzi" />
It would break because we’re calling list.map in our component and strings don’t have a .map method. This is where PropTypes come into play.
PropTypes explained
PropTypes allow you to declare the “type” (string, number, function, etc) of each prop being passed to a component. Then, if a prop passed in isn’t of the declared type, you’ll get a warning in the console.
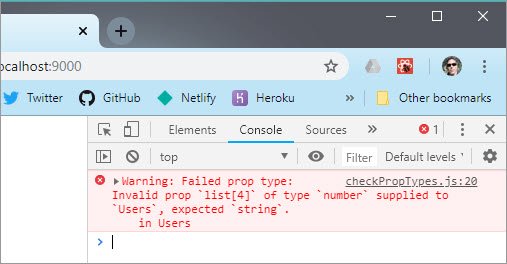
Here we passed in the number ‘23’ as the last array element.
ReactDOM.render(
  <Users list={['Tyler', 'John', 'Ryan', 'Michael', 23]} />,
  document.getElementById('app')
);
The browser displays a warning because the type expected was an array of strings.
Here’s what the PropTypes implementation looks like. We’re specifying that list will be an array of strings and that the property is required.
Users.propTypes = {
  list: PropTypes.arrayOf(PropTypes.string).isRequired
};
Here’s the component code in it’s entirety.
import React from 'react';
import ReactDOM from 'react-dom';
import PropTypes from 'prop-types';

class Users extends React.Component {
  render() {
    const { list } = this.props;
    return (
      <ul>
        {list.map(name => (
          <li key={name}>{name}</li>
        ))}
      </ul>
    );
  }
}

Users.propTypes = {
  list: PropTypes.arrayOf(PropTypes.string).isRequired
};

ReactDOM.render(
  <Users list={['Tyler', 'Mikenzi', 'Ryan', 'Michael', 23]} />,
  document.getElementById('app')
);
In order to use PropTypes, you’ll need to install them.
Note: PropTypes used to be included with React, but as of React 15.5 they were made they’re own package which can be downloaded from npm as prop-types.
PropTypes benefits
PropTypes are great for finding bugs in your components but what I like most about them is their ability to add documentation to a component.
When I look at a well written component, I can look at the render method to figure out what it’s going to look like and I can look at its propTypes to figure out what it needs to accept to render properly.
PropTypes gotchas
To use PropTypes with functions, the API is PropTypes.func rather than PropTypes.function. Also to use booleans, the API is PropTypes.bool not PropTypes.boolean.
I’m not 100% sure why but I assume it’s because with ES6 you can use named imports to do
var { array, object, number, function, boolean } = React.PropTypes
and both function and boolean are reserved words so that would break. Instead use func and bool and you’d be good.
The PropTypes api is very in depth and you can do even more things than just type checking (like making a property required or type checking specific properties of an object).
You can read more in the React documentation: Typechecking With PropTypes.
8.5 Practicing PropTypes
PropTypes: string
The propTypes property of our Badge component will be set to an object with a key for each prop being passed to our component.
Here’s an example of the Badge component with PropTypes.
const React = require('react');
const ReactDOM = require('react-dom');
const PropTypes = require('prop-types');
require('./style.css');

class Badge extends React.Component {
  render() {
    const { img, name, username } = this.props;
    return (
      <div>
        <h1>Badge 1</h1>
        <img src={img} alt="" />
        <h2>Name: {name}</h2>
        <h3>Username: {username}</h3>
      </div>
    );
  }
}

Badge.propTypes = {
  name: PropTypes.string.isRequired,
  username: PropTypes.string.isRequired,
  img: PropTypes.string.isRequired
};

ReactDOM.render(
  <Badge
    name="James Priest"
    username="james-priest"
    img="https://avatars1.githubusercontent.com/u/27903822?s=460&v=4"
  />,
  document.getElementById('app')
);
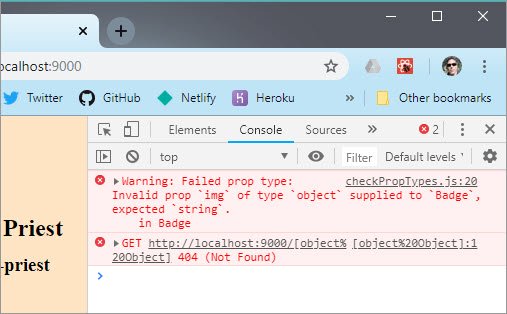
If we change the img prop from a string to an object like this.
ReactDOM.render(
  <Badge
    name="James Priest"
    username="james-priest"
    img={{
      image: 'https://avatars1.githubusercontent.com/u/27903822?s=460&v=4'
    }}
  />,
  document.getElementById('app')
);
Then we will get a console warning telling us about the issue.
PropTypes: arrayOf and shape
Looking at our Users component we can see list is an array of objects. Each object has two properties, and those properties are a string and a boolean.
ReactDOM.render(
  <Users
    list={[
      { name: 'Tyler', friend: true },
      { name: 'Ryan', friend: true },
      { name: 'Michael', friend: false },
      { name: 'John', friend: false },
      { name: 'Jessica', friend: true },
      { name: 'Dan', friend: false }
    ]}
  />,
  document.getElementById('app')
);
Since list is an array we could start with this.
Users.propTypes = {
  list: PropTypes.array.isRequired
};
We could then add this which stays our prop is an array of objects and the array is required.
Users.propTypes = {
  list: PropTypes.arrayOf(PropTypes.object).isRequired
};
Lastly, we can define the whole structure and specify our array contains objects with a shape of string for name and boolean for friend and that both are required.
It’ll look like this.
Users.propTypes = {
  list: PropTypes.arrayOf(
    PropTypes.shape({
      name: PropTypes.string.isRequired,
      friend: PropTypes.bool.isRequired
    })
  ).isRequired
};
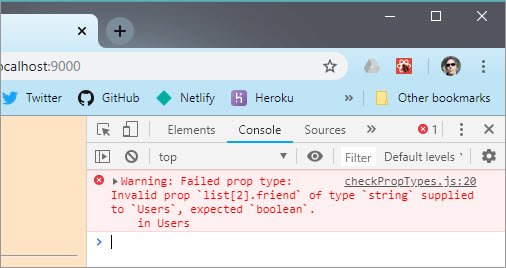
If I happen to pass in a string in place of a boolean like this.
ReactDOM.render(
  <Users
    list={[
      { name: 'Tyler', friend: 'true' },
      { name: 'Ryan', friend: true },
      { name: 'Michael', friend: false },
      { name: 'John', friend: false },
      { name: 'Jessica', friend: true },
      { name: 'Dan', friend: false }
    ]}
  />,
  document.getElementById('app')
);
Then we get an error like this.
What’s great about PropTypes is instead of having to go through the render method to figure out what’s going on, you can just look at the PropTypes in order to understand how to use the component.
Whenever you build a component, you’ll always want to specify the PropTypes for that component.
The reasons why are:
- It’s helpful to yourself and other developers down the line
- It creates documentation
- It’ll warn you if you use it wrong.
8.6 Quiz
Select the characteristics of a pure function.
- Doesn’t depend on variables outside its scope
- Doesn’t modify variables outside it’s scope
- Doesn’t contain other function invocations
- Doesn’t make Ajax Requests
- Doesn’t manipulate the DOM
You should treat props to a component as immutable
- true
- false
You should always add PropType validation to your component if that component is accepting props.
- true
- false
9. The ‘this’ keyword
9.1 Four types of binding
The ‘this’ keyword is probably one of the most misunderstood aspects of JavaScript.
The first thing to understand regarding this keyword is to understand its purpose, or what it is that ‘this’ keyword allows us to do in JavaScript.
- It allows us reuse functions with different contexts
- It allows us to decide which objects should be focal when invoking a function or a method.
There are 4 rules for the this keyword
- Implicit Binding
- Explicit Binding
- new Binding
- window Binding
The first thing we need to ask when using this keyword is
Where is this function invoked?
Because whenever you’re trying to find out what this keyword is you have to look at when the function was invoked… not when it was defined, but specifically when it was invoked.
Let’s say we had a function here called sayName that took in a name argument.
var sayName = function(name){
 console.log('Hello', name);
};
If we were to ask what name is at this point we wouldn’t know until the function is invoked.
sayName('James'); // now we know that name is 'James'
The same holds true for the this keyword.
We won’t know what
thiskeyword is in a function until that function is invoked.
Now let’s look at the first rule of implicit binding.
9.2 Implicit Binding
Implicit Binding is the most common rule and will be found in about 80% of use cases when trying to figure out what this is.
Example 1
// Implicit Binding
// Left of the Dot at Call Time
var me = {
  name: 'James',
  age: 48,
  sayName: function() {
    console.log(this.name);
  }
};

me.sayName(); // James
Implicit Binding says that in order to find the this keyword we look to the left of the dot of the function invocation. That’s what the this keyword is going to reference.
me.sayName();
In the code above, we see the sayName() invocation and look to the left of the dot. The me object is what this references.
Example 2
// Implicit Binding
// Left of the Dot at Call Time
var sayNameMixin = function(obj){
  obj.sayName = function(){
    console.log(this.name);
  }
}

var me = {
  name: 'james',
  age: 48
};

var you = {
  name: 'evi',
  age: 24
}

sayNameMixin(me); // james
sayNameMixin(you); // evi
When we pass both of these objects into our mixin it decorates them with a new sayName() property.
Then when we invoke each we look to the left of the dot to see what this references.
me.sayName(); // james
you.sayName(); // evi
Example 3
// Implicit Binding
// Left of the Dot at Call Time
var Person = function(name, age) {
  return {
    name: name,
    age: age,
    sayName: function() {
      console.log(this.name);
    }
  }
}

var jim = Person('jim', 42);
jim.sayName(); // jim
But what if we made this a bit more complex.
// Implicit Binding
// Left of the Dot at Call Time
var Person = function(name, age) {
  return {
    name: name,
    age: age,
    sayName: function() {
      console.log(this.name);
    },
    mother: {
      name: 'Susan',
      sayName: function(){
        console.log(this.name);
      }
    }
  }
}

var jim = Person('jim', 42);
jim.sayName(); // jim
jim.mother.sayName() // Susan
Once again we look to the left of the dot of the function invocation to get the object this refers to.
This seems deceptively easy, and because it is very straight-forward, whenever you get into situations where you need to find out what this is, the very first thing you should do is look at when the function was invoked and then look to the left of that function to find out what this is referencing.
9.3 Explicit Binding
Uses call, apply, or bind.
In previous example we can called sayName() method on the stacey object.
// Implicit Binding
// Left of the Dot at Call Time
var stacey = {
  name: 'Stacey',
  age: 34,
  sayName: function(){
    console.log('My name is ' + this.name);
  }
};

stacey.sayName() // Stacey
We look to the left of the dot to find that stacey is object that called the method to see what this refers to.
Example 1 - call
Let’s change things around so that sayName is just a function on the global scope but what we want to do is still call the function in the context of the stacey object.
// Explicit Binding
// call, apply, bind
var sayName = function() {
  console.log('My name is ' + this.name);
}

var stacey = {
  name: 'Stacey',
  age: 34
}

sayName.call(stacey) // Stacey
What we can do is type the function name and then use the call method, which is available to every function, to do just that.
The first argument that it takes in is the context that you want to call the function from.
So now the sayName function is going to be invoked but the this keyword inside of sayName will now reference the stacey object.
So in this example we’re explicitly stating what the this keyword is when we use call. It is the very first argument we pass to call.
.call()provides a new value of this to the function/method.With call, you can write a method once and then inherit it in another object, without having to rewrite the method for the new object.
Additional arguments to the function are passed in one by one after the first argument.
Example 2 - call with args
Now if we want to pass a few more parameters to sayName we can do that.
Let’s create an array and then pass the array elements to the function.
The very first argument in .call() is the context. Every argument after that will be passed to the function.
// Explicit Binding
// call, apply, bind
var sayName = function(lang1, lang2, lang3) {
  console.log(`My name is ${this.name}. I know ${lang1}, ${lang2}, ${lang3}.`);
}

var stacey = {
  name: 'Stacey',
  age: 34
}

var languages = ['JavaScrip', 'Ruby', 'Python'];

// sayName.call(stacey, languages[0], languages[1], languages[2]);
sayName.call(stacey, ...languages);
So, we are invoking sayName in the context of stacey and we are passing along three arguments.
Example 3 - apply
Next what we could do is rather than pass in the arguments one by one, we could pass them in as an array.
sayName.apply(stacey, languages);
This is exactly what .apply() does. It allows us to pass in the arguments as an array.
.apply()provides a new value of this to the function/method.Instead of having to pass additional arguments one by one, you can pass them in as an array after context which is the first argument.
Example 4 - bind
The .bind() is almost the same thing as .call() except there’s one thing that’s different.
What .bind() will do is return us a new function instead of invoking the original function.
Looking at our code from before.
// sayName.bind(stacey, languages[0], languages[1], languages[2]);
var newFn = sayName.bind(stacey, ...languages);
Now, instead of invoking sayName, it’s just going to bind this to stacey, pass in the languages arguments, and return a brand new function which we can call later.
Now we can invoke the new function with newFn();.
Summary
- call, apply, and bind allow us to explicitly state what the
thiskeyword is going to be in any given function.- call and apply behave in the exact same way. They will immediately invoke the function.
- call requires additional arguments to be passed in one by one
- apply allows you to pass in the arguments as an array
- bind is the same as call except that instead of immediately invoking the function it returns a brand new function that can be invoked later
9.4 new & window Binding
Here we’re going to talk about the last two rules when figuring out what this keyword is referencing.
The first is new binding and the last one is window binding.
Example 1 - new
Here we have a function which has the first letter capitalized to express that this is going to be a constructor function which is going to be called with the new keyword.
// new Binding
var Animal = function(color, name, type) {
  this.color = color;
  this.name = name;
  this.type = type;
};

var zebra = new Animal('black and white', 'Zorro', 'Zebra');
Because we’re invoking this function with the new keyword, what happens behind the scenes is that JavaScript is going to create a brand new object and bind this to that new object.
We can imagine it as this.
var Animal = function(color, name, type) {
  // this = {}
  this.color = color;
  this.name = name;
  this.type = type;
};
Example 2 - window
// window Binding
var sayAge = function() {
  console.log(this.age);
};

var me = {
  age: 48
};
If we wanted to call sayAge in the context of me we’d have to do this.
sayAge.call(me);
But if we don’t do this but instead just call sayAge we get undefined.
sayAge(); // undefined
The reason is if we invoke a function that uses the this keyword but doesn’t have anything to the left of the dot, it’s not using the new binding, and it’s not using call, apply, or bind, then the this keyword is going to default to the window object.
So if we decide to add a property of age to the window object we will get that result back.
window.age = 35;
sayAge(); // 35
Additionally, if we run the function in strict mode, JavaScript will return a TypeError if we try to access age without it being defined on the window object.
var sayAge = function() {
  'use strict';
  console.log(this.age);
};

sayAge(); // TypeError: Cannot read property 'age' of undefined
9.5 Binding rules recap
The four rules in a quick recap.
- Implicit Binding - look to the left of the dot at call time
- Explicit Binding - tells a function what the context of the
thiskeyword is going to be using call, apply, or bind - new Binding - is whenever you have a function invoked with the new keyword where the
thiskeyword is bound to the new object being constructed - window Binding - if none of the previous rules apply then the
thiskeyword is going to default to the window object unless you’re in strict mode in which case it will beundefined
10. Component State
10.1 ‘Popular’ Component
This is a screenshot of the completed UI we’re building.

It has a component called Popular that allows us to change the selected language. Clicking a language highlights that language and displays the most popular related repositories.

For now we are just going to focus on building this component in order to learn how to update state.
10.2 Update App Structure
We start by moving the component code out of index.js. We just want to require the main App without defining any components inside. We do this by copying the component and updating the file like this.
// index.js
var React = require('react');
var ReactDOM = require('react-dom');
require('./index.css');
var App = require('./components/App');

ReactDOM.render(<App />, document.getElementById('app'));
Next we create a components directory and create App.js. In it we paste the component we just copied out of index.js
Next, because we are requiring the App component in index.js with this line,
var App = require('./components/App');
we need to export it from here.
// App.js
var React = require('react');
var Popular = require('./Popular');

class App extends React.Component {
  render() {
    return (
      <div className="container">
        <Popular />
      </div>
    );
  }
}

module.exports = App;
We do this with module.exports = App;. This is called CommonJS.
We are also requiring and using the <Popular /> component that we will create in the next section.
Lastly, we add a className attribute to the div so we can style the container.
The style sheet looks like this.
/* index.css */
html, body {
  box-sizing: border-box;
  background: lightgreen;
  font-family: -apple-system, BlinkMacSystemFont, 'Segoe UI', Roboto,
    Oxygen, Ubuntu, Cantarell, 'Open Sans', 'Helvetica Neue', sans-serif;
}

.container {
  display: flex;
  justify-content: center;
  /* max-width: 1200px; */
}
10.3 Build Component
Next we move on to building the component. We start with a basic skeletal structure.
// Popular.js
var React = require('react');

class Popular extends React.Component {
  render() {
    return (
      <div>Popular!</div>
    );
  }
}

module.exports = Popular;
Next we create an array of languages and .map over it in the view making sure to add a key to each <li> element.
// Popular.js
  render() {
    var languages = ['All', 'JavaScript', 'Ruby', 'Java', 'CSS', 'Python'];
    return (
      <ul className="languages">
        {languages.map(function(lang) {
          return (
            <li key={lang}>
              {lang}
            </li>
          );
        })}
      </ul>
    );
  }
Two things to note.
- Whenever we return JSX we wrap it in parens so the compiler doesn’t insert a semi after the return statement.
- We add a
classNameto our<ul>element in order to style the list.
Here’s the style we applied.
/* index.css */
ul { padding: 0; }
li { list-style: none; }

.languages {
  display: flex;
  justify-content: center;
}

.languages li {
  margin: 10px;
  font-weight: bold;
  cursor: pointer;
}
10.4 Add State
Next we’ll add state. The reason we need to add state is so we can keep track of whichever tab is active. This allows us to do two things.
- Highlight it when its selected
- Render the list of repositories based on the currently selected tab
10.5 Set Default State
The way we do this is by adding a constructor to the Popular class.
Constructors are not unique to React but are part of classes in JavaScript 2015.
Whenever we add a constructor we always need to call super() passing in props. We’ll discuss why later.
// Popular.js
class Popular extends React.Component {
  constructor(props) {
    super(props);
  }
The way state is set on a component is by assigning an object to this.state with properties we want to track.
In this case we add a selectedLanguage property to our state object and set it to ‘All’. ‘All’ corresponds to one of the language array values.
// Popular.js
class Popular extends React.Component {
  constructor(props) {
    super(props);
    this.state = {
      selectedLanguage: 'All'
    };
  }

  render() {
    // our render code...
  }
}
Setting this in our constructor establishes the default state for our selectedLanguage property.
10.6 Update State Function
So far we have the following:
- Our UI for this component
- Our initial state for this component
What we need now is a way to update that state whenever we click on a specific tab.
We start by creating a new method inside of our class called updateLanguage(). We pass that function a lang argument and inside that function we call this.setState().
// Popular.js
class Popular extends React.Component {
  constructor(props) {
    // our constructor  code...
  }

  updateLanguage(lang) {
    this.setState(function() {
      return {
        selectedLanguage: lang
      }
    });
  }

  render() {
    // our render code...
  }
}
When we call this.setState() we pass it a function and whatever that function returns is going to be the new state.
The function returns a new object with lang assigned to the selectedLanguage property.
10.7 Click Handler
What we have so far is:
- Our UI for this component (render)
- Our initial state for this component (constructor)
- A way to update that state (updateLanguage)
The next thing we need to do is hook up the updateLanguage function to the click of each list item so we can update our selectedLanguage.
Context of ‘this’
One thing to keep in mind is that we are invoking this.setState inside of updateLanguage but we don’t know what this is bound to until updateLanguage is invoked.
The problem is, if updateLanguage is invoked in the wrong context then this keyword will be bound to the wrong object and this.setState will be undefined.
One way we can establish what this keyword is for a specific function is by using the .bind() method.
.bind() returns us a new function with the this keyword set to the object/value we specify.
The best place to bind this to our function is in our constructor.
// Popular.js
class Popular extends React.Component {
  constructor(props) {
    super(props);
    this.state = {
      selectedLanguage: 'All'
    };
    this.updateLanguage = this.updateLanguage.bind(this); // <- here
  }

  updateLanguage(lang) {
    this.setState(function() {
      return {
        selectedLanguage: lang
      };
    });
  }

  render() {
    // our render code
  }
To recap:
- The problem is we won’t know what
thiskeyword inupdateLanguageis bound to untilupdateLanguageis invoked. - Since
.bind()returns a new function withthiskeyword bound to the value we give it, we pass the currentthiscontext to the.bind()method and assign it to the currentthis.updateLanguagefunction.
Now it’s finally time to add our click handler to the <li> element.
Here we add an onClick handler to our list item and whenever it is clicked it will run this.updateLanguage.
The problem is that this inside of map is different than this outside of map. We can see this by adding console.log outside the map function and one inside the map function.
// Popular.js
  render() {
    var languages = ['All', 'JavaScript', 'Ruby', 'Java', 'CSS', 'Python'];
    console.log('Outside of map', this); {/* outer console.log */}
    return (
      <ul className="languages">
        {languages.map(function(lang) {
          console.log('Inside of map', this); {/* inner console.log */}
          return (
            <li
              key={lang}
              onClick={this.updateLanguage}
            >
              {lang}
            </li>
          );
        })}
      </ul>
    );
  }
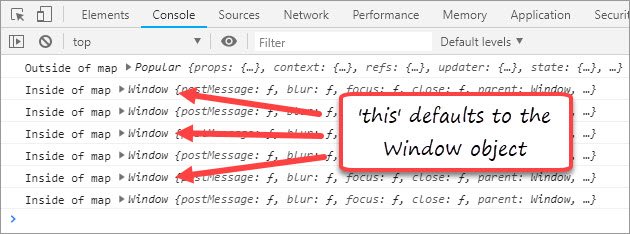
A pretty typical problem when it comes to .map() is that this changes context inside the callback. For this reason map() allows us to provide a second argument which is the this context.
// Popular.js
  render() {
    var languages = ['All', 'JavaScript', 'Ruby', 'Java', 'CSS', 'Python'];
    console.log('Outside of map', this); {/* outer console.log */}
    return (
      <ul className="languages">
        {languages.map(function(lang) {
          console.log('Inside of map', this); {/* inner console.log */}
          return (
            <li
              key={lang}
              onClick={this.updateLanguage}
            >
              {lang}
            </li>
          );
        }, this)} {/* we pass in 'this' context to map */}
      </ul>
    );
  }
Now this keyword inside the function is the same as this keyword outside the function.
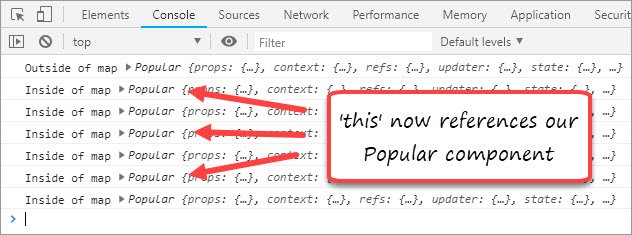
NOTE: One thing to keep in mind with ES5 is that each time we use an anonymous function as a argument to a method or function,
thiscontext changes inside that method or function.That is not the case with ES6 arrow functions. With ES6 arrow functions
thiskeeps the context of the parent block.Therefore higher-order functions like
.map()allow you to pass inthiscontext as the second argument.var arr = [1,2,3]; function logNum(num) { console.log(num); } var newArr = arr.map(function(num) { 'use strict'; this.logNum(num); // <- this would normally be undefined return num * 2; }, this); // <- it's not bc we passed in the parent context for thisKeep in mind that
thisdefaults to the global object, which iswindowin a browser, if not in strict mode.
The next issue we have is that updateLanguage expects an argument of lang in order to update the state.
Right now we’re not passing in the lang parameter to our function. We’re just invoking it.
We’re now going to use .bind() again because not only does it allow us to set the this context but it also allows us to pass arguments with the function.
Since we’ve already used .bind() to establish the context of updateLanguage we just pass in null as the first argument and lang as the second since whatever number arguments we pass bind after the first one will be passed to the new function.
// Popular.js
  render() {
    var languages = ['All', 'JavaScript', 'Ruby', 'Java', 'CSS', 'Python'];
    return (
      <ul className="languages">
        {languages.map(function(lang) {
          return (
            <li
              key={lang}
              onClick={this.updateLanguage.bind(null, lang)} // use bind
            >
              {lang}
            </li>
          );
        }, this)} {/* we pass in 'this' context to map */}
      </ul>
    );
  }
We can test by adding <p>Selected Language: {this.state.selectedLanguage}</p> after the opening <ul> and click each tab to see the state change.
10.8 Selection Highlight
The last thing to do is add highlighting for the selected tab.
We can do this by using the style property. What style does is it allows you to inline any styles you want the component to have.
We’ll use a quick ternary to do this by testing if lang is equal to selectedLanguage in state.
// Popular.js
  render() {
    var languages = ['All', 'JavaScript', 'Ruby', 'Java', 'CSS', 'Python'];
    return (
      <ul className="languages">
        {languages.map(function(lang) {
          return (
            <li
              key={lang}
              onClick={this.updateLanguage.bind(null, lang)} // use bind
              style={
                lang === this.state.selectedLanguage // test
                  ? { color: '#d0021b' }  // highlight if equal
                  : null  // otherwise pass in null
              }
            >
              {lang}
            </li>
          );
        }, this)} {/* we pass in 'this' context to map */}
      </ul>
    );
  }
Now when we click around each of the tabs highlights in turn.
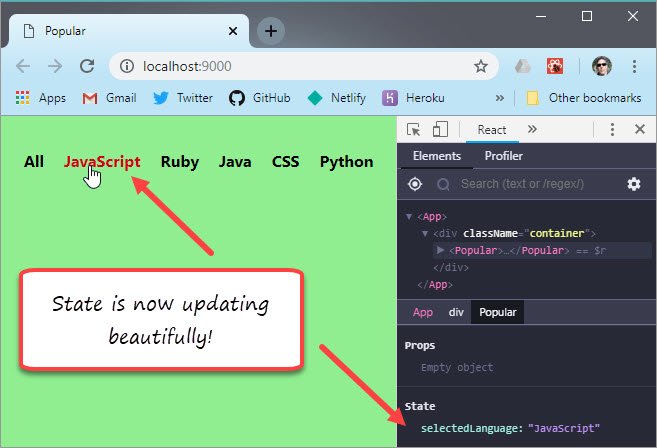
11. Stateless Fn Components
11.1 Stateless Fn Explained
We were first introduced to Stateless Functional Components during the “UI Composition” section.
If you’re using React correctly, you’re going to notice you have a lot of components that simply take in some data via props and output some UI - that is, components with just a render method.
The reason for this is because a really great paradigm to get used to is separating your components into container components and presentational components, with presentational components optionally taking in some data and rendering a view.
Because this is such a common pattern in React, as of React 0.14 you can now have components that are just normal functions if those components only have a render method and optional props.
Let’s take a look at an example.
// class component
class HelloWorld extends React.Component {
  render () {
    return (
      <div>Hello {this.props.name}</div>
    )
  }
}
ReactDOM.render(<HelloWorld name='Tyler' />, document.getElementById('app'))
Here’s an example you’ve seen before and you should be very comfortable with at this point. We’ve created a new React component that returns us a div that says “Hello “ + whatever name you passed in when you invoked the component.
You’ll notice that this component just has a render method, that means we can remove the React.Component abstraction and just use a plain function.
Refactored to use a stateless functional component, the example above would look like this
// stateless functional component
function HelloWorld (props) {
  return (
    <div>Hello {props.name}</div>
  )
}
ReactDOM.render(<HelloWorld name='Tyler' />, document.getElementById('app'))
Notice React passes props to your function as the first argument to the function. This is a lot cleaner and makes creating React components more natural since you’re literally just making a function.
It’s a good idea to try to use as many Stateless Functional Components as possible because then you have a good separation of presentational components vs other components.
Now you’ll notice I’m being very explicit with saying “Stateless Functional Components” rather than just “Functional Components”. That’s because future Functional Components may be able to contain state, here’s a blog post I wrote that goes into more detail if you’re interested in the naming convention.
11.2 Refactor ‘Popular’
Let’s refactor the ‘Popular’ component by moving the render code out to become it’s own stateless functional component.
If we look at the View output by the Popular component you’ll see it consists of two parts. The list which shows our selected language and the grid which shows the repos that match our language selection.
Right now we are rendering our list inside the Popular component. What we want to do is have Popular eventually encapsulate both the list and the grid so that it is as declarative as possible.
Let’s start by refactoring our list’s render code to become it’s own component.
Typically we create a component in it’s own file but since this list is very specific to the popular component we will just include it at the top of the Popular.js file. If at any point in the future we want to reuse the component elsewhere we can move it to it’s own file and import/export as usual.
We start by creating a class.
// Popular.js
class SelectLanguage extends React.Component {
  render() {
    var languages = ['All', 'JavaScript', 'Ruby', 'Java', 'CSS', 'Python'];

    return (
      <ul className="languages">
        {languages.map(function(lang) {
          return (
            <li
              key={lang}
              onClick={this.updateLanguage.bind(null, lang)}
              style={
                lang === this.state.selectedLanguage
                  ? { color: '#d0021b' }
                  : null
              }
            >
              {lang}
            </li>
          );
        }, this)}
      </ul>
    );
  }
}
The problem is that this.updateLanguage.bind(null, lang) and this.state.selectedLanguage are defined in Popular. So what we want to do is pass these in as props.
We will change these in SelectLanguage to:
this.props.onSelect.bind(null, lang)this.props.selectedLanguage
We’ll also want to add some PropTypes to define what props our component should receive.
We’ll add:
// Popular.js
var PropTypes = require('prop-types');

selectedLanguage.propTypes = {
  onSelect: PropTypes.func.isRequired,
  selectedLanguage: PropTypes.string.isRequired
}
Next we need to update Popular’s render() method to include the SelectedLanguage component passing in both our selectedLanguage and updateLanguage props.
// Popular.js
class Popular extends React.Component {
  constructor(props) {...}

  updateLanguage(lang) {...}

  render() {
    return (
      <div>
        <SelectedLanguage
          onSelect={this.updateLanguage}
          selectedLanguage={this.state.selectedLanguage}
        />
      </div>
    );
  }
}
At this point our app should function exactly the same. We haven’t changed anything other than moving some of the underlying details of our app’s construction around.
One way you can tell that you’re building a clean React app is if you have a lot of components that look like this, where basically all they do is they take in some props and render out a UI.
// Popular.js
class SelectLanguage extends React.Component {
  render() {
    var languages = ['All', 'JavaScript', 'Ruby', 'Java', 'CSS', 'Python'];

    return (
      <ul className="languages">
        {languages.map(function(lang) {
          return (
            <li
              key={lang}
              onClick={this.updateLanguage.bind(null, lang)}
              style={
                lang === this.state.selectedLanguage
                  ? { color: '#d0021b' }
                  : null
              }
            >
              {lang}
            </li>
          );
        }, this)}
      </ul>
    );
  }
}
There’s not a whole lot of complexity going on here because there’s no state, and nothing to change. It just takes in props and renders a UI.
Because this is a common pattern in React, React makes it easy if all our component has is our render method, then instead of creating an entire class for our component we can create a function, and whatever this function returns will be the UI for that component.
Once again, if all our component contains is a render method then what we can do instead is create a function that is basically going to return a UI.
Here’s the structure. Notice that we drop the render() method and that the first argument is props.
function SelectLanguage(props) {
  return (
    <div>Some UI</div>
  )
}
Here’s the refactored code. Notice we remove the this keyword from in front of props and from the map() method.
// Popular.js
function SelectedLanguage(props) {
  var languages = ['All', 'JavaScript', 'Ruby', 'Java', 'CSS', 'Python'];

  return (
    <ul className="languages">
      {languages.map(function(lang) {
        return (
          <li
            key={lang}
            onClick={props.onSelect.bind(null, lang)}
            style={
              lang === props.selectedLanguage ? { color: '#d0021b' } : null
            }
          >
            {lang}
          </li>
        );
      })} {/* notice 'this' is no longer necessary as map()'s 2nd argument */}
    </ul>
  );
}
Here is the completed code where SelectLanguage is now refactored as a stateless functional component.
// Popular.js
var React = require('react');
var PropTypes = require('prop-types');

function SelectedLanguage(props) {
  var languages = ['All', 'JavaScript', 'Ruby', 'Java', 'CSS', 'Python'];

  return (
    <ul className="languages">
      {languages.map(function(lang) {
        return (
          <li
            key={lang}
            onClick={props.onSelect.bind(null, lang)}
            style={
              lang === props.selectedLanguage ? { color: '#d0021b' } : null
            }
          >
            {lang}
          </li>
        );
      })}
    </ul>
  );
}

SelectedLanguage.propTypes = {
  selectedLanguage: PropTypes.string.isRequired,
  onSelect: PropTypes.func.isRequired
};

class Popular extends React.Component {
  constructor(props) {
    super(props);
    this.state = {
      selectedLanguage: 'All'
    };
    this.updateLanguage = this.updateLanguage.bind(this);
  }

  updateLanguage(lang) {
    this.setState(function() {
      return {
        selectedLanguage: lang
      };
    });
  }

  render() {
    return (
      <div>
        <SelectedLanguage
          selectedLanguage={this.state.selectedLanguage}
          onSelect={this.updateLanguage}
        />
      </div>
    );
  }
}

module.exports = Popular;
We’ve now abstracted all the complexity of SelectLanguage out into a stateless functional component but can include that in our stateful Popular component.
11.3 Private Components
By now you’ve heard over and over about the benefits of stateless functional components and functions that just return some UI. We can take our enamoration even one step further.
Let’s say we have the code below.
var React = require('react');

function FriendsList (props) {
  return (
    <h1>Friends:</h1>
    <ul>
      {props.friends.map(function (friend, index) {
        return <li key={friend}>{friend}</li>
      })}
    </ul>
  )
}

module.exports = FriendsList
So we have a FriendList component which is just returning us a header and an unordered list of friends.
This looks great, but remember, React is all about modularity. As your render method grows, it’s a good habit to take pieces and abstract them to new components. Why not create another stateless functional component that’s in charge of handling each friend?
var React = require('react');

function FriendItem (props) {
  return <li>{props.friend}</li>
}

function FriendsList (props) {
  return (
    <h1>Friends:</h1>
    <ul>
      {props.friends.map(function (friend, index) {
        return <FriendItem friend={friend} key={friend} />
      })}
    </ul>
  )
}
module.exports = FriendsList
Notice that all we’ve done is essentially create a “private component” just as we would a private function.
One thing I really like about stateless functional components that I haven’t mentioned up until this point is that they have no “this” keyword associated with them.
If you’re familiar with the “this” keyword you know that it allows you to call a function in a different context. What that means is that if you’re using the “this” keyword, you’re not 100% sure what the implementation of said function will look like.
By removing the option to have a “this” keyword, we’ve removed the one way in which our function can be called in a way we’re not expecting.
11.4 Fn vs Stateless Fn
Earlier today I read Dan Abramov’s React Components, Elements, and Instances article. As always I loved the article but even more than that, this time, I loved Dan’s focus on using proper vocabulary to describe technical topics. That post gave me the idea for this post. Three ways to describe React components which are often used incorrectly
- Stateless Components
- Stateless Functional Components
- Functional Components.
Let’s look at the differences between the three.
#1 Stateless Components
const Repos = React.createClass({
  render(){
    return (
      <div>
        <h3> User Repos </h3>
        <ul className="list-group">
          {this.props.repos.map((repo, index) => {
            return (
              <li className="list-group-item" key={repo.name}>
                <h4><a href={repo.html_url}>{repo.name}</a></h4>
                <p>{repo.description}</p>
              </li>
            )
          })}
        </ul>
      </div>
    )
  }
})
class Repos extends React.Component {
  render(){
    return (
      <div>
        <h3> User Repos </h3>
        <ul className="list-group">
          {this.props.repos.map((repo, index) => {
            return (
              <li className="list-group-item" key={repo.name}>
                <h4><a href={repo.html_url}>{repo.name}</a></h4>
                <p>{repo.description}</p>
              </li>
            )
          })}
        </ul>
      </div>
    )
  }
}
All the code above does is it receives an array of repositories of a specific user, maps over those repositories, and displays them to the view.
You should feel pretty at home with the code above. createClass has been around since the heavens opened and bestowed React upon us and React.Component has been around since React 0.13.0 Beta 1 (January 2015). Neither component is using getInitialState or a constructor to initialize a state property. Each component is receiving its data as props then simply presenting that data.
#2 Stateless Functional Components
const Repos = ({repos}) => {
  return (
    <div>
      <h3> User Repos </h3>
      <ul className="list-group">
        {repos.map((repo, index) => {
          return (
            <li className="list-group-item" key={repo.name}>
              <h4><a href={repo.html_url}>{repo.name}</a></h4>
              <p>{repo.description}</p>
            </li>
          )
        })}
      </ul>
    </div>
  )
}
Notice the code above is just a function (granted a fancy ES6 function but that’s besides the point). If your component has just a render method (and no state), you can simply create your component as a Stateless Functional Component and your function will be passed props as its first argument. Also notice that we’re NOT calling this a Stateless Component or a Functional Component. The reason for that brings us to number 3.
#3 Functional Components
const ReposWithState = () => {
  ¯\_(ツ)_/¯
}
In the future, React will have Functional Components that contain their own state. This is the reason why the code in #2 above shouldn’t be called a Stateless Component nor should it be described as a Functional Component, because future Functional Components will also be able to have their own state.
I realize this might come off as hairsplitting, but I strongly believe that clearly understanding the vocabulary for technical topics will make learning and teaching said topics much easier.